This article was co-authored by wikiHow staff writer, Jack Lloyd. Jack Lloyd is a Technology Writer and Editor for wikiHow. He has over two years of experience writing and editing technology-related articles. He is technology enthusiast and an English teacher.
The wikiHow Tech Team also followed the article's instructions and verified that they work.
This article has been viewed 571,567 times.
Learn more...
This wikiHow teaches you how to apply an auto-tune effect to vocals in Audacity. You'll use a free plug-in called "GSnap" to do so. Contrary to popular belief, GSnap is available for both Windows and Mac computers, though installing it can be a tricky process.
Things You Should Know
- Install GSnap on your computer and Enable it in Audacity.
- Import or record your vocals in Audacity. Highlight the vocals, click Effect, and choose the GSnap option.
- Select your key and play around with the different options by turning the knobs. Preview your settings to ensure you like them, and then hit Apply to save them.
Steps
Installing GSnap on Windows
-
1Download the GSnap plugin. Go to https://www.gvst.co.uk/gsnap.htm in a web browser, then click the Download GSnap (for 32-bit VST hosts) link near the bottom of the page. The GSnap plugin will download in a ZIP folder.
- The 64-bit version has a bug which prevents GSnap from showing up in the Effects menu.
-
2Extract the GSnap folder. Go to the downloaded ZIP folder, then do the following:
- Double-click the ZIP folder to open it.
- Click the Extract tab at the top of the window.
- Click Extract all
- Click Extract at the bottom of the window.
Advertisement -
3Copy the GSnap folder contents. In the extracted folder that opens, press Ctrl+A to select the folder's files, then press Ctrl+C to copy everything.
-
4Click This PC. It's a folder on the left side of the File Explorer window. This will open the This PC folder.
- You may have to scroll up in the left-hand sidebar of File Explorer to find this folder.
-
5Double-click your computer's hard drive. This option is below the "Devices and drives" heading in the middle of the page, and is usually the OS (C:) option.
- If you don't see any drives listed here, first click the Devices and drives heading to make them appear.
-
6Navigate to the Audacity "Plug-Ins" folder. To do so:
- Double-click the "Program Files (x86)" folder.
- Double-click the "Audacity" folder.
- Double-click the "Plug-Ins" folder.
-
7Paste in the GSnap files. Click anywhere in the "Plug-Ins" folder, then press Ctrl+V. You should see both of the GSnap files that you copied appear in the "Plug-Ins" folder. Now that you've added the GSnap plug-in to Audacity, you'll need to enable GSnap.
- If prompted, you'll need to click Continue before the files will paste into Audacity.


Installing GSnap on Mac
-
1Download the GVST plug-ins package. Go to https://www.gvst.co.uk/portpage.htm in your web browser, then click the Download GVST plug-ins for Mac (for 32- and 64-bit VST hosts) link below the "Mac OSX - BETA" heading.
- GSnap isn't available as an individual download for Mac computers, which is why you're downloading all VST plug-ins here.
-
2Open the downloaded ZIP folder. Double-click the GVST plug-ins ZIP folder that you downloaded to do so.
-
3Copy the GSnap file. Click the file entitled "GSnap", then press ⌘ Command+C.
- You can also click File and then click the Copy option in the drop-down menu.
-
4Click the Go menu item. You'll find it at the top of the screen. A drop-down menu will appear.
- If you don't see Go at the top of your Mac's screen, click the desktop or open a new Finder window.
-
5Click Go to Folder…. It's near the bottom of the Go drop-down menu. Doing so opens a pop-up window.[1]
-
6Go to the Audacity Application Support folder. Type ~/Library/Application Support/audacity into the text box in the pop-up window, then click Go.
-
7Open the "Plug-Ins" folder. You should find this option in the "audacity" folder.
-
8Paste in the GSnap file. Click inside of the "Plug-Ins" folder, then press ⌘ Command+V. Doing so will place the GSnap file inside of the "Plug-Ins" folder, thus adding it to Audacity. Now that you've added the GSnap plug-in to Audacity, you'll need to enable GSnap.
- You can also click File and then click Paste Item in the resulting drop-down menu.


Enabling GSnap in Audacity
-
1Open Audacity. Its app icon resembles an orange soundwave surrounded by blue headphones. Audacity's track editor view will open in a new window.
-
2Click Effect. This tab is at the top of the Audacity window. Clicking it prompts a drop-down menu.
- On a Mac, Effect is a menu item at the top of the screen.
-
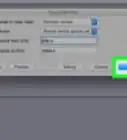
3Click "Add / Remove Plug-ins…". You'll find this option at the top of the Effect drop-down menu. Clicking it opens a new window.
- You may have to scroll up to find this option.
-
4Scroll down and click "GSnap". It's in the "G" section of the window.
-
5Click Enable. This button is below the list of available plug-ins. Doing so will switch GSnap's status from "New" to "Enabled".
-
6Click OK. It's at the bottom of the window. Clicking it will confirm your changes and close the window.
-
7Make sure that GSnap was installed. Click the Effect tab, then scroll down until you see GSnap near the bottom of the menu. If you see GSnap, you're all set to proceed with auto-tuning your vocals in Audacity.
- If you don't see GSnap here, you most likely installed the 64-bit version of GSnap on a Windows computer. You'll have to delete the GSnap file from the Audacity "Plug-Ins" folder and re-download the 32-bit version of GSnap.


Auto-Tuning Your Vocals
-
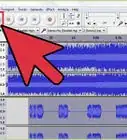
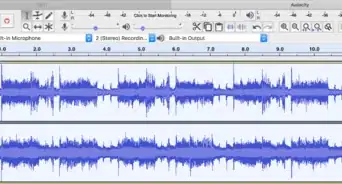
1Import your vocals. Click File, select Import, click Audio..., and double-click the audio file that you want to auto-tune.
- If you haven't yet recorded your vocals, you'll need to record them before proceeding. This may include attaching a USB microphone to your computer.
-
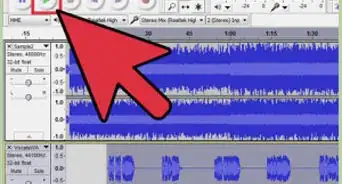
2Select your vocals. Click and drag your mouse across the section of the vocals that you want to auto-tune.
- You can select everything in Audacity by pressing Ctrl+A.
-
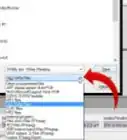
3Click Effect. The drop-down menu will appear.
-
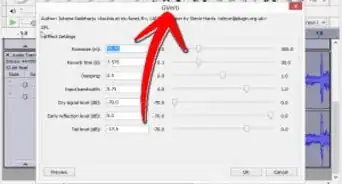
4Click "GSnap…". It's near the bottom of the Effect drop-down menu. The GSnap window will open.
- You may have to scroll down at the bottom of the drop-down menu in order to find the GSnap... option.
-
5Select a key. Click the SELECT A SCALE... button at the top of the window, select your song's key (e.g., A), select Major or Minor, and click OK
-
6Set the knobs to to auto-tune levels. Though you can play with these knobs as much as you want to get a unique sound, use the following settings to get the "classic" autotune sound:
- MIN FREQ: 80 hz
- MAX FREQ: 2000 hz
- GATE: -40 db
- SPEED: Between 1 (choppy vocals) and 10 (smoother vocals)
- THRESHOLD: 100 cents
- AMOUNT: 100%
- ATTACK: 1 ms
- RELEASE: 61 ms
-
7
-
8Make any necessary adjustments. The two main things to monitor are the "AMOUNT" value and the "SPEED" value:
- AMOUNT - 100 percent results in the largest amount of auto-tuning, so lower this value if there's too much autotune.
- SPEED - A low speed results in choppier, T-Pain-esque vocals, whereas a higher number will result in smoother vocals.
- You can also remove the sharps and flats by clicking the green circles on the black keys that are on the left side of the window.
-
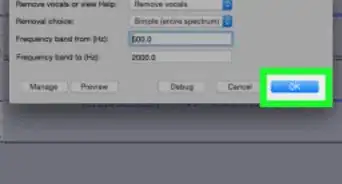
9Click Apply. It's in the bottom-right corner of the window. Doing so will apply the selected settings to your track.
-
10Customize your auto-tune. Keep playing with the settings to find the sound you want, but keep in mind the following:
- Larger "ATTACK" and "RELEASE" times make your voice sound more natural.
- Adding vibrato can make you sound more natural.
- The lower the "THRESHOLD" value, the more robotic you'll sound.
- The farther off-key you are on the recording, the more "auto-tuned" your voice will sound when you're done.
-
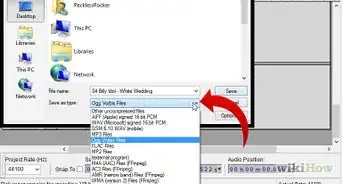
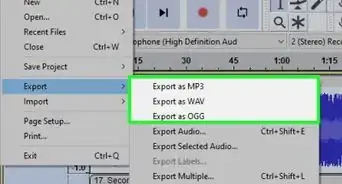
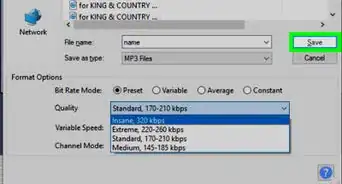
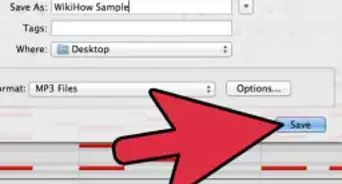
11Save your project as a music file. You can export the track as its own song by clicking File, clicking Export Audio..., entering a name and save location, and clicking Save.
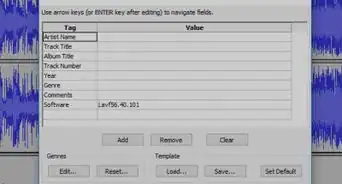
- If prompted to add tags (e.g., the artist name), you can add them or skip the process entirely.


Community Q&A
-
Question"Export Files" doesn't come up. What should I do?
 Community AnswerFind "Export All". If this doesn't work, try to open the zip file by double clicking it, selecting the files and copying them. If you cannot open it, try installing a zip extractor program like 7-zip.
 -
QuestionI did all the steps in part 1 but no window asking me to register appeared, and I can't seem to access Gsnap. Any ideas?
 Community AnswerYou may need to go to Effect | Add / Remove Plug-ins first. When you're in there you can find it (to enable it) by checking "New" or "Disabled" with the filter on the top right.
 -
QuestionWhat should I do if Norton 360 says that the 64-bit version of Audacity is infected?Community AnswerThis is usually a false positive. The 64-bit version of Audacity is completely safe. You can try other antivirus software to be sure.
Warnings
- Given that GSnap is a free plug-in for a free program, it's neither perfect nor anywhere close to professional-grade auto-tuning software.⧼thumbs_response⧽
.webp)

References
About This Article
1. Download Gsnap from https://www.gvst.co.uk.
2. Extract the zip file.
3. Copy the files to the Audacity "Plug-Ins" folder.
4. Open Audacity.
5. Click Effect.
6. Click Add/Remove Plug-ins.
7. Select Gsnap and click Enable.
8. Find Gsnap in the Effect menu.