This article was co-authored by Spike Baron and by wikiHow staff writer, Nicole Levine, MFA. Spike Baron is the Owner of Spike's Computer Repair based in Los Angeles, California. With over 25 years of working experience in the tech industry, Spike specializes in PC and Mac computer repair, used computer sales, virus removal, data recovery, and hardware and software upgrades. He has his CompTIA A+ certification for computer service technicians and is a Microsoft Certified Solutions Expert.
The wikiHow Tech Team also followed the article's instructions and verified that they work.
This article has been viewed 685,964 times.
Hardware acceleration is a process that occurs when software hands off certain tasks to your computer's hardware—usually your graphics and/or sound card. While hardware acceleration may improve performance on computers with powerful components, like super-fast GPUs, it can have the opposite effect on less powerful computers. If you're experiencing freezing and crashing while streaming, gaming, or even web browsing, disabling hardware acceleration may improve performance. This wikiHow teaches you how to turn off hardware acceleration on your Windows PC. There is no option to disable hardware acceleration system-wide on a Mac, but you can adjust your settings in individual applications.
Steps
Disabling Graphics Hardware Acceleration in Windows
-
1Right-click the Windows desktop and select Display settings. This opens your display controls.[1]
- Not all hardware supports system-wide hardware acceleration. You'll typically only find the option to enable or disable hardware acceleration on PCs with high-end GPUs. If you can't adjust your hardware acceleration settings for the entire system, you can often disable the feature in certain apps, including Chrome, AutoCAD, Discord, and various games.
- If you have a dedicated GPU, you may see the option to open your GPU's settings on the right-click menu. Depending on your GPU, you may be able to find the setting to disable hardware acceleration if you click that menu item.
-
2Click Advanced display settings. It's toward the bottom of the right panel. This opens properties for your monitor and GPU.Advertisement
-
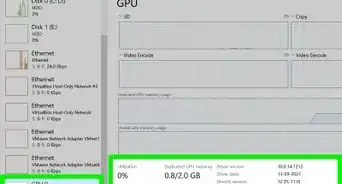
3Click Display adapter properties for Display 1. It'll be under the "Display information" header. A new window will expand.
-
4Click the Troubleshoot tab. If your video card supports hardware acceleration, you'll usually see this tab at the top of the window.
- If you don't have a Troubleshoot tab, click the Properties button at the top of the window, and then click the Resources tab.
-
5Click the Change settings button. If the Change settings button is grayed out/deactivated, your graphics card doesn't support changing hardware acceleration settings.[2] If you're sure your card can handle this change, you probably need to update your drivers.
-
6Move the "Hardware acceleration" switch to the left and click OK. This disables hardware acceleration on your PC.


Disabling Audio Hardware Acceleration in Windows
-
1Open your Windows Settings . It's the gear icon in your Start menu. You can also open your Settings by pressing Windows key + i on the keyboard.
- If hardware acceleration is turned on for your PC's sound card, sound tasks may be shifted from the CPU to the audio card to avoid overtaxing the CPU. You can try disabling hardware acceleration if you're experiencing high amounts of noise, choppy sound, and slow performance during audio playback.
-
2Click the System icon. It's the first icon in the Settings panel.
-
3Click Sound. It's in the left panel.
-
4Click Device properties in the right panel. It's under the name of your sound device at the top of the panel.
-
5Click Additional device properties. You'll see this toward the bottom below "Related settings."
-
6Click the Advanced tab. It's at the top of the window.
-
7Remove the check mark from "Allow hardware acceleration of audio with this device." It's under the "Hardware Acceleration" header.
-
8Click OK. This disables hardware acceleration for audio immediately.


Disabling Hardware Accelerated GPU Scheduling in Windows
-
1Open your Windows Settings . It's the gear icon in your Start menu. You can also open your Settings by pressing Windows key + i on the keyboard.
- Since the 2020 release of Windows 10 version 2004, Microsoft includes a new feature called Hardware Accelerated GPU Scheduling, which reduces latency and performance while running apps and games that use the GPU. This feature is only available if your have a separate GPU with updated drivers, so not everyone has access to the setting.
- Most GPU drivers are updated automatically, but you can always check the manufacturer's website to see if new updates are available.[3]
-
2Click the System icon. It's the first icon in the Settings panel.
-
3Click Display. You'll see it at the top of the left panel.
-
4Click Graphics settings. It's toward the bottom of the right panel.
-
5Click the "Hardware-accelerated GPU scheduling" switch to Off . You'll only see this switch if you have a modern GPU with updated drivers and an up-to-date version of Windows 10. If you don't see this option and you have a GPU that's separate from your motherboard, it may not support this feature.
- After disabling the feature, you'll be prompted to restart your computer. Hardware accelerated GPU scheduling will be turned off once your computer comes back up.


Expert Q&A
-
QuestionShould I turn off hardware acceleration?
 Spike BaronSpike Baron is the Owner of Spike's Computer Repair based in Los Angeles, California. With over 25 years of working experience in the tech industry, Spike specializes in PC and Mac computer repair, used computer sales, virus removal, data recovery, and hardware and software upgrades. He has his CompTIA A+ certification for computer service technicians and is a Microsoft Certified Solutions Expert.
Network Engineer & Desktop SupportIt depends on the tasks you need to perform. Keep in mind that some programs actually need hardware acceleration. Things like playing a DVD movie might need hardware acceleration to function correctly. The more in-demand the hardware is, the more you want to increase the acceleration. -
QuestionWhat about Windows 10?
 Xavier CamdenCommunity AnswerWhat do you mean? I personally prefer Windows 10 over any operating system ever, if that's what you mean. But this article likely wouldn't help for Windows 10 since it is new. This is mostly for older computers.
 -
QuestionWhat else can I do if I do not have the troubleshoot option?
 Community AnswerLook up your problem online, and be as specific as you can. Check official websites for whatever isn't working (i.e. the Microsoft website for Windows problems, the Adobe website for Adobe problems). Also check forums where the community discusses questions. If you still can't find an answer, contact support, or post your problem on one of these forums. Customer Support may be more prompt, but probably also more stressful.


References
About This Article

1. Right-click the desktop and select Display settings.
2. Click Advanced display settings.
3. Click Display adapter properties for Display 1.
4. Click Troubleshoot.
5. Click Change settings.
6. Turn off hardware acceleration.