This article was co-authored by wikiHow staff writer, Travis Boylls. Travis Boylls is a Technology Writer and Editor for wikiHow. Travis has experience writing technology-related articles, providing software customer service, and in graphic design. He specializes in Windows, macOS, Android, iOS, and Linux platforms. He studied graphic design at Pikes Peak Community College.
This article has been viewed 223,727 times.
Learn more...
Samsung’s Galaxy Tab has lithium-ion batteries that wear out over time and need replacement. Signs that your Galaxy Tab’s battery should be replaced include drastically lower battery life and sudden shutdowns. The battery in a Samsung Galaxy Tab can be easily removed with the help of special tools. You can purchase a battery replacement kit for your Samsung Galaxy Tab model online. This wikiHow teaches you how to remove your Samsung Galaxy Tab battery.
Steps
Removing the Battery From a Samsung Galaxy Tab
-
1Get the equipment needed. In order to remove the battery from a Samsung Galaxy Tab, you will need a plastic pry tool and a tiny screwdriver. Some models require a tri-wing screwdriver. You can purchase all the tools you need, along with a replacement battery or you can just purchase a replacement battery kit that comes with all the tools. Be sure you get the correct battery or kit for your Samsung Galaxy Tab model.
- Make sure you purchase the correct kit for your Samsung Galaxy Tab model. The wrong kit may not have the right battery or tools.
- If you do not have a plastic pry tool, you can use any thin piece of plastic, such as a guitar pick, or a thin piece of plastic cut from a soda bottle.[1]
-
2Turn off the Galaxy Tab. Press and hold the power button on the side or your Samsung Galaxy Tab unit to power off your device.Advertisement
-
3Remove the two screw covers near the charging port (If present). Some Galaxy Tab 10 models have screws on both sides of the charging port. If your Galaxy Tab model has screws to the sides of the charging port, use a safety pin or sharp object to remove the screw covers and then use a tri-wing screwdriver to remove the screws.
-
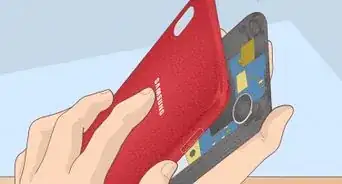
4Use the plastic pry tool to remove the back cover. Insert the plastic pry tool in between where the back cover attaches to the front. This is usually along the side edges of the device. On some models, it may be on the front around the screen. Go around the entire device while gently applying pressure to separate the front cover from the back.[2]
- Keep in mind that the clips that attach the back cover are easy to break, so go slowly and carefully. Be careful not to tear the microphone cable when you separate the front panel from the top left corner of the Galaxy Tab.
-
5Separate the back cover from the rest of the unit. Once all the clips are popped out, remove the back cover and set it aside.
-
6Remove the tape from the ribbon cables and battery. There may be tape covering the ribbon cable connectors and battery. Use the plastic pry tool to remove the tape and set it aside.
-
7Disconnect the ribbon cables covering the battery (if present). Many larger Samsung Galaxy Tab 10 models have 2 or 3 ribbon cables that go over the top of the battery. Use the plastic pry tool to pop the tab on the front of the connectors where the ribbon cables are attached. Then slide the ribbon cables out of the connectors. If no tab is present on the connectors, simply slide the ribbon cables out.
-
8Remove the battery screws (if present). On some Galaxy Tab models, the battery may be screwed in place. Use a tiny Philips screwdriver to remove the screws on all sides of the battery.
-
9Disconnect the battery from the board. There are 4 wires from the battery that attached to a black clip connected to the mainboard. Place the plastic pry tool under the wires and apply upward pressure to disconnect the wire clip from the board.
-
10Remove the battery. Once the battery is disconnected, simply lift the battery out to remove it.


Reassembling Your Samsung Galaxy Tab
-
1Insert a new battery. After removing the old battery, place the new battery in its place.
- If your Samsung Galaxy Tab model has ribbon connectors, make sure you don't place the battery over the ribbon connectors.
-
2Attached the battery wires to the board. Look for the 4 wires from the battery that are attached to a black clip. Gently press down on the black clip to attach the battery to the board.
-
3Reattach the battery screws. If the old battery was screwed in place, use a tiny Phillips screwdriver to secure the battery in place using the old screws.
-
4Reinsert the ribbon cables. If your Samsung Galaxy Tab has ribbon connectors, lay them over the top of the battery. Make sure the connector tabs are up and slide the ribbon cables back into place until they are firmly seated. Press the connector tabs down to lock them in place.
- Warning: If the ribbon cables are not firmly seated, it will cause performance problems with your device.
-
5Place the tape back over the ribbon connectors and battery. If there was tape covering the ribbon connectors and battery, put the tape back in its place.
-
6Reattach the back cover. After the battery is secure and all cables are properly attached, place the back cover over the back of the unit. Go around the edges with your fingers and apply a little bit of pressure to snap the back cover back in place.
-
7Reattached the screws. If your Samsung Galaxy Tab model had screws to the side of the charging port, use the Tri-wing screwdriver to reattach the screws. Then place the screw covers back over the screws. Your Samsung Galaxy Tab is now reassembled. You can power it on.
-
8Finished.


Community Q&A
-
QuestionHow do I remove the tight screws in my Samsung Tab 3?
 Community AnswerYou can get small screwdrivers that fit all sizes of screws, so you'll have to find one that fits the screws on the back of your Samsung Tab. Once you do, press it into the screws firmly and twist to the left.
 -
QuestionWhere are the screws on my Samsung Galaxy tab A tablet?
 Community AnswerStep 3 states that some Galaxy Tablets do not have screws. This may be the case for your Tablet. To take the battery out, you can just unsnap the back.


-on-Samsung-Galaxy-Step-17.webp)

References
About This Article

1. Purchase a Battery replacement kit.
2. Remove the screws on both sides of the charging port (if present).
3. Use the plastic pry tool to separate the back cover from the back.
4. Remove the tape from the battery and ribbon cable connectors.
5. Pop the tab on the front of the ribbon connectors and slide the ribbon cables out of the connectors.
6. Unscrew the screws securing the battery in place.
7. Detach the wires attached from the battery to the mainboard.
8. Lift the battery to remove it.