This article was co-authored by wikiHow Staff. Our trained team of editors and researchers validate articles for accuracy and comprehensiveness. wikiHow's Content Management Team carefully monitors the work from our editorial staff to ensure that each article is backed by trusted research and meets our high quality standards.
wikiHow marks an article as reader-approved once it receives enough positive feedback. This article received 27 testimonials and 82% of readers who voted found it helpful, earning it our reader-approved status.
This article has been viewed 566,106 times.
Learn more...
Air drying clay is a popular and relatively inexpensive choice for art projects big and small. It can be a great way for a budding artist or craftsperson to practice their skills, and even experienced artists often enjoy the simplicity of air drying clay. Air drying clay can be used for jewelry, ornaments, and different craft projects. Best of all, air drying clay doesn't require an oven or kiln to create a beautiful, unique product. Usually air dry clay will be dry to touch after 24 hours. The thicker the clay is, the longer it will take to fully dry. It can take as long as 72 hours.
Steps
Choosing and Buying Your Clay
-
1Determine the type of project you are using air drying clay for. There are different types of air drying clay that are ideally suited for different purposes.[1] You'll need to know what you are using the clay for, in order to determine which type of clay is right for you. These are other questions you should ask yourself:
- How big is my final product going to be?
- How heavy do I want my final product to be?
- How much money can I spend on my clay?
- Do I want my clay to have a heftier, "premium" feel (usually applies to jewelry/trinkets/beads)?
-
2Choose paper-based air drying clay for larger projects. Usually, larger projects will benefit from paper clay. Since they require a lot of material, you'll save money. The finished project will also be much lighter.Advertisement
-
3Choose resin-based air drying clay for smaller projects like jewelry. Equally strong, resin based clay (sometimes called porcelain based clay) is much denser, and when it is dried seems much more similar to baked polymer clay. It is also much more expensive and heavier.[4]
-
4Buy your clay. After you've determined what type of clay you want to purchase, you'll need to go out and buy it. Be sure that you buy enough for your project, but don't buy too much. Opened clay is hard to store and can easily become hard to work with and useless. [7] . You can purchase your clay locally at an arts and crafts store, or purchase it online.
- If you still aren't sure what type of clay to use, or want advice on your project, some stores have clerks that can answer your questions, and even offer classes.[8]
- Purchasing your clay online will usually give you better prices and options, but you may have to wait several days for it to arrive.


Shaping Your Clay
-
1Open your clay. Begin working over a smooth, clean, nonporous surface. Open your sealed bag of clay and pinch off the amount of clay that you want to use. If your project is larger and you need several bags of clay, only open one for now.
- You can use a wire or floss to "cut" chunks of clay off of a block. This is useful for accurately measuring how much you are using.
-
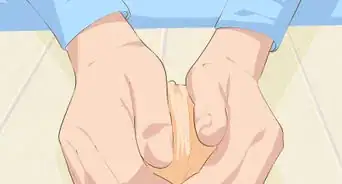
2Knead your clay until it is soft. Kneading and massaging the clay will soften it and make it easier to work with. The warmth of your hands will spread to the clay and make it malleable. Conditioning the clay is essential for proper use. If you planned to work with multiple bags of clay, knead them one at a time.
-
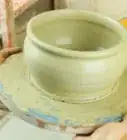
3Shape your clay. Both three dimensional and flat figures are easy to make with air drying clay. Use your hands and tools like knives, spoons, or even spinning wheels to form and shape the clay as you desire.
- Crafting tools (or even dental picks and equipment!) can be very useful for creating more complex projects, as you can be much more exact with them.[11]
- If you are making a larger project that needs to stand up such as a vase, make sure that it has a large, flat base.
-
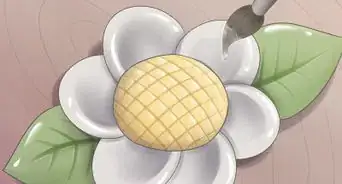
4Decorate your clay. You can press beads, yard, or even other pieces of clay into your project. Be sure to be careful, as you'll need to use enough pressure to press your decoration into the clay without changing or squashing your project. [12]
-
5Store your excess clay. Since clay spoils easily once it has been opened, ideally you'll have used it all. If not, leftover clay can be tightly wrapped in wax paper and stored in a plastic bag. It won't be as simple to work with or as useful afterwards though.[13]
- Tough excess clay can sometimes be saved by (carefully) using a microwave to warm the clay up.


Drying Your Clay
-
1Dry your clay. Find a clean, smooth, nonporous surface where your clay can dry for 24 hours. [14] Put your clay down and do not disturb or move the clay while it dries. You'll need to be patient to make sure that you don't ruin your project.
- A cool, dry area (one with low humidity) is best. Mild air circulation is also helpful.
- Thicker projects (over 1cm) may take even longer to dry.[15] Better to be safe than sorry.
-
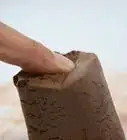
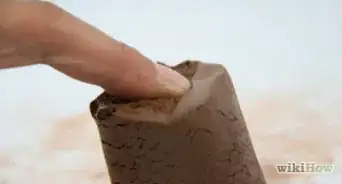
2Check if the clay is dry. After 24 hours the clay should definitely be dry to the touch, but that doesn't necessarily mean that it is ready. If your clay project is thick you may want to give it some extra time. There are other ways to visually evaluate if your clay is ready as well.
- Resin based clay turns darker and more translucent.[16]
- Paper based clay will stay very opaque.
-
3Remove the clay from the drying area. Once it is dry, carefully remove the clay from the drying area and take it back to your work area. You may want to lay down some newspapers or an old sheet. Be careful, while the clay will be hard it may be quite brittle. Don't drop it and risk breaking it.
-
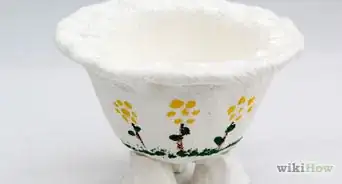
4Decorate your clay. If desired, you can decorate your project further! Tempera, acrylic, and watercolor paints can be used on dry clay projects.[17] You can also use glue to attach beads, sequins, fabric, and other fun decorations to your clay project.


Community Q&A
-
QuestionIs it okay if I put my clay models under a fan for faster drying?
 Community AnswerIt depends on the size of your model. Smaller pieces can be placed under a fan, but larger pieces can crack, so let it dry naturally.
 -
QuestionHow do I roll out the clay?
 Community AnswerThe easiest way is to use a rolling pin, preferably not a wooden one since they tend to leave marks from the grain. Ideally you want to use a smooth, non-porous material (such as metal, glass, or acrylic) to get a smooth clay surface.
 -
QuestionHow long does it take for clay to crack or dry?Community AnswerIt takes at least 24 hours to dry. If it's thicker, it takes longer to dry.
Warnings
- Dried clay is hard but brittle and may crack easily.⧼thumbs_response⧽
- Clay is sticky and may adhere to furniture, porous surfaces, clothes, and carpets.⧼thumbs_response⧽
Things You'll Need
- Air-drying clay
- Beads, paint, markers, etc. (optional)
- Plastic bags
- Refrigerator or freezer
- Microwave
References
- ↑ https://www.youtube.com/watch?v=L8bhR7KZUB4
- ↑ https://www.youtube.com/watch?v=L8bhR7KZUB4
- ↑ https://www.youtube.com/watch?v=L8bhR7KZUB4
- ↑ https://www.youtube.com/watch?v=L8bhR7KZUB4
- ↑ https://www.youtube.com/watch?v=L8bhR7KZUB4
- ↑ https://www.youtube.com/watch?v=L8bhR7KZUB4
- ↑ https://www.youtube.com/watch?v=L8bhR7KZUB4
- ↑ http://www.michaels.com/classes-and-events/classesandevents
- ↑ https://www.youtube.com/watch?v=L8bhR7KZUB4
- ↑ https://www.youtube.com/watch?v=L8bhR7KZUB4
- ↑ https://www.youtube.com/watch?v=L8bhR7KZUB4
- ↑ https://www.youtube.com/watch?v=L8bhR7KZUB4
- ↑ https://www.youtube.com/watch?v=L8bhR7KZUB4
- ↑ http://www.rapidonline.com/das-air-drying-modelling-clay-78257
- ↑ http://www.rapidonline.com/das-air-drying-modelling-clay-78257
- ↑ https://www.youtube.com/watch?v=L8bhR7KZUB4
- ↑ http://www.crayola.com/things-to-do/how-to-landing/airdry-clay.aspx
- ↑ https://www.youtube.com/watch?v=L8bhR7KZUB4
- ↑ https://www.youtube.com/watch?v=L8bhR7KZUB4
About This Article

When you’re ready to use air drying clay, use a wire or piece of cloth to cut off a chunk of it. Massage that chunk in your hands to warm it up and make it more pliable. Next, shape the clay how you want it, and decorate it with beads, yarn, or something similar. Then, leave the clay to dry for 24 hours, or longer for thicker projects. When the clay is completely dry, you can decorate it further with paint, beads, or fabric. To learn when to use paper or resin based clays, keep reading!