This article was co-authored by wikiHow Staff. Our trained team of editors and researchers validate articles for accuracy and comprehensiveness. wikiHow's Content Management Team carefully monitors the work from our editorial staff to ensure that each article is backed by trusted research and meets our high quality standards.
The wikiHow Tech Team also followed the article's instructions and verified that they work.
This article has been viewed 26,083 times.
Learn more...
This wikiHow teaches you how to link a credit or debit card to your Apple ID as your default payment method, and purchase a paid app on the App Store, using an iPhone or iPad. Once you add a payment method to your Apple ID, you can use it to make purchases on all your connected platforms, including iTunes, Apple Music, and other Apple products on mobile or desktop. You can add a credit/debit card or a PayPal account as a payment method.
Steps
Setting Up a Payment Method
-
1
-
2Tap your name at the top. Your Apple ID name and picture are located at the top of the Settings menu. Tap on it to open the Apple ID menu.Advertisement
-
3
-
4Tap your Apple ID at the top. Your Apple ID email is listed at the top in blue letters. It will open a pop-up menu.
-
5Tap View Apple ID in the pop-up. This will open your Apple ID account settings on a new page.
- If you're prompted, enter your Apple ID password, and tap Sign in here.
-
6Tap Manage Payments. This will open a list of all your saved payment methods on a new page.
-
7Tap Add Payment Method at the bottom. This will open the new payment method form on a new page.
-
8Select the type of your new payment method. You can select Credit/Debit Card here to link a card, or PayPal to link your PayPal account.
-
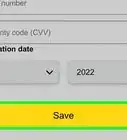
9Enter your payment information. You'll need to enter your card's number, expiration date, CVV security code, and billing address here.
- If you're adding a PayPal account, tap Log In to PayPal, login to your PayPal account to link it, and enter your billing address.
-
10Tap Done on the top-right. This is a blue button in the upper-right corner of your screen. It will add your new payment method to your Apple ID. You can now start making purchases on the App Store.


Buying an App
-
1
-
2Find the app you want to buy. You can open any paid app from the Today page, from an app category, or from the search.
-
3Tap the app's price tag button. You'll see a price tag next to every paid app. Tapping on the price will prompt you to confirm your purchase in a pop-up.
- For free apps, you'll see a GET button instead of a price.
-
4Tap Purchase in the confirmation pop-up. This is a blue button at the bottom. It will confirm your action, and charge your default payment method for the specified price.
- The app will now download to your iPhone or iPad.


About This Article

1. Add a payment method to your Apple ID.
2. Open the App Store.
3. Find a paid app.
4. Tap the price button next to the app.
5. Tap Purchase to confirm.