wikiHow is a “wiki,” similar to Wikipedia, which means that many of our articles are co-written by multiple authors. To create this article, volunteer authors worked to edit and improve it over time.
The wikiHow Tech Team also followed the article's instructions and verified that they work.
This article has been viewed 372,913 times.
Learn more...
Google Docs is a very versatile and useful word processor available on a web browser and as an app. If you're running a meeting, project, or event, you can use Google Docs to create your own customized signup sheet. If you're using a computer, you can even use existing templates to make the task even easier. This wikiHow will show you how to make a signup sheet on Google Docs using your computer, iPhone, iPad, or Android device.
Things You Should Know
- On mobile, create a new document. Tap "Table" and input the number of columns and rows for your sheet. Tap "Insert Table".
- On desktop, click "Insert" → "Table" → click the number of columns and rows. Name the headers of your signup sheet.
- On desktop, find a template by clicking "Extensions" → "Add-ons" → "Get add-ons". Enter a keyword such as "template" and click "Install".
Steps
Using Tables (Mobile)
-
1Open the Google Docs app. This looks like a blue document with a white background. If you aren’t already logged into Google, enter your email address and password to do so now.
- Google Docs is available for iOS in the App Store and for Android in the Google Play Store.
-
2Create a new document. Tap the multicolored plus sign at the bottom-right corner and tap New document.
- You can opt to name your document or leave it as the default Untitled document. Tap Create.
Advertisement -
3Tap +. This will be in the top-right corner. A pop-up menu will open.
-
4Insert a table. Tap Table underneath Image. Use the up and down arrows to adjust the number of Columns and Rows to begin with. You can add up to 20 columns and 20 rows. For more, you'll need to use the desktop version of Google Docs.
- When finished, tap Insert Table.
-
5Name the signup sheet. On top of the table, enter in the name of the signup sheet. Is it an attendance record, a volunteer signup sheet, a sign-in/sign-out sheet, or others? You can also add a description.
-
6Enter column headers. On the first row of the table, input the column titles. Tap each square, and then enter the title. Since this is a signup sheet, you will need at least a column for names. The other columns will depend on what else you need to be filled up.
-
7Enter row numbers. It will make the signup sheet easier to count if you put row numbers in front of each row. Start with 1 and continue until you reach the end.
-
8Share the document. You'll need to share the document so others can input their information.
- Tap the checkmark in the top-left corner to exit editing mode.
- Tap the person icon in the top-right corner.
- To send to specific people, enter their email into the top field. Be sure to assign them as Editor so they'll be able to make edits to the document.
- To share the link, tap the three-dots icon, and then Manage access. Tap Restricted and set the general access to Anyone with the link. Tap the link icon in the top-right corner and send the link to the recipients. This will allow anyone to edit the Google Doc, even without a Google account.
Using Tables (Desktop)
-
1Open https://docs.google.com in a web browser. If you aren't already logged in, enter your email address and password to do so now.
- Upon logging in, you will be brought to the main directory. If you already have existing documents, you can see and access them from here.
-
2Create a new document. Click the multicolored plus sign at the top of the page. A new window or tab will open with a blank document.
-
3Insert a table. A good signup sheet is tabular so that it will be easy to read and fill up. You'll need to know how many columns or headers you will need for your signup sheet.
- Click Insert in the top toolbar, and then hover over Table. Click on the dimensions you need for the table based on the number of columns and rows you will need. The table will be added to your document.
- The biggest table you can begin with is 20x20. If you want to add more columns later, click the bottom-left square and press Tab on your keyboard as many times as needed.
-
4Name the signup sheet. On top of the table, type in the name of the signup sheet. Is it an attendance record, a volunteer signup sheet, a sign-in/sign-out sheet, or others? You can also add a description.
-
5Enter column headers. On the first row of the table, put the column titles. Since this is a signup sheet, you will need at least a column for names. The other columns will depend on what else you need to be filled up.
-
6Enter row numbers. It will make the signup sheet easier to count if you put row numbers in front of each row. Start with 1 and continue until you reach the end. If needed, create more rows with Tab.
-
7Share the document. You'll need to share the Google Doc so others can input their information. If you didn't already name your file, do so now. Otherwise, Google Docs will default it as Untitled document.
- Click Share in the top-right corner.
- To send to specific people, enter their email into the top field. Be sure to assign them as Editor so they'll be able to make edits to the document. Check the box for Notify people and include a message, if desired.
- To share the link, click Restricted and set the general access to Anyone with the link. Click Copy link and send the link to the recipients. This will allow anyone to edit the Google Doc, even without a Google account.


Using Templates (Desktop)
-
1Open https://docs.google.com in a web browser. If you aren't already logged in, enter your email address and password to do so now.
- Upon logging in, you will be brought to the main directory. If you already have existing documents, you can see and access them from here.
-
2Create a new document. Click the multicolored plus sign at the top of the page. A new window or tab will open with a blank document.
-
3Open the Add-ons window. There's no native template in Google Docs. However, you can add some add-ons that contains the templates that you need. For this example, you need an attendance or signup template.
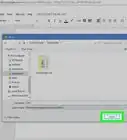
- Click Extensions in the top toolbar. Hover over Add-ons and click Get add-ons.
-
4Search for template add-ons. Depending on what you need, your keyword will be different. Type keywords in the search box at the top of the window, and view the results matching your search.
- You can use the keywords: template, attendance, signup, and more.
-
5Install the add-on. Click the “Install” button right beside the selected add-on. Most of them are free. The add-on will be installed to your Google Docs.
-
6Open your add-on. Click Extensions → Add-ons → select your add-on. Depending on your add-on, you may need to sort through available templates, and then click Copy to Google Drive. The template will be created as a new file under your Google Drive account.[1]
-
7Open the signup sheet. Access your Google Drive account. You should see the file for the signup sheet in the recent files. Double-click on it to open it on a new window or tab. You now have your signup sheet.
-
8Edit the signup sheet. Edit the template according to your signup needs. You'll be able to change anything on the template.
-
9Share the document. If you didn't already name your file, do so now. Otherwise, Google Docs will default it as Untitled document.
- Click Share in the top-right corner.
- To send to specific people, enter their email into the top field. Be sure to assign them as Editor so they'll be able to make edits to the document. Check the box for Notify people and include a message, if desired.
- To share the link, click Restricted and set the general access to Anyone with the link. Click Copy link and send the link to the recipients. This will allow anyone to edit the Google Doc, even without a Google account.


Community Q&A
-
QuestionHow do I make a sign in sheet individual so you can't see who else is signing in?
 Community AnswerI wouldn't use Google Docs, but Google Forms instead. Once they have signed up, all the data will be imported into one Google Sheet, and you will be able to view the data there.
 -
QuestionHow do I send out the completed form so attendees can sign up?
 Community AnswerYou can press the Share button, or the classic way of just handing them out.
 -
QuestionHow do I make like a sign up sheet that just has a bunch of blank lines on it where people simply write their names?Community AnswerDo method 1 through step 4. Instead of making a table, use underscores or horizontal lines.