This article was co-authored by wikiHow Staff. Our trained team of editors and researchers validate articles for accuracy and comprehensiveness. wikiHow's Content Management Team carefully monitors the work from our editorial staff to ensure that each article is backed by trusted research and meets our high quality standards.
The wikiHow Video Team also followed the article's instructions and verified that they work.
This article has been viewed 676,478 times.
Learn more...
Editing images in photoshop is a great way to take your favorite photos and make them even more dynamic. Create pop up, or 3D, photographs to emphasize a certain part of a photo and make it look as though the image were jumping off the screen. Share your photos online or print them to give to friends and family. Before you know it, you’ll be able to make these super cool images in no time!
Steps
Prepping, Selecting, and Cropping
-
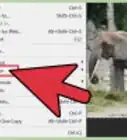
1Create a duplicate of the background of the photo you want to use. Select the original image in photoshop and press Ctrl+J (Windows) or Command+J (Mac) to make a second copy of the image. On the side panel of photoshop, you should see the “Layers” palette with a thumbnail of each image.[1]
- If you want, you can rename each image so you don’t get confused. The original picture could be called “Layer 1” and the copy could be called “copy” or “background image.” Whatever works best for you is fine!
Tip: For Windows commands, use the Ctrl button. For Mac commands, use the Command button.
-
2Add a blank layer between the 2 copies of your photo. Click on the top image in the layers palette. Then, press either Ctrl (Windows) or Command (Mac) and click on the “new layer” icon, which is on the bottom right-hand side of the layers box. A new, blank layer should appear between the first image and the second.[2]
- This blank layer is mainly used to help visually separate your images so that you’re less likely to get them mixed up while you’re working.
Advertisement -
3Turn the newly added layer white by using the background color option. Select the new, blank layer by clicking on it in the layers palette. Press Ctrl+Backspace (Windows) or Command+Delete (Mac) to fill the layer with a white background.[3]
- The main image on your screen is most likely the first image in your layers palette, so it should stay the same. Use the palette box to view the change in the background color.
-
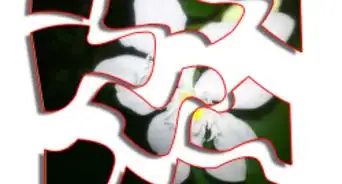
4Use the pen tool to select the images from the first photo that you want to pop. Select the first image in the layers palette so that that is the image you’re working on. Use the pen tool (or the lasso tool) to “cut out” the image you want to use from the photo. Carefully mark around the edges of the image, like if you were cutting it out from a magazine.[4]
- For example, if you have a photo of your dog catching a frisbee, you could select your dog and the frisbee to pop out from the rest of the background.
- Sometimes you might need to zoom in on the image to get a really clean line around the edge of the image. Take your time and do your best to keep the pen or lasso as close to the edge as possible.
-
5Copy the selected images into a new layer. With the selected image still highlighted or outlined, press Ctrl+J (Windows) or Command+J (Mac) to create a copy of the image in a new layer. In the layers palette, you should see an additional image pop up with just the cropped-out image on it.[5]
- At this stage, you should have 4 images on the layers palette: the background image layer, the white layer, the original layer, and the layer with this newly cropped-out image on it.
-
6Create a cropped version of the original photo to make it smaller. Select the “Layer 1” image again on the layers palette. Open the marquee tool and select the part of the original photo that you want to keep. It’s best to get rid of whatever excess is around the edges so you can make a really visually stunning 3D photo.[6]
- Doing this helps create the “popping out” visual that you’re looking for. The smaller the cropped photo, the bigger the popping image will appear.
Adding a Border, Merging, and Finishing the Photo
-
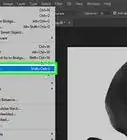
1Add a border around the cropped photo by using the “stroke” tool. Click on the “Layer Styles” button located at the bottom-left of the layers palette. Select “stroke” from the styles list. Where the styles box says “position,” select “inside” to create the border around the edge of the cropped image instead of around the entire slide. Then, move the pixel slide to either 13 or 15 pixels to make the image look more like a polaroid. Select white or a light gray color for the border color so that it doesn’t distract from the actual picture itself.[7]
- The higher the pixel number you select, the wider the border will be.
-
2Give the image a layer mask to remove the now blank background. With your cropped photo selected in the layers palette, click on the “Add A Layer Mask” button at the bottom of the palette box. This removes the blank section that was around the cropped image so that just the image itself fills the pane.[8]
- This should also automatically adjust for the clarity of the image, especially if the photo is now much more zoomed in than it was before.
-
3Merge together the 2 separate layers you created. Click on your now-bordered, cropped photo. Press the Shift key and click on the cut-out image in the layers palette. Press Ctrl+E (Windows) or Command+E (Mac) to combine the two slides into one image.[9]
- There should now only be 3 images in the layers palette: the combined image, the white slide, and the original background slide.
-
4Apply a drop shadow to the picture to make it pop even more. Keep the merged image selected and click on the “Layers Style” button at the bottom of the palette box. Click “Drop Shadow” from the styles options. Lower the opacity from 75% (which is the default) to 60%. Make the angle 120-degrees, make the distance 5 pixels, and make the size 10 pixels (leave the spread at 0).[10]
- The drop shadow just helps outline the cropped image a little bit more from the background image, which makes it visually pop a little bit more than if you didn’t add it.
- Feel free to play around with the settings for the drop shadow. You may find that something a little different works best for your particular image.
-
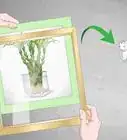
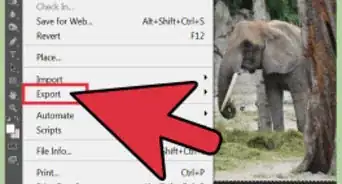
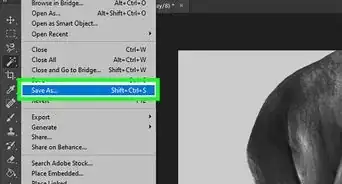
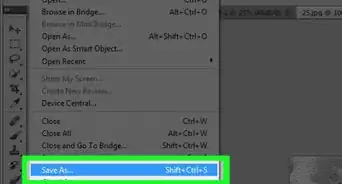
5Print your photo or share it online to enjoy your handiwork. Whichever way you decide to share what you created, you’re bound to impress friends and family with your skills. Pop up photographs are a great way to highlight a special moment and they make great gifts.
Tip: If your picture is of someone else and you want to share it online, make sure to get that person’s permission before you post it.
Community Q&A
-
QuestionHow do you make a 3D ball popup?
 Community AnswerIt's all about the angel. Try to watch YouTube tutorials as it's much easier to explain in them. And try taking pictures with different angels. You will master this art surely.
Things You’ll Need
- Computer
- Photoshop
- Digital image of photo
References
- ↑ https://youtu.be/hfdrReMIOEM?t=33
- ↑ https://www.photoshopessentials.com/photo-effects/pop-out/#
- ↑ https://www.photoshopessentials.com/photo-effects/pop-out/#
- ↑ https://youtu.be/Zl8m3-jn7cQ?t=251
- ↑ https://www.photoshopessentials.com/photo-effects/pop-out/#
- ↑ https://www.photoshopessentials.com/photo-effects/pop-out/#
- ↑ https://youtu.be/hfdrReMIOEM?t=83
- ↑ https://youtu.be/Zl8m3-jn7cQ?t=298
- ↑ https://www.photoshopessentials.com/photo-effects/pop-out/#
About This Article