This article was co-authored by Amy Guerrero and by wikiHow staff writer, Jessica Gibson. Amy Guerrero is an Arts and Crafts Specialist and the Owner of Sunshine Craft Co., a crafting studio based in Phoenix, Arizona. Amy specializes in macrame, DIY crafting, and teaching fiber arts. She offers monthly in-person and online workshops along with having developed a range of DIY craft kits for at-home projects. Amy holds a BS in Industrial Design from Philadelphia University. She worked as a graphic designer before starting her own business. Sunshine Craft Co. is a creative hub that offers a wide range of workshops, tools, and resources for any craft project to inspire creativity and community engagement.
wikiHow marks an article as reader-approved once it receives enough positive feedback. This article has 31 testimonials from our readers, earning it our reader-approved status.
This article has been viewed 2,066,200 times.
Pop-up cards are a great twist on the ordinary greeting card. Make a few simple cuts into a piece of decorative paper to create a tab. Push the tab forward and apply your pop-up image. If you want to work with a card you've purchased, just add tabs to the pop-up image and place it in the center of the card. The recipient of your pop-up card will love your creation!
Steps
Making a Pop-Up Card with Tabs
-
1Choose the paper for your card. Take 2 pieces of card stock or colorful paper that are the same size. Try using 8 x 11 in (20 x 28 cm) pieces of paper to make a standard sized card. You can use any heavy type of decorative or scrapbooking paper. If it's heavy enough, you could even use brightly colored construction.[1]
-
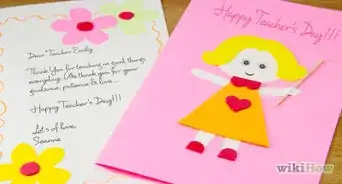
2Fold 2 pieces of card stock or colorful paper in half. Fold both of the pieces in half widthwise for a standard-sized card. One piece will end up being the one with tabs and the pop-up image. This will fit inside the other piece which will be the front and back of the card.[2]
- You can use your fingers or a bone folder to completely smooth the fold.
Advertisement -
3Make 2 cuts in the center of the card that are 1-inch long. Take one of the folded pieces of paper and keep it folded in half. Make 2 parallel cuts that are 1-inch (2.5 cm) long through the folded side of the paper. The cuts should be in the center of the card so the pop-up image is centered. These tabs should work for images that are 2 to 3 inches (5 to 7.5 cm) in size.
- Take the size of your pop-up image into account. For example, if your pop up is large, you'll probably need a bigger tab.
-
4Open the card and push the tab out. Open the card that you just cut, so you can see the slits. Use your fingers to gently push the tab section up towards you. Run your fingers along the fold of the card so that it's firmly creased. Crease the tab section in the opposite direction so it pops out and away from the card.[3]
-
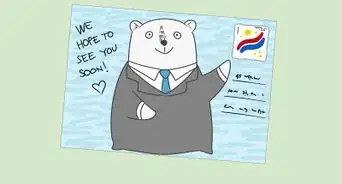
5Cut out your pop-up image. Draw or cut out a pop-up image into any shape you like. You could even use small photographs. For example, use a gift shape, a cut-out of a person's name, a heart, or a small school photo. Cut out your pop-up shape and ensure that it will fit in your card.[4]
- Consider using an Exacto knife to make a precise cut around your image.
-
6Attach the pop-up image to the tab. Open the card with the tab and apply a little glue to the bottom of the tab. Push the pop-up image to the tab and press it firmly so it sticks.[5]
- Avoid gluing the top of the tab or the image won't pop out properly.
-
7Secure the second piece of paper to the card with the pop up. Get out the second piece of paper that you folded earlier. Rub a glue stick or lay double-sided tape across both sides of the paper when it's unfolded. Open the card with the pop-up image and set it into the adhesive. Press down firmly and let it dry completely.[6]
- The second piece of paper will hide the tab so you can't see that the card is a pop-up until you open it.
-
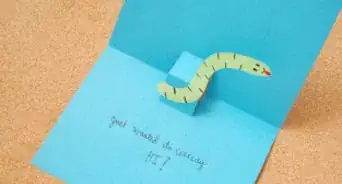
8Decorate and sign the pop-up card. Write your message and use whatever craft supplies you'd like to embellish the card. If you have ribbon, glitter, stickers, stamps, or any scrapbooking materials around the house, use them! Place the card in the envelope and give it to the recipient.
- Consider using specialty trimming scissors to cut decorative borders along the sides of the card.


Adding a Pop-Up Image to a Card without Tabs
-
1Get out a card or fold your decorative paper in half. If you'd like to add a pop-up image to a card that you've already made or purchased, set it on your work surface. If you want to make a simple card, take a piece of heavy, decorative paper and fold it in half.
- Most cards are folded widthwise, although you can fold it lengthwise to make a tall card.
- The card should be heavy enough to support the pop-up image.
-
2Draw the pop-up image on a separate piece of decorative paper. Get out a piece of decorative paper or use a scrap of decorative paper large enough for your image. Use a pen or pencil to draw the image you'd like to pop up on the paper. You could also use printed images or photographs as long as you cut them to fit in the card.
- For example, take a photograph and cut the part of the picture you want into a decorative shape.
- Cut out shapes that match the theme of the card. For example, cut out or print flowers for a graduation card, use a cake image for a wedding, or use a picture of balloons for a birthday.
-
3Draw small tabs on the sides of your pop-up image. Depending on the size and shape of your image, draw a long thin rectangle on each of its sides. You'll fold back this rectangle to make a tab that attaches to the card. Each rectangle tab should be at least 1 to 2 centimeters wide, so you can fold them. If you prefer, you could fold the image itself instead of adding tabs.
-
4Cut out the image with the tabs and fold it in half. Use a pair of scissors or an Exacto knife to cut out the pop-up image and the folding tabs.[7] Ensure that you keep them in a single piece.
- If you accidentally cut the tabs out, you can still use them. You'll just need to glue the tabs the back of the image and glue them into the card.
- If you're making a detailed image, you can set it down on a cutting mat. Then use a utility knife to cut around the image.
-
5Draw a line halfway through the image and fold it in half. Set a ruler down in the center of the image. Draw a line down the center to create 2 equal sides. Use your fingers or a bone folder to fold and smooth the image in half along the line.
-
6Fold the tabs back to make a V-fold. Locate the tabs that you left on the sides of your image. Fold them back behind the image, so you can't see them anymore. If you accidentally cut them earlier, use glue or a glue stick to apply them to the back and sides of the image.
- If you prefer, you can even fold back the sides of the image itself. For example, if you're making a heart, folding back the sides will just make the heart appear longer.
-
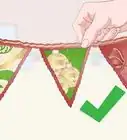
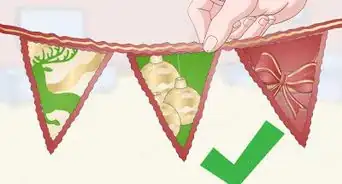
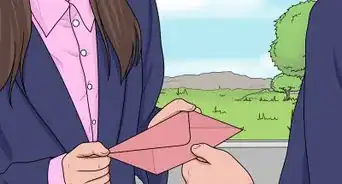
7Attach the tabs or V-folded image to the center of your card. Lay a strip of double-sided tape on the sides of the tabs that will touch the center of the card. Open your card and lay it flat. Place your pop-up image in the center and push down firmly on the tabs so the double-sided tape sticks in place. Close the card and open it to check that the image pops out.
- While you can use glue, it may leak out the sides. Tape is easier to handle and won't be visible.
-
8Sign and decorate the card. If you're using a purchased card, just write your message and sign it. If you used your own decorative paper to make the card, you can also add embellishments and decorations. For example, brush adhesive over the card and sprinkle glitter or attach a ribbon. Place the card in an envelope and it's ready to send.
- Consider using specialty trimming scissors to cut decorative borders along the sides of the card.
- You can also use punches, stickers, beads, stamps, or colored markers to decorate the card.


Community Q&A
-
QuestionCan I make multiple pop-ups on the same paper?
 Community AnswerYes, you may make more than one pop-up.
 -
QuestionHow can I make a good anniversary card?Community AnswerMake the pop up a heart and around it, write how much you love your significant other or whatever you want the person to know.
-
QuestionHow can I make a beautiful pop up card?
 Community AnswerDecorate your card with glitter pens, stamps, stickers, beads or other craft items. Use special trimming scissors to add interesting borders and designs around your card.
Warnings
- If a child is making the pop up card, supervise them when handling scissors.⧼thumbs_response⧽
Things You'll Need
For Both Methods
- 8 x 11 in (20 x 28 cm) pieces of paper (construction paper, cardstock, or scrapbook paper)
- Scissors
- Glue/double-sided tape
- Markers, crayons, colored pencils, writing utensils
- Envelope
- Card
- Decorations (optional)
- Ruler (optional)
- Bone folder (optional)
-Step-17.webp)
References
- ↑ http://ohhappyday.com/2011/05/diy-pop-up-cards/
- ↑ http://ohhappyday.com/2011/05/diy-pop-up-cards/
- ↑ http://ohhappyday.com/2011/05/diy-pop-up-cards/
- ↑ http://ohhappyday.com/2011/05/diy-pop-up-cards/
- ↑ http://ohhappyday.com/2011/05/diy-pop-up-cards/
- ↑ http://ohhappyday.com/2011/05/diy-pop-up-cards/
- ↑ Amy Guerrero. Arts & Crafts Specialist. Expert Interview. 9 October 2020.
About This Article

1. Get 2 pieces of card stock or colorful paper that are the same size.
2. Fold both pieces in half widthwise and set one of the pieces aside.
3. Make 2 parallel, 1-inch cuts in the center of the folded side of the paper.
4. Open the card and gently push the tab section upward toward you.
5. Cut out your pop-up image from a third sheet of paper and glue it to the bottom of the tab.
6. Glue the second piece of paper to the outside of the first to make the outside of the card.
7. Decorate your card!


-Step-2-Version-3.webp)