This article was co-authored by wikiHow Staff. Our trained team of editors and researchers validate articles for accuracy and comprehensiveness. wikiHow's Content Management Team carefully monitors the work from our editorial staff to ensure that each article is backed by trusted research and meets our high quality standards.
wikiHow marks an article as reader-approved once it receives enough positive feedback. This article has 28 testimonials from our readers, earning it our reader-approved status.
This article has been viewed 1,602,145 times.
Learn more...
There is nothing quite like flying a kite outdoors on a sunny, breezy day. What’s even better? Flying a kite you made yourself! Making a simple diamond kite is an easy project you can complete in one afternoon. We’ll walk you through the process step-by-step and show you how to build the frame, fashion the sail, and put it all together. Then, you can enjoy watching your very own custom kite soar across the sky.
Steps
Making the Frame
-
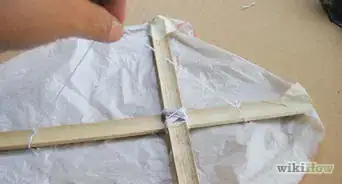
1Make a lowercase T-shape with your sticks. Take the 20 in (51 cm) stick and put it across the 24 in (61 cm) stick so it looks like a lowercase T. These sticks will make up the frame for your kite.[1]
- If you want to make a larger kite, use longer sticks. Just make sure the horizontal stick is at least 4 inches (10 cm) shorter than the vertical stick.
-
2Attach the 2 sticks together with string and glue. Wrap twine around the 2 pieces in the middle 1-2 times. Then, tie the string or twine with a small knot and trim off the excess string with scissors. You can also put a dab of super glue between the 2 pieces and press them together at the joint so they are extra secure.[2]
- Make sure the sticks form a right angle to each other when they’re attached. The horizontal stick should be positioned straight across the vertical stick.
Advertisement -
3Make 1 to 2 in (2.5 to 5.1 cm) horizontal notches at the end of each stick. Use scissors to make 1 notch at the end of each stick. These notches should run horizontally, or across the width of the stick. Make them deep enough to fit the string you are going to use to attach the sail.
- If you’re using very thin sticks and string, you can poke holes into the ends of the sticks instead of making notches.
-
4Stretch the string around the frame. Loop the string around the top notch on the frame, wrapping it once around the stick. Then, pull the string through the notch on the right end of the frame. Stretch the string to the notch at the bottom end of the frame and then through the left end of the frame. Finally, wrap the string 1-2 times around the top end of the frame. Remove any excess string with scissors.
- Double-check that the string is taut but not too tight to prevent the sticks from bending or warping.
- The string will help the frame retain its shape as your kite soars through the air.

Measuring and Cutting the Sail
-
1Use a plastic bag, paper, or fabric that is 40 inches (100 cm) wide for the sail. You can get creative here. A large, white garbage bag is a great option, since it will be durable and easy to decorate. Or you can use strong white contact paper or newspaper.[3]
- Fabric can also work for the sail in a pinch, though it should be thick and sturdy so the sail is strong.
-
2Lay the frame on the sail. Spread the material you’re using for the sail flat on the ground. Then, place the frame in the center of the sail.
-
3Outline the frame with a ruler. Place the ruler on the top of the frame and then down the end of the stick on the right side of the frame. Use a pen or pencil to draw a diagonal line from the top end to the end of the stick on the right, using the ruler as a guide. Do this again from the right end to the bottom end of the frame as well as from the bottom end to the left end. Finish by drawing a diagonal line from the left end up to the top end of the frame.[4]
- When you’re finished, you should have a diamond shape on the sail, with the frame in the middle of the diamond.
-
4Cut the diamond 2 inches (5.1 cm) wider than the outline. Use scissors to cut out the diamond, leaving a bit of space around the outline so you can wrap the sail to the frame easily.
- You should now have a nice, clean diamond sail that can fit snugly over the frame.
Assembling the Kite
-
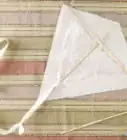
1Fold the edge of the sail over the frame and glue and tape it down. Run a thin line of super glue on the frame and press the edge of the sail on the frame to keep it in place. You can also use masking tape or electrical tape to secure the sail to the frame, taping the edge onto the inside of the sail.[5]
- Check that the sail sits tightly over the frame—you don’t want it to come loose in the air!
-
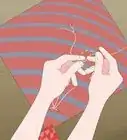
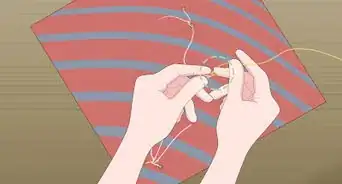
2Attach the flying line. Use string that is at least 20 inches (51 cm) long for the flying line. Poke a small hole right above where the 2 sticks meet with scissors. The hole should be big enough to fit the flying line. Then, pull one end of the flying line through the hole and tie it tightly around the cross point. Let the flying line hang down freely while you finish the rest of the kite.
- You can then add string to the flying line to make it longer based on your arm length and height. Sometimes, adding more string to the flying line can also help the kite to fly straighter.
-
3Make a kite tail with a 6 ft (1.8 m) long piece of thick string. Attach the tail to the bottom end of the frame, looping it over the frame several times and tying it tightly. Use thick string or a strip of cloth for the tail.[6]
- Pick a string or cloth color that matches the color of your sail so your kite looks pretty in the air.
-
4Attach pieces of cloth or ribbon to the tail at 1 foot (0.30 m) intervals. Use pieces that are 2 to 3 inches (5.1 to 7.6 cm) long. Tie them onto the tail with a small knot, allowing them to dangle down off the string. The cloth or ribbon pieces will help the tail stay balanced and ensure the kite flies straight.
-
5Decorate the kite with markers or colored paper. This is the fun part! Get creative by writing inspirational words or phrases on your kite with markers. You can also color your kite with markers, creating a fun pattern like stripes or dots. Try gluing shapes made from colored paper, like swirls, triangles, or circles, onto the sail.
- You could write your name on the kite so you can see your name flying in the air.
-
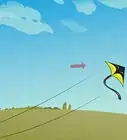
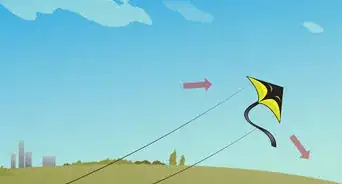
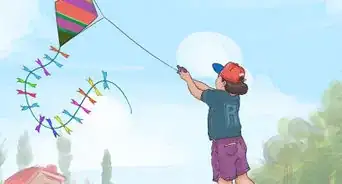
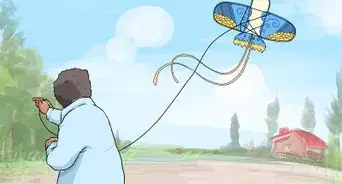
6Try out the kite in a spot with no trees or power lines. Look for an area close to a body of water like a lake or the ocean, as it will have good winds for kite flying. Hold tight to the kite string and run in the direction of the wind. Then, release the kite as you are running, pushing it upward into the wind. Use the flying line to keep the kite in the air.
Community Q&A
-
QuestionCan I use newspaper to make a kite?
 Community AnswerYes. You can even use tissue paper or a plastic bag to make a kite. Keep in mind that the lighter the material you use is, the better the kite will fly.
 -
QuestionWhat materials do I need for a traditional diamond kite?
 Community AnswerConstruction paper, string, pipe cleaners/sticks, scissors, colored pencils/markers (optional), tape (optional), and a ruler.
 -
QuestionAre yard sticks too heavy to use as rods?Community AnswerYes. It will add unnecessary weight and the kite will not be aerodynamic.
Things You'll Need
- Plastic garbage bag, strong paper, or thin fabric
- 2 thin wood or bamboo sticks, 24 inches (61 cm) and 20 inches (51 cm)
- Cotton string or twine, at least 8 to 10 feet (2.4 to 3.0 m)
- 5-6 pieces of ribbon or cloth
- Super glue
- Masking or electrical tape
- A ruler
- Scissors
- Colored pencils /markers/colored paper (optional)
References
- ↑ http://www.skratch-pad.com/kites/make.html
- ↑ http://www.skratch-pad.com/kites/make.html
- ↑ http://www.skratch-pad.com/kites/make.html
- ↑ http://www.skratch-pad.com/kites/make.html
- ↑ http://www.stormthecastle.com/how-to-make-a/kite/make-a-traditional-kite.htm
- ↑ http://www.stormthecastle.com/how-to-make-a/kite/make-a-traditional-kite.htm
About This Article

To make a kite, first you'll need 2 wooden dowels that are less than 2 inches (5 cm) in diameter and about 40 inches (100 cm) long. Cut one of the dowels so it's about 6 inches (15 cm) shorter than the other one. Then, lay the longer dowel down on a flat surface, and place the shorter dowel on top of it about 4 inches (12.5 cm) above the midpoint so they're perpindicular. Wrap string around the point where the 2 dowels meet, and use hot glue to cover the string and seal the 2 dowels together. Wait a few minutes for the hot glue to dry. Next, cut a notch in the end of each dowel using a small knife. Run a long length of string around the ends of the dowels to connect the 4 ends. Use the notches you cut to keep the string in place. Pull the string tight so it's taut, then tie the 2 ends into a knot. Cut off the excess string with scissors. Now, lay your frame on top of a garbage bag or sheet of thin plastic, and outline the frame with a marker. Set the frame aside, and cut around the outline you drew, adding 2 inches (5 cm) to each side as you cut. Then, lay the frame on top of the sheet you’ve cut, and line the inside of each dowel with hot glue. Fold the excess plastic over the dowel and press it into the hot glue. Next, tie a piece of string to the end of one of the dowels. Run the other end of the string to the opposite end of the dowel and tie it there. Repeat this process with the other dowel and a second piece of string. Finally, tie the 2 lengths of string to a third piece of string at the junction where the 2 strings meet to make your brindle and line. For help making a sturdy frame that'll withstand high winds, read on!