This article was co-authored by wikiHow Staff. Our trained team of editors and researchers validate articles for accuracy and comprehensiveness. wikiHow's Content Management Team carefully monitors the work from our editorial staff to ensure that each article is backed by trusted research and meets our high quality standards.
The wikiHow Video Team also followed the article's instructions and verified that they work.
This article has been viewed 470,520 times.
Learn more...
Making a paper kite is easier and faster than you think. As a matter of fact, you only need one sheet of paper and a few other materials that you probably have lying around your home. The best part about making and flying a kite is that you create long-lasting memories, while also enjoying an outdoor activity. This craft project is fun and great for kids of all ages.
Steps
Making a Fast Bumblebee (Schaeffer) Kite
-
1Gather all required materials. It is best to place all of the required materials on your desk, table, or wherever you plan to work. Below is what you will need to make and fly your kite:
- 8.5” by 11” sheet of printing paper or construction paper
- Lightweight string
- Pencil
- Stapler
- Ruler
- Scissors
- Hole punch (optional)
- A nice breeze or light wind (6-15 mph)
-
2Begin the construction process. Place your paper in front of you in a vertical position with the long sides on the right and left. Fold your paper in half so that the fold (seam) is at the bottom.Advertisement
-
3Establish the wing dimensions. Use your pencil to make a dot at the very bottom of the folded paper, about 2” from the left edge of the fold. While you have your pencil in hand, make another dot at the very bottom of the folded paper, about 2” from the first dot for attaching the string later.
- The Bumblebee (Schaeffer) kite, first created by William Schaeffer in 1973, may be the easiest of all kites to create and was designed with a simple fold that sails in gentle winds.[1]
-
4Secure the wings. Fold the top left end of the paper down until it is touching the first dot. Do not crease this fold. Do the exact same thing on the opposite side so that both sides are identical. Secure the ends of the folded pieces with a staple (the staple should be placed where you made the first dot).[2]
-
5Create the attachment point. Place tape over the second dot and make sure the piece of tape is long enough to cover both sides. Use your hole punch to make a hole over the dot. This hole is the attachment point for the string.
- If you do not have a hole punch, you can carefully use scissors to create the hole.
- The purpose of the tape is to reinforce the hole so that it does not tear later.
-
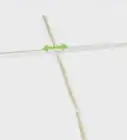
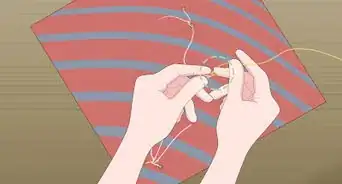
6Attach the string. Insert your kite string through the hole that you created and tie the string with a gentle, but tightly secured knot. If you are really feeling crafty, you can create a handle for your string with a wide stick or any tube shaped item. A handle makes it easy for you to reel in or extend your kite, and also prevents your kite from flying away.
- The string is also called the flying line.

Making a Fast Delta Paper Kite
-
1Gather all required materials. It is best to place all of the required materials on your desk, table, or wherever you plan to work. Below is what you will need to make and fly your kite:
- 8.5” by 11” sheet of printing paper, construction paper, or card stock
- A thin wooden stick or bamboo skewer
- Tape
- Lightweight string
- Lightweight ribbon
- Pencil
- Scissors
- Hole punch (optional)
- A nice breeze or light wind (6-15 mph)
-
2Begin the construction process. Place your paper in front of you in a horizontal position with the long sides at the top and bottom. Fold your paper in half so that the fold (seam) is on the left side.[3]
-
3Establish the wing dimensions. Use your pencil to make a dot at the very top of the folded paper, about 1.5” to 2” from the fold, depending on your desired wing size. Make another dot at the very bottom of the folded paper, about 1.5” to 2” from the opening. Imagine or draw a line that connects the two dots.
- Delta kites were first created in the 1940s by Wilbur Green and were designed with wings that fly well in lighter winds.
-
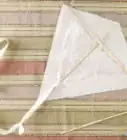
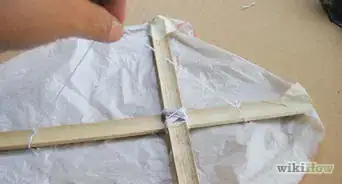
4Assemble and secure the wings. Fold the paper along the line that you just made or imagined. Turn the paper over and fold that side exactly as you did in step 3. Be sure both sides are exactly the same. Use your tape to secure the folded sides along the middle seam. You should already see your kite taking shape.
-
5Reinforce the structure. Place your thin wooden stick or bamboo skewer horizontally across the widest part of the wings. This section of the kite is also called the sail. Use tape to secure the stick into place. Be sure that your stick is not longer than the width of the kite. If it is, carefully use your scissors to shorten the stick.
-
6Create the attachment point. Draw a dot about a third of the way down the spine of your kite and about half an inch from the edge. Place tape over this dot and make sure the piece of tape is long enough to cover both sides. Use your hole punch to make a hole over the dot. This hole is the attachment point for the string.
- The hole will be located at the narrow end of the flap, which is towards the top of the kite.
- If you do not have a hole punch, you can carefully use scissors to create the hole.
- The purpose of the tape is to reinforce the hole so that it does not tear later.
-
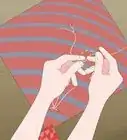
7Attach the string. Insert your kite string through the hole that you created and tie the string with a gentle, but tightly secured knot. You can create a handle for your string with a wide stick or any tube shaped item. A handle makes it easy for you to reel in or extend your kite, and also prevents your kite from flying away.
- The string is also called the flying line.
-
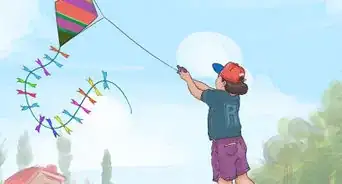
8Create a tail. Tape lightweight ribbon at the very bottom of your kite on the same side as the stick. Your tail can be as long as you desire. You can start out with a long tail and cut it shorter if your kite is unable to fly.[4]
- The tail is important because it balances your kite while in flight and prevents it from flipping and nose-diving to the ground.
- Some tails are 3 feet or shorter, and some are 15 feet or longer.
- The length of the tail will be determined by the weight of the ribbon.

Flying Your Kite
-
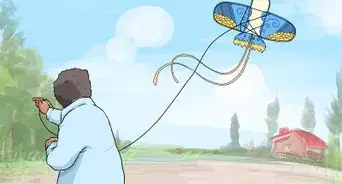
1Find open space. Now that you have completed the construction of your kite, it is now time to send it to flight. To start, find a location where there is lots of open space without trees, such as a park, lake, or beach. Although your paper kite may not reach significantly high heights, avoiding any hindrances is still a good practice.
-
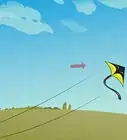
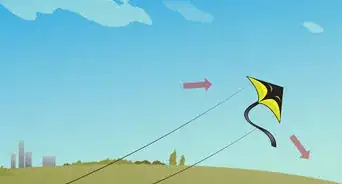
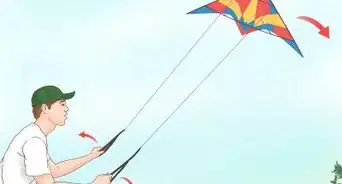
2Launch your kite. To launch your kite, begin to walk with the flying line in one hand and the kite in the other hand. Increase your walking pace to allow your kite to fly using simple aerodynamics. When launching your kite, your back should be to the wind and your kite should face you.
- Aerodynamics is the movement of a solid object through the air.[5]
- The right wind direction will keep your kite in flight.
-
3Guide your kite. You can release more string when you feel your kite rising and reel in your kite when it begins to fall.


Community Q&A
-
QuestionCan you still fly a kite even if there is no wind?
 Community AnswerIf you run really fast and let the kite trail behind you, you may get it airborne, but getting it to an altitude where it can catch thermals and stay aloft would be pretty difficult.
 -
QuestionCan I make a paper kite without a ribbon?Community AnswerIt's optional, but helps the kite keep balanced.
-
QuestionCan I make a kite with line paper?
 Alberto ZoulCommunity AnswerYes, it’s the same thing as paper, but there's no color to it. The line paper is lightweight and goes higher, but it’s gone as soon it hits the ground.
Warnings
- Never fly a kite near an overhead power line or during a thunderstorm.⧼thumbs_response⧽
- Paper kites tear easily, so be gentle with decorations and avoid high winds.⧼thumbs_response⧽
References
About This Article

With only one sheet of paper, you can make your own fast kite to fly on breezy days. To make a fast bumblebee kite, you’ll need a sheet of A4 paper, string, scissors, a pencil, stapler, and ruler. Start by folding your paper in half vertically. Make a dot at the bottom of the folded paper, about 2 inches from the left edge of the fold. Then, fold the top left edge down to touch the dot and staple it in place to make the first wing. Repeat this step on the other side of the paper so the 2 wings are symmetrical. Next, make a hole with a hole punch or scissors 2 inches down from the staples and tie your string through it. Finally, cover the hole with a strip of tape to prevent it from ripping while your kite’s in the air. For more tips, including how to fly your homemade kite, read on!