This article was co-authored by wikiHow staff writer, Darlene Antonelli, MA. Darlene Antonelli is a Technology Writer and Editor for wikiHow. Darlene has experience teaching college courses, writing technology-related articles, and working hands-on in the technology field. She earned an MA in Writing from Rowan University in 2012 and wrote her thesis on online communities and the personalities curated in such communities.
The wikiHow Tech Team also followed the article's instructions and verified that they work.
This article has been viewed 1,855,726 times.
Learn more...
Many websites and apps won’t allow you to upload a photo unless it ends in .JPG (also known as a JPEG). If your photos end in .GIF, .TIFF, .PNG or any other file extension, this can be super frustrating. While converting some images to JPEG will result in a less crisp picture, the format is known for its ability to retain the best possible quality in the smallest possible file size. While you don't have to be a computer whiz to convert an image to JPEG, you will need to learn a few tricks of the trade. This wikiHow article teaches you how to convert pictures to JPEG files.
Things You Should Know
- Use an online converter in a web browser on an Android, iPhone, or iPad to turn your pictures into JPG files while you're on the go.
- If you have a Windows computer, use Paint to save your file as a JPG.
- If you have a Mac, use Preview to save your file as a JPG.
Steps
Using a Web Browser
-
1Choose a web converter. This method works for any device connected to the web, including smartphones and tablets. Do a web search for “convert XXX to jpg online” (where “XXX” is the type of file you’re converting from) to browse through options. Sites like Online-Convert[1] contain lists of all of the file types it can convert to and from.
-
2Upload your image. In your converter, find the button that says something similar to “Choose file” and locate the file you wish to convert. Note that many converters have maximum file sizes.
- Read through the terms or usage policy before uploading.
- Some converters allow you to enter a URL, which is great if your image is online.
Advertisement -
3Verify that the converter is ready to convert your file to a JPEG. Most converters will have a dropdown menu or button to press where you can select “JPEG” or “.JPG” (these two options will do the same thing). Some converters also allow you to modify the size and quality of the file on this screen.
-
4Convert the image. Find the button that says “Convert” or “Save” to start the conversion. This could take several minutes. The image will either download automatically to your default download location or you’ll be prompted to choose one. Once the process is complete, your image will be converted to a JPEG.


Using Paint in Windows
-
1Open Paint. Paint comes pre-installed on your PC. Press ⊞ Win+S to open the search box and type
paint. When you see “Paint” appear in the search results, click on it.- You can use Paint on Windows 10/11.
-
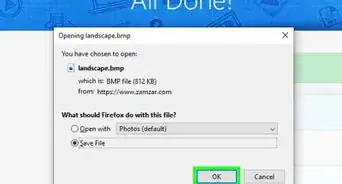
2Open your image in Paint. Make sure the image is on your computer. Click the “File” menu and select “Open.” Locate your image and click “OK.”
-
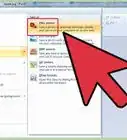
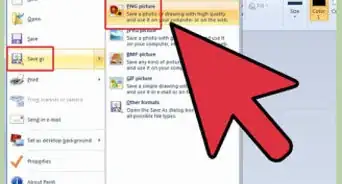
3Click “File,” then click the arrow next to “Save As.” A list of image types, including JPEG, will appear.
-
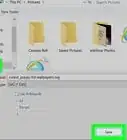
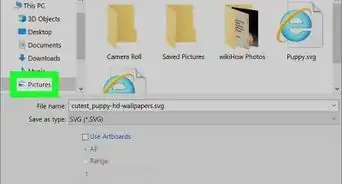
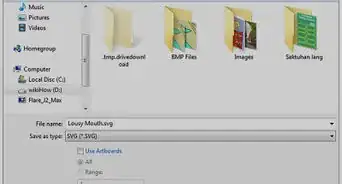
4Click “JPEG.” This will launch a new box which allows you to choose a folder, rename the file, and select a “Save as type.” Navigate to a folder you’ll recall later and make sure “JPEG” is selected as the “Save as type.”
-
5Rename the file if you wish, then click “Save.” Your file has been converted.


Using Preview on a Mac
-
1Open your image with Preview.[3] Preview comes pre-installed on your Mac and will open almost any type of image.Ctrl + click the image and select “Open With.” Choose “Preview.”
- If you run into an image type that you can’t open or that looks wrong in the software, try using a web converter instead.
- The image has to be on your computer for this method to work. If you’ve not yet downloaded the image to your computer, you’ll need to do that first.
-
2Click on the "File” menu and select “Export.” A box containing several menus will appear.
-
3Change the format to JPEG. You can also adjust the quality and resolution if you wish. The higher the quality or resolution, the more space the photo will take up on your hard drive.
-
4Rename the file and save. Make sure the name of your file ends with “.jpg” (case does not matter) then select a saving location that you’ll remember. Click “Save” to complete the conversion.


Using Gimp on PC, Mac or Linux
-
1Get Gimp.[4] If you’re trying to convert an image type that isn’t supported in your current software, or if you just want an option that’s more robust, Gimp is massively popular and free. If you don’t already have Gimp installed, download and install it.
-
2Open the image you want to convert.[5] Click “File,” then “Open.” Select the image and click “Open” once more.
-
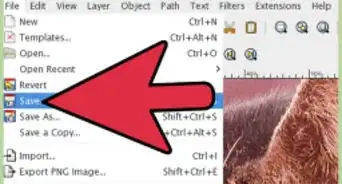
3Click “File,” then “Export As” to choose the JPEG file type.[6] A dialog box will appear with several options to choose from. Click “JPEG.”
-
4Modify your options. A new dialog box will appear with options for your JPEG. Put a check in the box next to “Show preview in image window” before adjusting the image quality. Move the slider to the place where your image looks best in the preview.
-
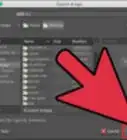
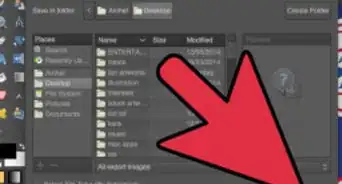
5Click “Export.” A box will appear that asks you to choose a new file name and location. Find a folder you’ll remember and give the file a new name if you’d like. The file already has .jpg appended to the end, so leave that part intact (the extension is not case-sensitive). Click “Save” to complete the conversion.


Changing the File Extension
-
1Understand what changing the file extension does. If you have a JPEG file with the wrong file extension, such as if your file ends with “.JGP” instead of “.JPG,” this method will be useful. This method will not technically “convert” an image to a JPEG.
- If your image file is not already a JPEG file, changing the file extension could break your file. See other methods if you’re hoping to turn a different image file into a JPEG file.
- File extensions are not case-sensitive. .JPG and .jpg are the same thing.
- Before you get started, make a note of the original file extension so that you can change it back if necessary.
-
2Find your file. It could be on your desktop, as in the example, or in a separate folder you can access through Finder or Windows Explorer.
-
3Make the filename editable. If you’re using Windows, you can skip this step. Mac users should click once on the image, click “File,” then “Get Info.” Click the arrow next to “Name and Extension” and remove the check from “Hide Extension.” Click “Save.”
-
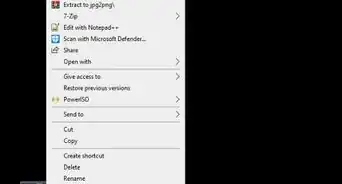
4Delete the current file extension. Erase everything after the “.” in the file name.
- On a Mac, click the image once and press ⏎ Return. Click at the end of the file extension and press Delete until you’ve erased everything after the period.
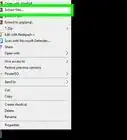
- In Windows, right-click the image and select “Rename.” Click at the end of the file extension and press ← Backspace to delete everything after the period.
-
5Type
JPGafter the period. Upper or lowercase is fine. Your filename should look something like this:image.jpegorimage.jpg. JPEG and JPG are the same thing. You can use both file extensions based on your need. Press ↵ Enter or ⏎ Return. -
6Confirm your change. Whether you’re using a Mac or a PC, you’ll see a warning about how changing the file extension could make your file unusable. Click “Use.jpg” or “Yes” if you want to make the change. Your file name will now end in .JPG.


Community Q&A
-
QuestionHow do I make a jpeg file using Google Drive?
 Community AnswerSave the file of choice to your computer and follow the steps in the article.
 -
QuestionWhere does a jpeg come from?
 Community AnswerA jpeg is a Joint Photographic Experts Group. It is a file used commonly for pictures stored on computers.
 -
QuestionCan I download a JPEG to an android phone?Community AnswerYes. JPEG is one of if not the most common photo file types so as long as you have the option of saving any kind of photo you can save JPEGs to android phones.


References
About This Article