This article was co-authored by wikiHow staff writer, Jack Lloyd. Jack Lloyd is a Technology Writer and Editor for wikiHow. He has over two years of experience writing and editing technology-related articles. He is technology enthusiast and an English teacher.
The wikiHow Tech Team also followed the article's instructions and verified that they work.
This article has been viewed 47,462 times.
Learn more...
This wikiHow teaches you how to store an iPhone backup file in Dropbox, as well as how to back up individual files from your iPhone into your Dropbox account. For most comprehensive iPhone backups, you'll need more than the two gigabytes of free space that Dropbox offers, meaning that you'll need to purchase additional storage.
Steps
Creating an iPhone Backup File
-
1Attach your iPhone to your computer. Plug the USB end of your iPhone's charger cable into one of your computer's USB ports, then plug the other end of the charger into your iPhone's charging port.
-
2Open iTunes. Its app icon resembles a multicolored musical note on a white background.
- If prompted to update iTunes, click Install iTunes and wait for the updates to install, then restart your computer when the installation is complete.
Advertisement -
3Click the "Device" icon. It's an iPhone-shaped icon in the upper-left side of the iTunes window. Doing so opens your iPhone's page.
-
4Check the "This computer" box. This option is in the "Backups" section of the page.
-
5Click Back Up Now. It's on the right side of the "Backups" section. This will prompt your iPhone to begin backing up all of its information onto your computer.
-
6Wait for the backup to complete. This will take several minutes. While you're waiting for your iPhone to finish backing up, you can proceed to the next part of this process which is purchasing more Dropbox space.
- Be sure to leave your iPhone attached to your computer for the duration of the backup.


Purchasing Dropbox Space
-
1Open Dropbox. Go to http://dropbox.com/ in your web browser. This will open your Dropbox main page if you're logged into Dropbox.
- If you aren't logged into Dropbox, click Sign in in the upper-right corner of the page, then enter your email address and password.
- If you haven't yet signed up for Dropbox, create an account before proceeding.
- You can skip to the last step in this part if you already have purchased Dropbox space.
-
2Click Upgrade account. It's a light-blue link in the upper-right corner of the page. Doing so takes you to a page with a list of different Dropbox packages.
-
3Select the "Plus" package. Click the blue Get started button below the "Plus" heading near the top of the page.
- The "Plus" package allows up to a terabyte (1024 gigabytes) of storage, which is more than enough to store several different iPhone backups.
-
4Click Choose your plan. It's a grey button on the right side of the page.
-
5Click Select. It's a blue button below the "Plus" heading. Doing so will take you to the plan purchase page.
-
6Select a billing cycle. Check either the "Billed Yearly" or the "Billed Monthly" box.
- The annual plan is cheaper in the long run.
-
7Enter your payment details. In the "Enter payment details" section, add the following information:
- Credit or debit card number
- Security code
- Expiration date
- Country
- Billing ZIP code
- You can also check the "PayPal" box at the top of the section and enter your PayPal login information to pay with PayPal if you like.
-
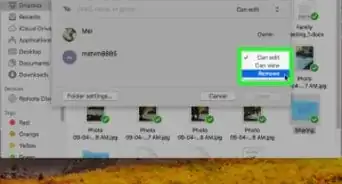
8Check the "I agree to Dropbox Terms" box. It's on the right side of the page.
-
9Click Buy now. This blue button is on the right side of the page. Doing so will purchase your selected amount of storage (1 terabyte, in this case) and immediately apply it to your Dropbox account.
-
10Open the Dropbox Files page. If this page doesn't open immediately after buying more space, go to https://www.dropbox.com/home in your browser. This is the folder to which you'll add your iPhone's backup file.


Uploading the Backup File to Dropbox on Windows
-
1
-
2
-
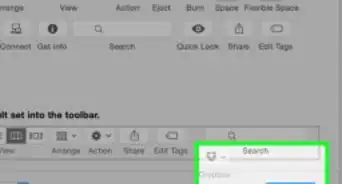
3Click This PC. It's a computer-shaped icon in the far-left side of the File Explorer window.
- You may have to scroll up or down on the left-hand sidebar to see This PC.
-
4Double-click your computer's hard drive. Usually, the hard drive is labeled OS (C:). This will open your computer's hard drive folder.
- If you don't see anything listed below the "Devices and drives" heading, first double-click the heading.
-
5Enable hidden folder viewing. Click the View tab at the top of the File Explorer window, then check the "Hidden items" box in the "Show/hide" section.
-
6Double-click the Users folder. You'll find it near the top of the hard drive's folder. Doing so opens a list of all of the users who have access to this computer.
-
7Double-click your user folder. This is the folder with your username (or the first several letters of your username).
-
8Navigate to the iPhone Backups folder. To do this, click through the following folders:
- Double-click the AppData folder.
- Double-click the Roaming folder.
- Double-click the Apple Computer folder.
- Double-click the MobileSync folder.
- Double-click the Backup folder.
-
9Find the most recent backup. The easiest way to do this is by right-clicking a blank space in the window, selecting the Sort by option in the resulting drop-down menu, and clicking Date modified in the pop-out menu. This will place the most recent backup at the top of the window (or in the upper-left corner of the window if the files aren't arranged in a list format).
-
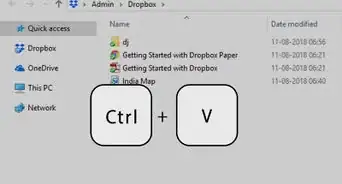
10Click and drag the backup folder into the Dropbox window. Since the backup "file" is really a folder that contains a collection of more folders, you'll have to drag the file into the Dropbox window rather than uploading it from within Dropbox.
- You can lock the File Explorer window next to the Dropbox window by clicking and dragging the top of the File Explorer window to the far-left side of the screen, dropping it there, and selecting the window in which Dropbox is located.
-
11Wait for the backup to finish uploading. This may take several hours, so make sure that your computer is plugged in and has a sturdy Internet connection. Once the upload is complete, you can close the Dropbox window.
- If you need to download the backup file at any time, click ⋯ to the right of the file's name in Dropbox, then click Download in the resulting menu.


Uploading the Backup File to Dropbox on Mac
-
1Switch to the Desktop or the Finder. This will prompt the Go menu item to appear at the top of your Mac's screen.
-
2Hold down ⌥ Option and click Go. Doing so prompts a drop-down menu with the Library item in it.
-
3Click Library. It's near the bottom of the Go drop-down menu.
- If you stop holding down the ⌥ Option key, the Library folder will disappear.
-
4Navigate to the Backup folder. To do so:[1]
- Double-click the Application Support folder.
- Double-click the MobileSync folder.
- Double-click the Backup folder.
-
5Find the most recent backup. Look for the folder with the current day's date next to it; this is the most recent backup.
-
6Click and drag the backup folder into the Dropbox window. Since the backup "file" is really a folder that contains a collection of more folders, you'll have to drag the file into the Dropbox window rather than uploading it from within Dropbox.
-
7Wait for the backup to finish uploading. This may take several hours, so make sure that your computer is plugged in and has a sturdy Internet connection. Once the upload is complete, you can close the Dropbox window.
- If you need to download the backup file at any time, click ⋯ to the right of the file's name in Dropbox, then click Download in the resulting menu.


Backing up Individual iPhone Files
-
1
-
2Open Dropbox. Once Dropbox finishes downloading, tap OPEN to the right of its heading in the App Store. Alternatively, tap the Dropbox app icon, which resembles a white, open box on a dark-blue background.
-
3Log into your Dropbox account. Tap Sign In near the bottom of the page, then enter your Dropbox email address and password.
- You'll need to tap Continue with Basic if prompted before continuing.
-
4Tap Create. It's a + icon at the bottom of the screen. A pop-up menu will appear.
-
5Select an upload option. Tap one of the following options in the pop-up menu:
- Upload Photos - Allows you to upload photos from your iPhone's Photos app.
- Create or Upload File - Allows you to upload a non-picture file (e.g., a PDF) from your iPhone's Files app.
-
6Select files to upload. If you're uploading photos, tap each photo that you want to upload to select multiple ones.
- If you tapped Create or Upload File in the last step, you'll first need to tap Upload File and then tap Browse in the menu.
-
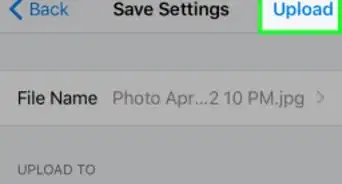
7Upload the files. Tap Next in the top-right corner of the screen (photos only), then tap Upload in the top-right corner of the screen. Your files will begin uploading to Dropbox.


Community Q&A
-
QuestionHow do i backup photos to a particular folder from my iPhone?
 Community AnswerYou should have the iCloud backup feature turned on in settings. If it doesn't work, all you can do is download Google Photos from the app store and back them up in there for free and then transfer them onto any device.
Warnings
- There is no way to back up your iPhone directly to Dropbox in the same way in which you back up your iPhone to iCloud or your computer.⧼thumbs_response⧽
- It's best to upload files to Dropbox over a Wi-Fi connection rather than over cellular data.⧼thumbs_response⧽