X
This article was co-authored by wikiHow staff writer, Jack Lloyd. Jack Lloyd is a Technology Writer and Editor for wikiHow. He has over two years of experience writing and editing technology-related articles. He is technology enthusiast and an English teacher.
This article has been viewed 299,980 times.
Learn more...
This wikiHow teaches you how to add a repeating line of text to the top of each page of a Microsoft Word document.
Things You Should Know
- Adding a header in Microsoft Word will add text to the top of your pages.
- When adding a header, you can choose between pre-made templates or blank.
- In Header settings, you can toggle "Different First Page" and "Header Position".
Steps
Part 1
Part 1 of 2:
Adding a Header
-
1Open Microsoft Word. It's a blue app with a white "W" on it.
- You can also open an existing document by double-clicking it.
-
2Click Blank Document. This will open a new document in Word.Advertisement
-
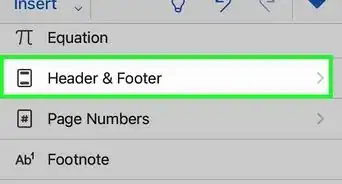
3Click the Insert tab. You'll see it near the top of the Word window, directly to the right of the Home tab.
-
4Click Header. It's in the "Header & Footer" section that's on the right side of the row of options near the top of the screen. You'll see a list of header options in a drop-down menu.
- These options will vary depending on your Office subscription type and version of Word.
-
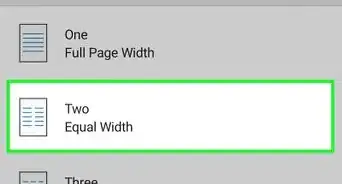
5Click a header option. In most cases, you'll just click the Blank option, since it will apply to the majority of Word documents necessitating a header. Selecting an option will add it to your document.
-
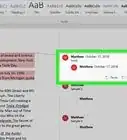
6Type in your header's text. This is the text that will appear at the top of every page.
-
7Click Close Header and Footer. Doing so will apply it to your document; you'll see your header text at the top of each page.


Advertisement
Part 2
Part 2 of 2:
Editing Header Settings
-
1Double-click your header text. Doing so will open the Header options menu in the bar near the top of the Word window.
-
2Review the header's basic settings. There are a couple of aspects of the header that you can edit in the "Options" and "Position" sections:
- Different First Page - Check this box to customize your document's first page's header. It will appear different than the header on the rest of the pages.
- Header Position - Change the number in the "Header from Top" box to raise or lower the header's position on the page.
-
3Click and drag your cursor across the header text. This will select it, which will allow you to modify it as needed.
- If you're using the "Different First Page" option, you'll need to do this on a page other than the first for your changes to apply across your document (first page aside).
-
4Click the Home tab. Doing so will allow you to edit the header by using options in the following sections:
- Font - Edit your text's font, size, color, and general formatting (e.g., bolding or underlining).
- Paragraph - Change your header's orientation (e.g., centered).
-
5Double-click the "Header" tab. It's below your header's text; doing so will save your changes and close the header section.


Advertisement
Community Q&A
-
QuestionHow do I make the header show up in the document?
 Community AnswerTo make a header appear, double-click (left mouse key) the highest part of the "page" and a new box will appear, with a dotted line indicating the "header" boundaries. You can then select the font/sizing/etc. for the header. When you've finished writing your header, double-click (left mouse key again) to return to the normal page, and leave the header at the top. Note that the header will fade out slightly and will seem to have a greyish tint. Your header will appear at the top of every page.
 -
QuestionHow can I have page numbers inserted sequentially?
 Community AnswerOnce you add page numbers in the header options, they will automatically be inserted sequentially.
 -
QuestionHow do I add another header in Microsoft Word if I already have one?
 Community AnswerGo to the "Design" tab in the menu across the top. You'll see an option to "Link to Previous." That is where you turn headers on and off.
Advertisement


About This Article
Jack Lloyd
wikiHow Technology Writer
This article was co-authored by wikiHow staff writer, Jack Lloyd. Jack Lloyd is a Technology Writer and Editor for wikiHow. He has over two years of experience writing and editing technology-related articles. He is technology enthusiast and an English teacher. This article has been viewed 299,980 times.
How helpful is this?
Co-authors: 16
Updated: October 25, 2022
Views: 299,980
Categories: Microsoft Word
Article SummaryX
1. Open a new or existing document in Microsoft Word.
2. Click Insert.
3. Click Header.
4. Click a header template.
5. Enter your preferred text.
6. Click Close Header and Footer.
Did this summary help you?
Advertisement