This article was co-authored by wikiHow Staff. Our trained team of editors and researchers validate articles for accuracy and comprehensiveness. wikiHow's Content Management Team carefully monitors the work from our editorial staff to ensure that each article is backed by trusted research and meets our high quality standards.
There are 14 references cited in this article, which can be found at the bottom of the page.
This article has been viewed 53,786 times.
Learn more...
There are lots of ways in which to make baskets, from willow to rope. The simplest basket to make, however, is the woven basket. Starting with an easy-to-work-with material, such as paper, will help you understand the process. Once you get the hang of it, you can move on to more complex baskets made from willow or reed.
Steps
Creating the Bottom
-
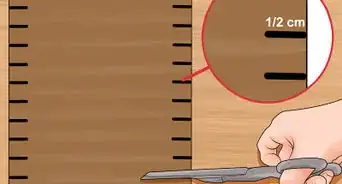
1Cut colored paper into eight 14 by 1 in (35.6 by 2.5 cm) strips. Use a ruler to make the strips nice and straight. They can be all 1 color, or they can be 2 different colors. For example, you could have 4 pink strips and 4 blue strips. This will be enough to make a small, 4 in (10 cm) square basket. You can cut more strips to make a larger basket.[1]
- If you are making a larger basket, cut 2 extra strips for every 1 inch (2.5 cm) that you would like to add.
- Construction paper will work the best, but you can also use thin plastic sheets, cardstock, felt, or thin cardboard.
- These methods won't work well for reed or willow because you need to prepare those materials differently.
-
2Arrange 4 strips side-by-side vertically. If you used 2 different colors, arrange them in an alternating pattern. For example: pink-blue-pink-blue. Make sure that the strips are almost touching. You will be adjusting the strips later on to eliminate any gaps.[2]
- You want just a sliver of space between the vertical strips because this will make weaving the horizontal strips through them easier.
- If you are making a larger basket, then add more vertical strips. For example, if you want a 5 in (13 cm) basket, then use 5 vertical strips total.
Advertisement -
3Weave a fifth strip horizontally across the 4 vertical strips. Take 1 of your remaining 4 strips, then weave it over and under across the 4 vertical strips. Try to position it as close to the center of the vertical strips as possible.[3]
- Make sure that the horizontal strip is centered, too; you want an equal amount of paper sticking out to the first and last vertical strip.
-
4Repeat the process with the remaining 3 strips. If you used 2 colors for your strips, be sure to alternate them here as well. For example, if you used blue in your previous row, continue with a pink-blue-pink pattern.[4]
- If you are making a larger basket, then continue to add horizontal strips. For example, if you're making a 5 in (13 cm) basket, then add a fifth horizontal strip.
-
5Adjust the strips so that everything is centered and even. Slide the vertical strips closer together so that they are all touching. Next, slide the horizontal strips so that they are halfway down the vertical strips; make sure that they are touching as well. You will end up with a grid in the middle of your woven strips.
- There should be an equal amount of paper on each side of the grid.
-
6Glue down the corners on the grid. Starting at the top-left corner, lift the paper to expose the strip beneath it. Put a dab of glue on the bottom strip, then press the upper strip back down. Work your way around the grid until you are back where you started.[5]
- You just need to do the corners for right now. Don't worry about the top, bottom, and side edges.
- A glue stick will work just fine for paper, but if you are working with plastic or felt, hot glue will be the way to go.
-
7Fold the strips towards the center to create a box shape. Using the top edge of the grid as a guide, fold down the paper strips to crease them, then unfold them. Repeat this step for the remaining 3 sides of the grid. You'll end up with a sort of box shape.[6]
- Some of the strips may peel away from the bottom edge of your "box." Glue these down so that the edge is seamless.


Adding the Sides
-
1Cut four 18 by 1 in (45.7 by 2.5 cm) strips of paper. These should be all 1 color, but this can be different from the color(s) that you used to make the bottom of the basket. For example, if you used pink and blue previously, you could use purple here.[7]
- If you used more than 8 strips to make your base, count how many strips are on each edge, then add 2 inches (5.1 cm). This is how long your new strips should be in inches.
- If your paper is not long enough, tape or glue 2 strips together to make a longer strip.
- If you are making a bigger basket, then make 1 additional strip for every 1 inch (2.5 cm) of height.
-
2Mark and fold your first strip every 4 inches (10 cm). You will end up with four 4 in (10 cm) segments and one 2 in (5.1 cm) segment. These 4 segments will make the 4 sides of your basket. The 2 in (5.1 cm) segment will allow you to connect the strip into a square.[8]
- If you used more strips to make your basket, it will be larger. Count how many strips are on 1 side. This is how far apart your marks will be.
- If you are working with a longer strip for a larger basket, you still want 4 equal-sized segments and one 2 in (5.1 cm) segment.
-
3Overlap and glue the ends together to form a square. Your strip should already be forming a rough square or pentagon shape. Take the 2 ends of your strip, and overlap them until they form a square shape. Secure the square with tape or glue.[9]
- The end of your strip should nestle into the fold that comes just before the 2 in (5.1 cm) segment.
- This square will create the first row on all 4 sides of your basket.
-
4Repeat the process for the remaining 3 pieces. Make and fold the strips into four 4 in (10 cm) segments and one 2 in (5.1 cm) segment. Overlap and glue the ends to turn them into squares. When you are done, you'll have 4 paper squares, including the first one.
- Each square will create 1 row for your basket.
- If you made a bigger basket, make more squares. If you want a shorter basket, however, you can skip this.
-
5Weave the basket's strips through the first square. Set the first square down on top of the grid so that it's nestled inside the strips. Take every other strip, and pull them so that they are now on the outside of your square. Do this for all 4 sides of the square.[10]
- This will complete 1 row.
-
6Repeat the process, reversing which strips go on the outside. This means that the strips that were on the inside of the first square, should now be on the outside of the second square.[11]
- Continue adding paper squares and weaving your strips around them until you reach the top.
- Each square that you add will make your basket taller. If your basket reaches the height you want, then stop adding squares.


Finishing the Basket
-
1Glue the top edges of the vertical strips down to the last square. Starting on the outside, peel back the vertical strips. Place a dab of glue on the exposed horizontal row, then press the strip back into place. Repeat this step for the inside of the basket.[12]
- A glue stick will work just fine. If you choose to use liquid glue, secure the paper with a paper clip until it dries. Use hot glue for felt or plastic.
- Your basket has vertical strips and horizontal strips. The vertical strips come from the base and sides of the basket. The horizontal strips come from the squares you made.
-
2Trim the vertical strips that are sticking out over the top of the basket. When you first cut your paper, you made the vertical strips a little longer than necessary to allow room for weaving. As such, you may have some excess material sticking out over the top of your last row. Trim these strips down until they are flush with the last, horizontal row.[13]
-
3Cut one 18 by 1 in (45.7 by 2.5 cm) strip of paper for the handle. If you made your basket multiple colors, then you can choose any of these colors for the handle. If your basket is all 1 color, then match the handle color to the basket.[14]
- If you made a different sized basket, measure the height of your basket. Multiply it by 3, then add 2 inches (5.1 cm).
-
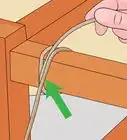
4Tuck the handle into the basket so that the ends touch the base. Place the left end of the handle against the left side of the basket, and the right end against the right side of the basket. Make sure that both ends of the handle are on the inside of the basket, then slide them down until they hit the bottom of the basket.[15]
- If the handle is too long, cut the ends shorter. If the handle is too short, move it upwards.
- Use tape or clothespins to temporarily secure the handle in place.
-
5Secure the handle with glue. Pull away 1 side of the handle, coat it with glue, then press it back into place. Repeat the process for the other side of the handle. Alternatively, you can just weave both ends of the handle through the strips in the basket.[16]
- A glue stick will work just fine here, but liquid glue will be even better. If you made a felt or plastic basket, use hot glue.
-
6Use the basket with care. Most baskets are pretty delicate to begin with, but homemade baskets are even more fragile. Unless your basket is made from plastic or foam, you should avoid getting it wet. Also, don't carry anything too heavy inside your basket.
- A paper basket is great for kids' Easter baskets with plastic eggs.
- You can store heavier items in you basket, but you don't be able to carry your basket around; otherwise, it may break.


Community Q&A
-
QuestionHow can you make it waterproof?
 MichelleF2Community AnswerIf you are making the basket out of paper, it might be hard to make it waterproof. However, try buying a waterproofing spray, one meant for paper or perhaps even fabric.
 -
QuestionDo these baskets make a good choice for giving as a gift?
 LemonstersCommunity AnswerYes, these would be wonderful gifts. They would be good for people who want to look stylish, or just need something to keep things in. An optional suggestion is to put items in the basket when you hand it to them, such as chocolate, since it can help make the gift seem complete.
 -
QuestionCan I make it with ribbon?
 LemonBarCommunity AnswerYou can always try different materials, but ribbon might make it a little too too flimsy. Maybe use wire-edged ribbon and varnish to give it rigidity.
Things You'll Need
- Construction paper
- Ruler
- Scissors
- Glue


References
- ↑ https://www.youtube.com/watch?v=sEgEKwHOKSQ&feature=youtu.be&t=44s
- ↑ https://www.youtube.com/watch?v=sEgEKwHOKSQ&feature=youtu.be&t=1m33s
- ↑ https://www.youtube.com/watch?v=sEgEKwHOKSQ&feature=youtu.be&t=1m39s
- ↑ https://www.youtube.com/watch?v=sEgEKwHOKSQ&feature=youtu.be&t=1m44s
- ↑ https://www.youtube.com/watch?v=sEgEKwHOKSQ&feature=youtu.be&t=2m33s
- ↑ https://www.youtube.com/watch?v=sEgEKwHOKSQ&feature=youtu.be&t=2m48s
- ↑ https://www.youtube.com/watch?v=sEgEKwHOKSQ&feature=youtu.be&t=44s
- ↑ https://www.youtube.com/watch?v=sEgEKwHOKSQ&feature=youtu.be&t=3m17s
- ↑ https://www.youtube.com/watch?v=sEgEKwHOKSQ&feature=youtu.be&t=3m54s
- ↑ https://www.youtube.com/watch?v=sEgEKwHOKSQ&feature=youtu.be&t=4m24s
- ↑ https://www.youtube.com/watch?v=sEgEKwHOKSQ&feature=youtu.be&t=4m50s
- ↑ https://www.youtube.com/watch?v=sEgEKwHOKSQ&feature=youtu.be&t=6m5s
- ↑ https://www.youtube.com/watch?v=sEgEKwHOKSQ&feature=youtu.be&t=6m41s
- ↑ https://www.youtube.com/watch?v=sEgEKwHOKSQ&feature=youtu.be&t=44s
- ↑ https://www.youtube.com/watch?v=sEgEKwHOKSQ&feature=youtu.be&t=6m44s
- ↑ https://www.youtube.com/watch?v=sEgEKwHOKSQ&feature=youtu.be&t=6m50s
About This Article

To weave a simple basket, start by cutting some colored paper into 8 strips. Make each strip 14 inches (35.5 centimeters) long by 1 inch (2.5 centimeters) wide. To make your basket look more interesting, use 2 different colors of paper and cut an equal number of strips of each color. Lay out 4 of the strips side by side, vertically. If you’re using different colors of paper, alternate the colors. Next, weave another strip of paper horizontally across the 4 strips, going over the first strip, under the next, and so on. Position this strip about midway between the tops and the bottoms of the 4 vertical strips. Repeat the process with the other 3 strips, but alternate the pattern. For instance, if you started your first row by going over one of the vertical strips, start the second by passing under that same strip. If you’re using different colors, make sure to alternate these as well. Carefully adjust the strips so that they’re all straight, centered, and touching each other. You should have a nice square grid at the middle of your set of woven strips. Next, lift up the top strip at each corner of the grid and add a dab of glue to fasten it down to the strip underneath. Fold up the ends of the strips around the central grid to create a box shape. Now it’s time to make the sides of the basket. Cut out 4 more strips of paper, and make each one 18 inches (45.7 centimeters) long by 1 inch (2.5 centimeters) wide. Again, you can use alternating colors if you like. Make a mark every 4 inches (10 centimeters) along each strip, then fold the strip at each of these marks to make a square. You should have an extra “tail” of paper at one end that you can fold down and glue in place to close the square. Do this with all 4 of your side pieces. Weave the strips that form the sides of the basket around the first square, so that they alternate passing in front of it and behind it. Carefully push the square down so that it rests flush against the bottom of the basket. Repeat this process with the other 3 squares, alternating which strips pass behind or in front of each square. Fasten the vertical strips to the top square with dabs of glue, then cut off any extra paper that’s sticking up over the top edge of the square. To make a handle, cut out another 18 by 1 inch (45.7 by 2.5 centimeter) strip of paper and tuck the ends into the basket on each side so that they touch the base on the inside of the basket. Glue the ends of the handle in place, and your basket is all done! To learn how to add a handle to your basket, read on!