This article was co-authored by Lois Wade. Lois Wade has 45 years of experience in crafts including sewing, crochet, needlepoint, cross-stitch, drawing, and paper crafts. She has been contributing to craft articles on wikiHow since 2007.
There are 7 references cited in this article, which can be found at the bottom of the page.
wikiHow marks an article as reader-approved once it receives enough positive feedback. In this case, 96% of readers who voted found the article helpful, earning it our reader-approved status.
This article has been viewed 468,235 times.
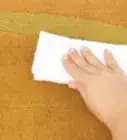
You can find rugs in just about every room in the home, from kitchens to bathrooms, bedrooms to offices. They wear out quickly, however, and there's no guarantee that you'll find the perfect rug in a store. Luckily, it is easy to make a rag rug. From braided to woven, there are lots of ways to make a rug. Best of all, they are all eco-friendly too!
Steps
Making a Shag Rug
-
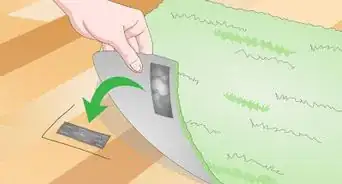
1Get a non-slip, rubber rug mat. It is a rubber mesh-like mat that people place under rugs to keep them from slipping. You can usually find them alongside the other rug-making supplies in an art store, or in the home-improvement section of a store.
-
2Cut the mat down to the desired size. Non-slip rubber mats for rugs come in rolls, so you will need to cut yours down to the right size. You can make your rug a square or a rectangle. You can even cut it into a shape, such as a crescent moon or heart.[1]Advertisement
-
3Cut your fabric into thin strips. Stack several pieces of cotton fabric together, then cut it into 1 by 5-inch (2.54 by 12.7-centimeter) strips. You can use all one color, but using two or three will make your rug look more interesting.[2]
- Consider using one solid color and one coordinating pattern.
- Using a rotary cutter will make cutting the fabric strips faster and easier.
-
4Pull a fabric strip through two of the holes in the mat. Use a pair of tweezers to pull the fabric strip down through one hole and out the other. Make sure that the strip crosses under the corner between two squares; don't cross it under the actual square itself.
-
5Tie the two ends of the strip together, if desired. You don't have to do this, but it will make your rug more durable and prevent the strips from falling out.
-
6Repeat the process for the rest of the holes and strips until the rug is filled. Start at one end of the rug and work your way to the other in rows. If you are making a shape, such as a heart, start at the center of the rug and work your way outward.[3]


Sewing a Shaggy Rug
-
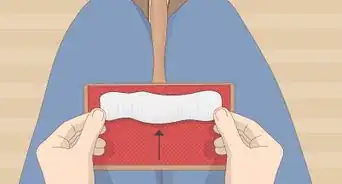
1Choose fabric to use as your base and as your scraps. Your base fabric should be sturdy and already cut to the size and shape you want your rug to be. A towel will work great for this, but you can also use canvas. For your scrap fabric, choose something that doesn't fray much, such as jersey or cotton.
- If your base fabric isn't hemmed, take a moment to do so now.
- Your scrap fabric doesn't have to match. Try using coordinating patterns and colors!
-
2Draw parallel guidelines on your base fabric, then set it aside. The lines should run across the width of your fabric. The closer together you make these lines, the denser your rug will be; keep in mind that you'll also need to use more fabric as well. About 1 inch (2.54 centimeters) apart would be a good place to start.[4]
- Use a dressmaker's pen and a ruler for this. The lines will disappear when you wash the fabric.
- If you are making a round or oval rug, draw rings inside the rug, like ripples, instead.
- Do not draw guidelines on your scrap fabric.
-
3Cut your scrap fabric into small, skinny rectangles. You will be sewing these onto a larger piece of fabric to make a shaggy rug. The rectangles can be whatever size you want them to be, but 4 by 1 inches (10.16 to 2.54 centimeters) is a good place to start.[5]
- Cut your fabric a few pieces at a time. They way, the rectangles will all come out the same size.
-
4Lay down the first few fabric scraps across the first parallel line. The scraps need to be centered on the line, so that you have 2 inches (5.08 centimeters) sticking out to each side. Overlap each scrap by a small amount—no more than ¼ inch (0.64 centimeter).[6]
- The first scrap needs to be right up against the edge of the base fabric.
-
5Sew the scraps down using your sewing machine. Use a straight stitch and a thread color that either matches your base fabric or coordinates with the scraps. Backstitch across the first scrap a few times, then sew straight down, using the parallel line as a guide.[7]
-
6Add a few more scraps and continue sewing. Keep adding and overlapping scraps to the parallel line until you reach the bottom of the rug. Backstitch a few times across the last scrap. Trim off the excess thread.
-
7Fold the scraps to the side to reveal the next parallel line. If you started on the left side of the rug, you should fold the scraps to the left. If you started on the right side, you should fold them to the right. You have to do this to get the scraps out of the way. If you don't, you will accidentally sew them down when you do the next row.[8]
-
8Sew down the next row of scraps using the same method as before. Now that you have to scraps out of the way, sew down more scraps to the next parallel line. Remember to overlap them and to backstitch at the start and end of your sewing. When you finish that row, fold the scraps over and do the next one. Keep going until you reach the opposite end of the rug.[9]
-
9Finish the rug. Once you have all of the scraps attached, go over your rug and snip off any loose or hanging threads. Your rug is now ready to use!


Braiding a Rug
-
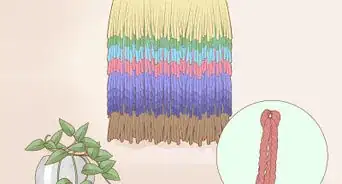
1Cut your fabric into strips. How wide you cut the strips is up to you, but they should all be the same width. Something around 1½ inches (cc centimeters) wide would be ideal.[10] You can use any type of fabric you want for this, but old bed sheets or t-shirts work exceptionally well.
-
2Knot three strips together at the top. Pin the strips to something that can hold them steady while you work, such as the couch. You can also secure a safety pin to the end, then use a hook to attach it to a cabinet knob or handle.[13]
-
3
-
4Join two strips together, as needed. Cut a slit in the end of the first strip, and the beginning of the next strip. Slide the end of the first strip into the slit of the second strip. Next, thread the rest of the second strip through the slit on the first strip. Tug on the two strips to tighten the knot.[15]
-
5Continue braiding until you get the size you want, then secure the end with a pin. Coil your braid into a circular spiral as you braid it. Once you get the size of rug you want, secure the strips together with a sewing pin or a safety pin. Cut off the excess strips.
-
6Fold the end of the braid onto itself and stitch it down. Go back to where you started the braid. Remove the safety pin, then fold the knot against the braid. Sew the knot to the braid by hand or using a large, loose zigzag stitch on your sewing machine.
- If you are using a sewing machine, backstitch at the start of your sewing.
-
7Sew the rug into a spiral. Begin to wrap the rug into a spiral, sewing the two edges together. Once again, you can do this by hand or on a sewing machine. If you are using a sewing machine, be sure to use a loose, large zigzag stitch.[16] When you reach the last 2 inches (5.08 centimeters), stop.
-
8Finish the rug by tucking and sewing the end down. Fold the end of the braid against itself by 1 inch (2.54 centimeters). Continue sewing the braid to the rest of the rug, sandwiching the end inside. Knot and snip the thread when you are done.
- If you are using a sewing machine, remember to backstitch at the end of your sewing.


Weaving a Rug
-
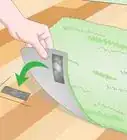
1Cut a piece of cardboard into a rectangle to use as a base. The rectangle needs to be 4 inches (10.16 centimeters) taller and 4 inches (10.16 centimeters) wider than you want the finished rug to be. It would be easiest if you use a box cutter, but you can use scissors too.
-
2Cut evenly-spaced slits into the narrow edges of the cardboard. Cut 2-inch (5.08-centimeter) long slits into the narrow ends of the cardboard. Start and finish making the slits 2 inches (5.08 centimeters) from the each side of your cardboard. Space the slits ½ inch (1.27 centimeters) apart the rest of the way. Use a ruler to make your lines nice and straight.
- Make sure that the top and bottom slits align.[17]
- You are leaving a 2-inch (5.08-centimeter) gap on both sides of the cardboard for strength and durability.
-
3Cut your fabric into strips. Cotton fabric from old (but clean!) bed sheets will work the best for this, but you can use other types too. Cut the fabric into 2-inch (5.08-centimeter) strips.[18]
- If you are using cotton, you can save time by cutting a notch into the fabric first, then tearing it.
- If you are repurposing a t-shirt, cut the strips in one, continuous strand, starting from the bottom hem and finishing under the armpits.[19]
-
4Insert both ends of your strips into each slit on the loom. Take your first strip. Place one end into the first slit on the top of the cardboard, and the other end on the first slit on the bottom. Do this for all of the slits.[20]
- Make sure that you have an even amount of fabric hanging out of the slits.
-
5Wrap a piece of tape around a new strip, and begin to weave it. Choose a new strip of fabric to begin weaving with. Wrap a piece of tape around the end (preferably masking) to make it nice and stiff. Weave it over and under across the vertical strips on your cardboard, starting from the left. When you get to the opposite (right) end, pull on the weaving strip until you have a 6-inch (15.24-centimeter) long tail.[21]
-
6Weave your way back to the left side. This time, weave in the opposite direction. If you finished weaving under on the first row, begin weaving over on the second row, and vice-versa. When you complete the second row, push it up against the first one so that it is straight and snug.[22]
- Don't pull, otherwise your rug will curve inward.
-
7Continue weaving back and forth, joining strips as needed. Cut a vertical slit into the end of your first strip, and the beginning of the next strip. Slide the end of the first strip into slit of the second strip. Next, pull the entire second strip through the slit on the first strip. Tug on the strips to tighten them.[23]
-
8Tie the ends of the weaving strips to the fringe when you are done. When you reach the bottom row of slits, stop. Cut your weaving strip until it is about 6 inches (15.24 centimeters) long. Pull the strip closest to the edge out of its cardboard slit, then tie the two together in a tight, double knot. Repeat the process for the top.
-
9Cut the fringes. Flip the loom over so that you can see the back. Hold the fringes down with one hand as you cut across them. How short you make them is up to you. Remember to trim the fringe that you tied to the weaving strips as well.
-
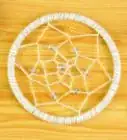
10Remove the rug from the loom. Your rug is now ready to use!


Crocheting a Rug
-
1Cut your fabric into 1-inch (2.54-centimeter) strips. Regular cotton fabric from a bed sheet will work the best. It would be even better if you use a duvet cover, however; this way you can cut the fabric in one, continuous strip.[24]
- If you are using old t-shirts, cut the fabric in one continuous strip, starting from the bottom hem.
-
2Join the fabric strips together. Cut a vertical slit into the end of one strip, and the beginning of another. Slide the end of the first strip through the slit on the second strip. Push the opposite end of the second strip through the slit on the first strip. Pull on the second strip to tighten the knot.[25]
- Do this for all of your strips until you have one, continuous strip.
- Roll your strip into a ball to prevent it from tangling.
- If you cut the fabric in one continuous strip, you don't have to do this.
-
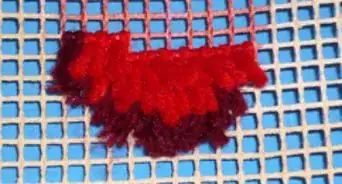
3Create a magic circle with 6 single crochets inside of it. If you don't know to how to do a magic circle, do 2 chain stitches, then 6 single crochets into the second chain. Join the first and last single crochets with a slip stitch.[26]
- Use the large, chunky crochet hooks meant for t-shirt yarn.
- For this method, the last slip stitch does not count as a stitch.
-
4Do a single crochet increase in each stitch. Begin round 2 with a chain stitch. Next, do 2 single crochets in each stitch. Join the first and last stitches together with a slip stitch.[27]
-
5Do a single crochet increase in every other stitch. Begin round 3 with a chain stitch. Do 2 single crochets in the first stitch, and 1 single crochet in the next. Repeat this pattern for the rest of the round. Join with a slip stitch.[28]
-
6Continue making rounds with increasing stitches until you get your rug size. Always begin your rounds with a chain stitch. Follow up with 2 single crochets in the first stitch. Next, increase the number of single crochets with each round. Close each round with a slip stitch. For example:[29]
- Round 4: Ch 1, 2 sc in first stitch, 1 sc for next 2 stitches, repeat for round, then join with sl st.
- Round 5: Ch 1, 2 sc in first stitch, 1 sc for next 3 stitches, repeat for round, then join with sl st.
- Round 6: Ch 1, 2 sc in first stitch, 1 sc for next 4 stitches, repeat for round, then join with sl st.
-
7Finish your rug with a single crochet in every stitch. Begin with a chain stitch. Do 1 single crochet into every stitch. Join the first and last single crochets with a slip stitch. Do a final chain stitch, then tie the end off. Cut off any excess fabric yarn.[30]
-
8Weave the tail ends of the fabric into the rug. It would be easiest to do this with a smaller crochet hook. Weave in the tail on the outer edge of the rug first, then do the center.[31]


Community Q&A
-
QuestionHow do I keep the material from coming untied? I made one for my granddaughter, and it is coming untied.
 Community AnswerMaybe you cut the strips too short, so they pull out. It might be that you didn't weave in the strips closely enough, as it is the bulk of the fabric tightly packed together that helps keep them all in place. At this point, post-manufacture; the only remedy is to add more strips to make it denser, or to tie or sew the strips in.
 -
QuestionHow can I determine the finished size and shape when making a rectangular rug or large oval rug?
 Community AnswerThere is no right answer. It all depends on what type of fabric you use and the method. Don't be afraid to just go for it. If it's too small, you now know that the next time you make it, you'll make it larger or longer.
 -
QuestionHow do I edge my rag rug?Community AnswerA braided or crocheted rug needs no edging. The other rugs will need something to finish. Usually rugs are finished by sewing on strips of fabric. Traditionally this was hessian (the same fabric that was used for the base of a shag rug), but you can use cotton or toweling. Cut two long strips of around two inches by the length of your rug and two strips that are two inches by the width. Fold over the end of a strip so the raw edge is just inside, and sew it onto the last 3/4" of fabric on the 'best' side. Then tuck it over the edge of the rug, fold in the other edge of the strip, and sew it onto the underside.
Things You'll Need
Making a Shag Rug
- Non-slip rubber rug mat
- Fabric scissors
- Cotton fabric
- Tweezers
Sewing a Shaggy Rug
- Towel or canvas fabric
- Cotton or jersey fabric
- Fabric scissors
- Fabric pen
- Ruler
- Thread
- Sewing machine
Braiding a Rug
- Cotton or jersey fabric
- Fabric scissors
- Thread
- Sewing machine
- Safety pin
Weaving a Rug
- Cardboard
- Box cutter or scissors
- Cotton or jersey fabric
- Fabric scissors
Crocheting a Rug
- Cotton or jersey fabric
- Fabric scissors
- Large crochet hook (for t-shirt yarn)


References
- ↑ https://www.youtube.com/watch?v=kDSJ6hFaxFI
- ↑ https://www.youtube.com/watch?v=PRbDabb_mEk
- ↑ https://www.youtube.com/watch?v=kDSJ6hFaxFI
- ↑ https://diyprojects.com/craft-ideas-diy-rag-rug/
- ↑ https://diyprojects.com/craft-ideas-diy-rag-rug/
- ↑ https://diyprojects.com/craft-ideas-diy-rag-rug/
- ↑ https://diyprojects.com/craft-ideas-diy-rag-rug/
- ↑ https://diyprojects.com/craft-ideas-diy-rag-rug/
- ↑ https://diyprojects.com/craft-ideas-diy-rag-rug/
- ↑ http://www.littlehouseliving.com/how-to-make-rag-rugs.html
- ↑ http://www.littlehouseliving.com/how-to-make-rag-rugs.html
- ↑ https://www.apieceofrainbow.com/make-rag-rug-from-old-t-shirts/
- ↑ http://www.littlehouseliving.com/how-to-make-rag-rugs.html
- ↑ http://www.littlehouseliving.com/how-to-make-rag-rugs.html
- ↑ https://www.apieceofrainbow.com/make-rag-rug-from-old-t-shirts/
- ↑ http://www.littlehouseliving.com/how-to-make-rag-rugs.html
- ↑ http://abeautifulmess.com/2014/04/make-your-own-woven-rag-rug.html
- ↑ http://abeautifulmess.com/2014/04/make-your-own-woven-rag-rug.html
- ↑ https://www.apieceofrainbow.com/make-rag-rug-from-old-t-shirts/
- ↑ http://abeautifulmess.com/2014/04/make-your-own-woven-rag-rug.html
- ↑ http://abeautifulmess.com/2014/04/make-your-own-woven-rag-rug.html
- ↑ http://abeautifulmess.com/2014/04/make-your-own-woven-rag-rug.html
- ↑ https://www.apieceofrainbow.com/make-rag-rug-from-old-t-shirts/
- ↑ http://www.lookatwhatimade.net/crafts/yarn/crochet/crochet-tutorials/how-to-crochet-a-round-rag-rug/
- ↑ https://www.apieceofrainbow.com/make-rag-rug-from-old-t-shirts/
- ↑ http://www.lookatwhatimade.net/crafts/yarn/crochet/crochet-tutorials/how-to-crochet-a-round-rag-rug/
- ↑ http://www.lookatwhatimade.net/crafts/yarn/crochet/crochet-tutorials/how-to-crochet-a-round-rag-rug/
- ↑ http://www.lookatwhatimade.net/crafts/yarn/crochet/crochet-tutorials/how-to-crochet-a-round-rag-rug/
- ↑ http://www.lookatwhatimade.net/crafts/yarn/crochet/crochet-tutorials/how-to-crochet-a-round-rag-rug/
- ↑ http://www.lookatwhatimade.net/crafts/yarn/crochet/crochet-tutorials/how-to-crochet-a-round-rag-rug/
- ↑ http://www.lookatwhatimade.net/crafts/yarn/crochet/crochet-tutorials/how-to-crochet-a-round-rag-rug/
About This Article

To braid a rag rug, first cut your fabric into strips of equal width. Knot 3 strips together at the top, then braid the strips, crossing the left and right over the middle repeatedly. Continue adding strips to your braid by cutting a slit into the end of one strip and slicing another slit into the beginning of the new strip. Slide the end of the first strip into the slit of the second and thread the rest of the second through the slit on the first. As you work, coil your braid into a circular spiral. Then, when your rug is the right size, sew the coiled edges together and tack down the ends. If you want to learn how to crochet or knit your rag rug, keep reading the article!