This article was co-authored by Landis Owens and by wikiHow staff writer, Janice Tieperman. Landis Owens is a Personal Trainer and the Owner of Almighty Personal Training Studio in Tempe, Arizona. With over 15 years of experience in the health and fitness industry, Landis specializes in weight loss, nutrition, and core and strength training. Landis received a football scholarship to Mesa Community College where he studied Engineering and Sports and Exercise. He is an ISSA Certified Personal Trainer and also holds certifications in Nutrition, Youth Sports, Injury Stay Free, and CPR. Landis also competes in bodybuilding competitions.
There are 24 references cited in this article, which can be found at the bottom of the page.
This article has been viewed 22,126 times.
Not to be mistaken with stationary bikes, spin bikes use a spinning wheel to recreate the feeling of riding on an outdoor bike.[1] Spin bikes are easy to use, and offer a lot of different exercise options, regardless of your fitness level. Once you’ve adjusted your bike to a comfortable position, you can put your best foot (or pedal) forward as you embark on your workout!
Steps
Setup
-
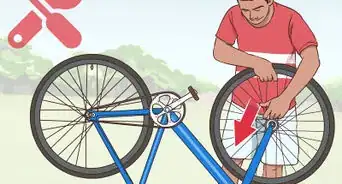
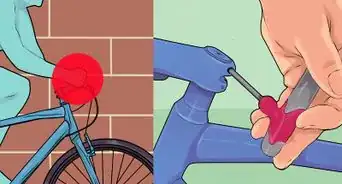
1Line the bike saddle up with your hips. Stand next to your bike and see how high up it goes. For a smooth, comfortable ride, your spin bike saddle should be around hip-level.[2] If your bike isn’t the right height at first, that’s okay! Use the pop-pin on your bike to lift the saddle higher or lower.[3]
-
2Sit on the seat so your legs are slightly bent. Extend your legs down to the pedals. If your legs are completely straight, adjust the seat down a notch so you can ride more comfortably.[4]Advertisement
-
3Lift your seat up if your knee bends too much while you pedal. Do a practice spin with your pedals, focusing on your knees as you go. If your leg bends a lot during the rotation, lift up your seat a notch or 2.[5]
- It may take a few minutes before you find the sweet spot on your spin bike. That’s totally fine!
-
4Adjust the saddle forward or backward so your toes and knees are in line. Sit on your bike saddle and check your lower legs. If your knee leans over your toes, adjust the seat backwards until your leg is straight.[6]
-
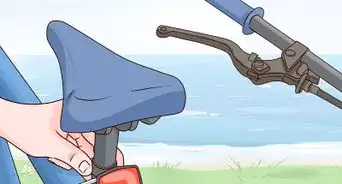
5Raise or lower the handlebar height so your back stays straight. Sit at your spin bike with the handlebars at their current height. Can keep your back straight in this position, or does your back tend to arch? Lift or lower the handlebars until you can sit comfortably without putting any extra strain on your back.[9]
- You can adjust the handlebars using a pop-pin.[10]
-
6Double-check all the changes you’ve made to your spin bike. Double-check all the pins and knobs on your bike to see if they’re secure. You don’t want your saddle or handlebars shifting while you’re in the middle of a workout![11]
-
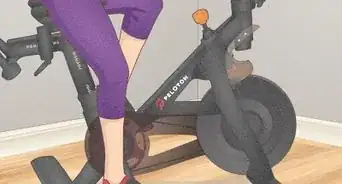
7Strap your shoes in the pedals. Plant both feet firmly into each pedal so you don’t slip or slide during the workout. With many bikes, you can clip or strap your shoes into the pedals so they stay put.[12]
-
8Turn the resistance knob to make your workout more or less intense. Take a peek beneath the handlebars, where you’ll find a small knob. This will control the resistance of your workouts. Shift the knob to the right to raise the resistance, which will make your workout a bit more intense. Move the knob left to lower the resistance levels.[13]


Posture
-
1Bend your arms slightly and hold onto the handlebars gently. Don’t be too rigid while you’re riding a spin spike. Instead, keep your elbows slightly bent, and keep your shoulders relaxed. Try to stay nice and relaxed on your spin bike so you can have a smooth, comfortable ride.[14]
-
2Seat yourself on the widest part of the saddle. This part of the spin bike is cushioned, and designed to keep you comfortable and supported throughout your ride. During your workout, scoot yourself back once in a while to make sure you’re sitting on the widest part of the seat.[15]
-
3Lean toward your handlebars at a 45-degree angle with your back straight. Leave your shoulders relaxed, arranging your hands on the handlebars as you go. Double-check that you’re still sitting on the widest part of the saddle—if you’re too far forward, your back may curve and hunch, which isn’t good for your body.[16]
-
4Tighten your abs to maintain your balance. Like a traditional bike, a spin bike doesn’t come with any kind of seat back or support to keep you upright during your ride. Instead, engage your abs so you can stay balanced throughout your workout.[17]
- Think of it this way—if someone gave you a light nudge, would you keep your balance, or would you fall off the bike?
-
5Guide the pedals through each rotation instead of just pushing them. It can be tempting to just push on the pedals with your feet, but this isn’t a very efficient way to exercise. Your foot straps are there to help! Use your feet to pull the pedals through each rotation, instead of just pushing the pedals along—this way, you’ll be giving both your quads and hamstrings a great workout, instead of just your quads.[18]


Hand Positions
-
1Hold your hands at the center of the handlebars to create hand position 1. Your spin bike handlebars look like a huge “U” shape. In hand position 1, hold both hands along the bottom-center section of the “U,” toward the middle of the handlebars.[19]
- This hand position is great for simple bike rides, where your focus is on building stamina and strength.[20]
-
2Place your hands on opposite ends of the handlebars to form hand position 2. Place your hands on opposite sides, keeping them on the bottom row of the handlebars. At this point, you shouldn’t be touching the vertical sides of the bars.[21]
- This hand position is a bit more versatile, and used for a variety of different positions and techniques.
-
3Form hand position 2.5 by placing your hands on the bottom of the vertical handles. Shift your hands onto the vertical sides of the handlebars, keeping them toward the bottom.[22]
- This is a popular option for more intense riding positions, like jumps and climbs.
-
4


Seat Positions
-
1Perform the seated flat with your hands in positions 1, 2, or 2.5. Hold onto the bottom row of your handlebars; since you’re staying seated, you don’t need to use hand position 3. Seat yourself along the wide, cushioned part of the bike saddle, keeping your torso loose and relaxed. Don’t grip the handlebars too tightly—just use them as a support during your workout.[25] Whenever you do the seated flat, try to complete around 80-110 RPMs.[26]
- Whenever you use a spin bike, choose a resistance level that provides a good challenge without leaving you completely worn out.[27]
-
2Hold your hand in positions 2 or 2.5 to do the seated climb. The seated climb is very similar to the seated flat position—the main difference is that you increase the resistance gradually throughout the exercise, as though you’re riding up a hill.[28] Continue sitting comfortably on the widest part of the bike saddle, leaving your upper body loose and relaxed.[29] Since this exercise requires a bit more resistance, aim for 60-80 RPMs.[30]
- It may help to have a spin instructor guide you through the changes in your resistance level.
-
3Keep your hands in positions 2 or 2.5 to perform the standing flat. Pull yourself off the bike saddle, keeping your knees slightly bent as you stand on the bike. As you transition, turn up the resistance level so you don’t slip or lose your balance.[31] During this exercise, aim for 80-110 RPMs.[32]
-
4Put your hands in position 3 and lift yourself up to do the standing climb. Grip the ends of the handlebars to situate yourself in hand position 3.[33] Then, lift yourself up and off the seat into a standing position. Lean forward slightly, tightening your glutes and core muscles. Maintain a loose, relaxed grip on the handlebars and keep your hips pressed back.[34] While you’re in the standing climb, aim to complete 60-80 RPMs on your bike at a higher resistance level.[35]
-
5Move from sitting to standing with your hands in positions 2 or 2.5 to perform a jump. Don’t worry—you aren’t actually “jumping” on your bike during this exercise. Instead, start in a seated flat position before shifting into the standing flat position. Overall, aim for 80-110 RPM during this type of exercise.[36]
- Jumps are typically done in even intervals. For instance, you might sit for 4 beats, and then “jump” to a standing position for another 4 beats.[37]


Workouts
-
1Burn lots of calories with a 30-minute speed-based workout. Start off in a standing position with your hands in third position, moving at a comfortable warm-up pace for 3 minutes. Transition to a 30-second sprint, and then shift into cycling at a comfortable pace for 30 seconds. Repeat this pattern for 6 minutes and shift back to a medium pace in third position for 3 minutes. Alternate the 30-second sprinting circuits and 3-minute cycling for 3 sets. Then, give yourself 3 minutes to cool down at a slow, comfortable pace.[38]
- If you're just beginning, try to hit 20 minutes if you can't go for the full 30.[39]
-
2Push your limits with a 45-minute endurance workout. Wait until you're at an intermediate level before doing a longer spin workout.[40] Ride at an easy, comfortable pace for about 5 minutes, and move into a 1-minute push with 80-100 RPMs. Recover for 30 seconds, and bike for 90 seconds at 90 RPMs. Recover again, and do a 2 minute cycle for 80 RPMs. Catch your breath for 5 minutes, and repeat the 60, 90, and 120 second circuits 3 more times.[41]
- At the end of this exercise, give yourself at least 5 minutes to cool down at an easy pace.
- As you get more experienced, try increasing your time up to 1 hour.[42]
-
3Push yourself with a 23-minute tabata ride. Bike for 5 minutes at a light, comfortable pace. Then, do 8 tabata reps where you sprint for 20 seconds and recover at a light pace for 10 seconds. Transition to 5 minutes of riding at a steady pace. Once again, do 8 more tabata reps with 20 seconds of hard biking and 10 seconds of recovery. Cool down for 5 minutes at the end of your workout.[43]
-
4Promote fat loss with a 15-minute bike ride. Give yourself 5 minutes to warm up. Ride for 5 minutes at a low resistance, and then ride for another 5 minutes at a higher resistance level. At the 10-minute mark in your workout, sprint for 20 seconds and recover for 10 seconds. Repeat this circuit 8 times to give yourself a great fat-burning workout. Once you’re done, cool down with a low resistance setting on your bike.[44]
- For a really quick workout, just do the sprinting and recovery circuit.


Warnings
- Increase your bike’s resistance whenever you shift to a standing position. This way, you won’t slip or lose your balance during the transition.[47]⧼thumbs_response⧽


References
- ↑ https://www.exercisebike.net/blog/stationary-bike-vs-spin-bike-how-do-they-differ/
- ↑ https://www.glamour.com/gallery/5-must-know-tricks-for-positioning-your-spin-bike/#1
- ↑ https://youtu.be/qhnWJ4G5JMA?t=21
- ↑ https://www.glamour.com/gallery/5-must-know-tricks-for-positioning-your-spin-bike/#3
- ↑ https://www.glamour.com/gallery/5-must-know-tricks-for-positioning-your-spin-bike/#3
- ↑ https://aaptiv.com/magazine/how-to-use-and-indoor-bikes
- ↑ https://www.glamour.com/gallery/5-must-know-tricks-for-positioning-your-spin-bike/#4
- ↑ https://youtu.be/csNeUKYBW0E?t=146
- ↑ https://aaptiv.com/magazine/how-to-use-and-indoor-bikes
- ↑ https://youtu.be/qhnWJ4G5JMA?t=161
- ↑ https://aaptiv.com/magazine/how-to-use-and-indoor-bikes
- ↑ https://aaptiv.com/magazine/how-to-use-and-indoor-bikes
- ↑ https://images-na.ssl-images-amazon.com/images/I/A1NT1QEuuNS.pdf
- ↑ https://m.youtube.com/watch?v=mcauZYlJfAg&t=2m20s
- ↑ https://m.youtube.com/watch?v=mcauZYlJfAg&t=0m33s
- ↑ https://m.youtube.com/watch?v=mcauZYlJfAg&t=1m1s
- ↑ https://www.besthealthmag.ca/best-you/fitness/mistakes-spin-class/
- ↑ https://aaptiv.com/magazine/how-to-use-and-indoor-bikes
- ↑ https://www.goodhousekeeping.com/health/fitness/g4914/where-to-put-hands-spin-class/
- ↑ https://maddogg-assets.s3.amazonaws.com/ed677e740693906a5996744bd8b46212c3241a72d03bfbe9ccc26d948466cbdc.pdf
- ↑ https://spinning.com/proper-form-101
- ↑ https://spinning.com/proper-form-101
- ↑ https://www.goodhousekeeping.com/health/fitness/g4914/where-to-put-hands-spin-class/
- ↑ https://maddogg-assets.s3.amazonaws.com/ed677e740693906a5996744bd8b46212c3241a72d03bfbe9ccc26d948466cbdc.pdf
- ↑ https://www.goodhousekeeping.com/health/fitness/g4914/where-to-put-hands-spin-class/
- ↑ https://maddogg-assets.s3.amazonaws.com/ed677e740693906a5996744bd8b46212c3241a72d03bfbe9ccc26d948466cbdc.pdf
- ↑ https://www.shape.com/fitness/tips/spinning-exercise-mistakes
- ↑ https://maddogg-assets.s3.amazonaws.com/ed677e740693906a5996744bd8b46212c3241a72d03bfbe9ccc26d948466cbdc.pdf
- ↑ https://www.goodhousekeeping.com/health/fitness/g4914/where-to-put-hands-spin-class/
- ↑ https://maddogg-assets.s3.amazonaws.com/ed677e740693906a5996744bd8b46212c3241a72d03bfbe9ccc26d948466cbdc.pdf
- ↑ https://www.goodhousekeeping.com/health/fitness/g4914/where-to-put-hands-spin-class/
- ↑ https://maddogg-assets.s3.amazonaws.com/ed677e740693906a5996744bd8b46212c3241a72d03bfbe9ccc26d948466cbdc.pdf
- ↑ https://maddogg-assets.s3.amazonaws.com/ed677e740693906a5996744bd8b46212c3241a72d03bfbe9ccc26d948466cbdc.pdf
- ↑ https://www.active.com/fitness/articles/group-fitness-spin-and-reg-class-terms-you-should-know
- ↑ https://www.bicycling.com/training/a28940733/spin-workouts/
- ↑ Landis Owens. Personal Trainer. Expert Interview. 8 June 2021.
- ↑ Landis Owens. Personal Trainer. Expert Interview. 8 June 2021.
- ↑ https://www.bicycling.com/training/a28940733/spin-workouts/
- ↑ Landis Owens. Personal Trainer. Expert Interview. 8 June 2021.
- ↑ https://spoonuniversity.com/healthier/5-spin-bike-workouts-you-can-do-in-30-minutes-or-less
- ↑ https://www.coachmag.co.uk/equipment/exercise-bike/4109/stationary-bike-workouts
- ↑ https://www.lifespan.org/lifespan-living/benefits-spinning-class-you-age
- ↑ https://www.cnet.com/health/how-to-do-spin-class-at-home/
- ↑ https://www.goodhousekeeping.com/health/fitness/g4914/where-to-put-hands-spin-class/
About This Article