This article was co-authored by wikiHow Staff. Our trained team of editors and researchers validate articles for accuracy and comprehensiveness. wikiHow's Content Management Team carefully monitors the work from our editorial staff to ensure that each article is backed by trusted research and meets our high quality standards.
There are 7 references cited in this article, which can be found at the bottom of the page.
This article has been viewed 92,813 times.
Learn more...
A Prusik knot, or triple sliding hitch, is a friction hitch used to put a loop of cord around a rope so that the rope can be climbed. It's mostly used in climbing, canyoneering, mountaineering, and caving. The Prusik is a slide-and-grip knot, which means that when it isn’t weighted, it will slide easily, but when pulled, it will grip tightly. Tying this knot involves wrapping a loop a few times inwardly around a standing line and then tightening the knot.[1]
Steps
Setting Up
-
1Gather a standing line and a loop. The standing line needs to be about twice diameter of the loop. For example, if your loop is 6mm (about a quarter of an inch) thick, the standing line should be at least 12mm (about half an inch) thick. The standing line will support the knot and the loop will form the knot around the standing line. You can buy a standing line and a Prusik loop at a local sporting goods store or on Amazon.[2]
- You can also form your own loop with a cord that is about 5ft (about 1.5m) long and 5-6mm (or .2in) thick. To join the ends, tie a double fisherman’s knot.[3]
- The standing line can be a simple climbing rope. Climbing ropes come in all different lengths, depending on what you will use it for. If you wish to cover significant distance, get one that is at least 100ft (about 30m) long. For shorter distances, a 25ft (about 7.5m) rope would work well.
-
2Shape the loop into a thin oval. You will want to elongate the loop as opposed to keeping it rounded. This will help you to distinguish between the long and short side of it.[4]Advertisement
-
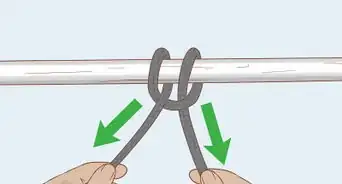
3Place the loop underneath the standing line. It should be off center and perpendicular to the standing line. Lay the loop flat underneath the standing line and let the standing line rest on top of it. If your loop has a knotted end, make this the long end and the other end will be the short end. By placing it off center, you will be able to see which side you are looping more easily. The long end will be looped and the short end will stay in place, so it is important to distinguish between the two.[5]


Tying the Knot
-
1Fold the long end on top of the standing line. At this point, you can slightly widen your oval so that there is sufficient space for the loops to move inwardly. Simply fold the long end over the standing line. The fold should be very close to the standing line, wrapping above it. Let the loop rest on top of the standing line. Make sure to keep the short end in place.[6]
-
2Loop the long end beneath the standing line inside of the loop’s short end. Take the long end and place it inside of the short end of the loop. Pull the long end underneath the standing line over to the opposite side. This is the first coil of your knot. The coil should have formed inwardly towards the center, as this knot is made from the outside in. Keep the short end in place. It will never move; only the long end will wrap.[7]
-
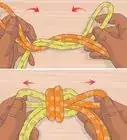
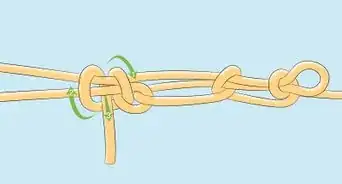
3Repeat two more times, coiling inwardly each time. Continue to wrap the long end of the loop inwardly around the standing line at least three times in total. Each time, you will wrap the long end of the loop over the standing line, then through the small end of the loop on the inside of your previous coil, then underneath the standing line over to the other side. Your wrap will get narrower each time, so make sure to start with enough space for at least three inward coils. The windings will never overlap but will coil inwardly instead.[8]
- A three-wrap Prusik is standard, but a Prusik can be formed with only two wraps or up to five. If there is not a large difference between the diameter of the loop and the standing line, you will need to wrap the loop more times, up to five. But if there is a good difference in diameter between the two, the standing line being at least twice as thick, a three-wrap Prusik will suffice.[9]
-
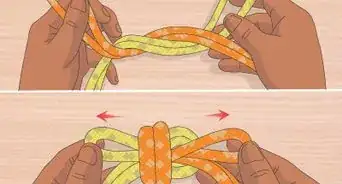
4Loop the long end over the standing line then under the shorter end. This will finish your knot. Do not go all the way around the standing line. Simply fold the long end on top of the standing line and place it underneath the small end of the loop.[10]
-
5Pull on the long end to tighten the knot. Once the long end of the loop is tucked under the shorter end, simply pull on the long end and the knot is complete. It will hold in place and will slide with ease up and down the standing line when there isn’t pressure applied, but will grip tightly to the standing line when pulled.[11]


Community Q&A
-
QuestionHow do I add a carabiner to the knot?
 Community AnswerYou can simply clip one to the long end of the loop. If you would like a knot with a carabiner in the knot, try a Bachmann hitch.
References
- ↑ http://www.backpacker.com/view/photos/skills-photos/how-to-tie-a-prusik-knot/#bp=0/img5
- ↑ http://www.backpacker.com/view/photos/skills-photos/how-to-tie-a-prusik-knot/#bp=0/img1
- ↑ http://www.animatedknots.com/prusik/index.php#ScrollPoint
- ↑ http://roperescuetraining.com/en/knots_hitch_prusik.asp
- ↑ http://www.backpacker.com/view/photos/skills-photos/how-to-tie-a-prusik-knot/#bp=0/img2
- ↑ http://www.backpacker.com/view/photos/skills-photos/how-to-tie-a-prusik-knot/#bp=0/img3
- ↑ http://www.netknots.com/rope_knots/prusik-knot
- ↑ http://www.netknots.com/rope_knots/prusik-knot
- ↑ http://roperescuetraining.com/en/knots_hitch_prusik.asp
About This Article