wikiHow is a “wiki,” similar to Wikipedia, which means that many of our articles are co-written by multiple authors. To create this article, 11 people, some anonymous, worked to edit and improve it over time.
This article has been viewed 56,526 times.
Learn more...
Whether you want to learn how to tie a fisherman's knot for climbing, search and rescue, or just because you like tying knots, it's relatively simple to learn how. As long as you're willing to commit to a little bit of practice you'll be tying fisherman's knots in no time.
Steps
Learning the Ropes
-
1Find the tag end of your rope. This is the end of your line and the part that will be doing the knot tying. [1] Designate the end of your rope before you start.
-
2Learn the meaning of standing line. This is the rest of your line that would run up toward a reel if you were fishing, or a cinch if you were rock climbing. Basically it is all the middle section of your rope.Advertisement
-
3Understand the turn. The turn is when the end of the rope – the tag end – passes completely around the standing line. Some call this a wrap. [2]


Tying the Fisherman's Knot
-
1Grab hold of both ends of the rope. The end in your left hand is end 2, and the end in your right hand is end 1. End 1 will be doing the knot tying, so recognize this as the tag line. [3]
- Make sure you give yourself plenty of slack. It's helpful to have a lot of string or rope to work with as you learn.
-
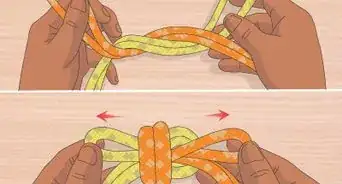
2Cross end 2 in front of end 1. You want to cross them so that end 2 lies over end 1. The end of the tagline (end 2) will be behind the loop you have created and pointing downwards. You can leave a short tail or a long tail depending on how much rope you have. To start, make sure that you have at least 6 inches (15 cm) of rope to do the tying. This means that you should have 6 inches (15 cm) of rope above where you crossed it.
-
3Pull the tagline through the loop you've created. [4] You've crossed your two lines, so one line should be dangling over the other. Take the dangling piece and start to wrap it around the other piece. As you do this, the part of rope that you originally crossed will start to form a loop. So instead of wrapping that dangling piece (end 2) around end 1, pull end 2 through the loop and up to the left. This will create a smaller loop on top of the larger loop underneath. Keep the loops loose so you're able to get the line through the hole.
-
4Pull the tagline through the smaller loop. Using your right hand, pull end 2 through the smaller loop. You should enter the smaller loop from the back and pull up to the front.


Tightening the Fisherman's Knot
-
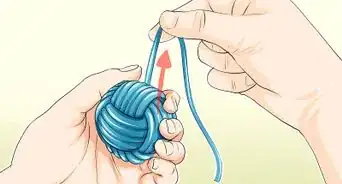
1Start to tighten the loop you made. You can tighten the loop by pulling the tagline with your right hand and end 1 with your left hand. End 1 will be next to the bigger loop at this point. [5]
- This will create a knot on top of your larger loop. End 1 should be able to slide back and forth enabling you to adjust the loop to the appropriate size. If you have ever tied a tie before, it's a similar concept to the tightening of a tie.
-
2Create another small loop. To continue tightening your knot, pull end 1 through the large loop from behind. Imagine a tie that has already been tied. If you were following instructions to make a tighter fisherman's knot, you would take the bottom of the tie and stick it in through the top of the knot that is holding your tie in place. Once you've done this, pull the line upwards once again. This will proceed to make another small loop on top of the larger loop you just pulled your rope through.
-
3Pull end 1 through the smaller loop from behind. Make sure you pull it through the loop from behind. Pull the loop to tighten it using your left hand.
-
4Tighten the final loop. [6] Just like you tightened the first knot, tighten this knot by pulling the larger loop from either side. If you plan to undo your work and try again, then you probably shouldn't pull too hard or it will be hard to untie the knot.


References
- ↑ http://www.dummies.com/how-to/content/tying-the-fishermans-knot.html
- ↑ http://www.dummies.com/how-to/content/tying-the-fishermans-knot.html
- ↑ http://www.netknots.com/rope_knots/double-fishermans/
- ↑ http://www.dummies.com/how-to/content/tying-the-fishermans-knot.html
- ↑ http://www.dummies.com/how-to/content/tying-the-fishermans-knot.html
- ↑ http://www.indoorclimbing.com/Fishermans_Knot.html
About This Article
To tie a fisherman’s knot, grab the ends of the rope in your hands, where the right hand is end 1, and the left hand is end 2, or the “tagline” which does the tying. First, cross end 2 over end 1 and pull end 2 downward and around end 1 to create a loop. Then, pull end 2 through the loop you just made to create a smaller loop inside of the original loop. Pull end 2 through the back of the smaller loop to the front to complete the knot. If you want to learn how to make your knot tighter, keep reading the article!