X
This article was co-authored by Kerri Christensen. Kerri Christensen is a Cleaning & Organization Specialist and the Owner of Busted Knuckles Cleaning. With more than seven years of cleaning experience, she specializes in helping others make their homes a cleaner place. Kerri holds a Bachelor’s in Human Resources Management and Services from Western International University.
This article has been viewed 69,020 times.
Storing quilts can sound like a simple thing, but the quilt will only remain in good condition if it is stored clean and correctly. The effort is rewarded by keeping your quilt in first rate condition, free of insect or temperature damage and maintaining its heirloom value.
Steps
Part 1
Part 1 of 3:
Cleaning the Quilt
-
1Ensure your quilt is clean before storing. Any food scraps or stains need to be removed prior to storage as these tend to attract insects as their own food source. Also remove dirt, smudges and any other source of stains. The safest method for cleaning a quilt is vacuuming, followed by airing, then washing. Each approach is discussed in the following steps.
-
2Vacuum the quilt. The best vacuum is a hand-held one, such as a dust buster. Alternatively, use the upholstery nozzle of a standard household vacuum cleaner, covered with muslin/cheesecloth or similar light fabric. Set the vacuum to the lowest level and sweep it back and forth across the quilt to collect loose fluff, debris and dirt. Check that the quilt looks okay before deciding whether anything further is needed before storage.
- If the quilt is antique, place a nylon or fiberglass screen across the quilt before vacuuming; this will protect the fibers from the strong suction.
Advertisement -
3Air the quilt. If the only noticeable problem with the quilt is that it smells musty or unpleasant, airing might be the answer. To air the quilt:
- Wait for a dry day without too much wind.
- Find a suitable shady spot outside. The spot should be fairly clean, such as concrete, nice grass or fresh new leaves, etc. Don't choose a spot where there is a lot of dust liable to blow over the quilt.
- Throw a large cotton sheet across the ground. This will keep the quilt separate from the surface, preventing any potential stains.
- Lay the quilt over the sheet, taking care not to overlap at the edges.
- Alternatively, a quilt that is in good, strong condition can be laid over a clothesline. If so, throw the base sheet over several of the lines of the clothesline (as if you were laying the table), then drape the quilt across the sheet, over the several lines. This method will probably use up all of the clothesline, so avoid doing it on a usual washing day. Avoid pinning the quilt to the clothesline as usually done for drying clothing, as this will stretch the stitches and fibers too much.
-
4Wash the quilt. This requires full knowledge on your behalf of what can happen to the quilt, and given that quilts are made from varying materials, this can be hard to know sometimes. Issues that you might encounter include dyes running, fabric shrinkage, stretched stitches and fibers due to the heaviness of being wet and pummeling by the washing process itself. To know whether or not it's okay to wash the quilt, answer the following questions:
- Do you know the age of the quilt? A more recent quilt may be less impacted by a wash than an older one.
- What condition is the quilt in? If it's already falling apart, washing is not really an option. However, it is possible to baste fraying edges with tulle, organza or netting before washing, provided you're up for the extra effort.
- Have you tested the fabric dyes in the quilt? This is easier done if you made the quilt as you'll likely have swatches of the fabric pieces used. If it's an heirloom quilt, and the person who made it is still alive, ask this person whether the fabrics are dye-fast. If neither is possible, test by dampening a back or non-obvious section of each fabric pieces and blot with a white face washer or other cloth. If the dye comes off on the blotter, you'll know it's going to run during a wash. Even if it doesn't come off on the blotter, try this test again with a little detergent this time; if the dye shows, the fabric will run when detergent is added. If both tests show no dye, it's safe to wash.
- Has the quilt been washed before? If so, you'll already know how it stood up to a wash.
- Is the quilt strong or fragile? Only strong quilts should be washed.
-
5Wash the quilt in the bath. If you've answered the above questions to your satisfaction, consider washing by hand. Machine washing is really only suitable for very strong quilts (or those cheap ones made in China that you intend to only hang on to for a short time). The bathtub is the best place as it's big and there's plenty of room to maneuver. Ideally, you will need a helper to wash and lift the wet quilt.
- Fill the bath about 8 inches/20cm with lukewarm/tepid water. (If your local water is hard, consider using distilled water or rainwater from the tank, heated in a kettle or saucepan.)
- Lower a large sheet into the bath first. This acts as a "sling" for the quilt.
- Gently lower the quilt onto the sheet.
- Press gently across the quilt. Swish the water around gently, but not the quilt; keep it steady.
- If using a detergent, make sure it is suitable for the quilt. Ask at a local quilt retailer or society for advice on a suitable detergent. A wool wash will usually be okay if you can't find a specialized detergent but dilute it before adding it to the bathwater.
- Drain the water, taking care to keep the quilt away from the drain suction. Refill with lukewarm water for a rinse cycle. Gently agitate, drain again. Do this about 4 to 6 times until you feel the quilt has been cleaned adequately and the detergent is off the quilt.
- Drain one last time. Pat the quilt with large dry and clean towels. These will start to absorb leftover water from the quilt.
- Lift the quilt out of the bath by holding the corners of the sheet it is sitting on. Carry it outside to dry (see Airing above, although you may wish to substitute a blanket for a sheet on the ground). This really needs to be done with a helper, to prevent a mishap (and wet quilts tend to be heavy). When drying, place right side down to keep this as clean as possible.
- Allow to dry completely. It should not be stored until it is completely dry, to avoid the possibility of mildew growth.
-
6Wash by machine. This is riskier than washing by hand but may be suitable for a strong, modern quilt that you know won't run when washed. It's also a fairly painful process because you can't just shove the quilt in and walk away. Here is what to do:
- Check that the quilt will fit. Many times they won't and it's no good pushing it in so tightly that it'll break the washing machine.
- Use the delicate washing cycle only. Use wool wash for the detergent, or a suitable quilt detergent.
- Check the progress of the washing every half a minute.
- Stop the washing after 3 minutes.
- Use a short rinse cycle. If you have a gentle spin dry, use this.
- Remove the quilt from the washing machine. Dry as for Airing above.
-
7Be very careful when cleaning antique quilts. These aren't just old, they're usually very delicate and they've suffered their fair share of wear and tear. The fibers and colors of such quilts are likely to have been exposed to light, moisture and acidic conditions over time and hence will have weakened.
- If the quilt seems too fragile to wash, call a local museum or textile conservator society to ask for their opinion. There will usually be someone in such a community organization who is willing to offer advice on the best cleaning options.
- Do not give an antique quilt to a dry cleaner unless a select service is recommended by a quilt society or textile conservator.


Advertisement
Part 2
Part 2 of 3:
Preparing the Quilt for Storage
-
1Determine the age of your quilt. Older quilts lack the strength and resilience of quilts made from more modern materials. As such, the age of the quilt will determine some of the storage method, requiring greater care about folding and using non-acidic materials for storing.
-
2Wash your hands. Your body oils will transfer to the fabric as you prepare the quilt for storage. Either wash your hands and dry thoroughly or don a pair of cotton gloves.
-
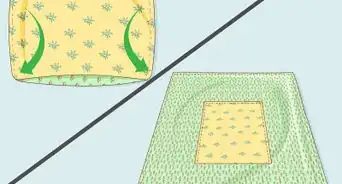
3Fold the quilt. This will enable you to place it inside a protective cover and then place on a shelf or other storage space. However, it is a good idea to use acid-free paper between each layer of the quilt to protect it from staining and creasing, and wherever the folds are, stuff these with crumpled acid-free paper to prevent the holds from becoming too permanent.
- If you can, store the quilt flat rather than folding it; this is the most ideal way of storing, although it is recognized that few people have such space to spare.
- If the quilt is small and thin, roll it around a tube; this will prevent creases and folds from forming.
-
4Place the folded quilt inside a suitable protective cover. The cover will protect it from insects, dust and other sources of potential damage. Cover with a cotton pillowcase or similar cotton sack. A large cotton sheet or length of muslin can improvise as a cover.
- Plastic is not an ideal covering; it can sweat (creating humidity) and some plastic bags may even leach colors from dyes and damage the quilt, especially with long-term storage.
- Anything that the quilt is stored in or on must be acid-free.


Advertisement
Part 3
Part 3 of 3:
Storing the Quilt
-
1Bear in mind what not to do when storing a quilt. Things that should be avoided during quilt storage include:
- Direct sunlight
- Direct or close heat (even from an incandescent bulb; if possible, replace with fluorescent lighting inside the storage area)
- High temperature or high humidity
- Acidic surfaces (this includes some wooden surfaces).
-
2Put the quilt into a closet, or anywhere that is dark. If quilts are stored in semi- or full-light, they will fade overtime.
- It is not a good idea to put quilts in storage anywhere that moisture is likely to occur, such as the basement or the attic. Moisture will cause mildew growth in fabric. And if the quilt is overheated, it will begin to fall apart, while very cold temperatures will cause it to turn brittle.
- The temperature range for storing a quilt is ideal around 59 - 68ºF/15 - 20ºC, with humidity around 50 percent.
-
3Deter insects by adding some sort of repellent. Many herbs are suitable for this purpose, as are cedar balls or blocks.
- Do not allow insect repellents to come into direct contact with the stored quilt (or any other fabrics in the storage space).
-
4Remove the quilt from storage periodically. Don't expect to be able to store a quilt for years without ever opening it. A quilt needs to be aired regularly and folded out to prevent permanent fold lines and musty odors. At least every 6 months, be prepared to remove the quilt, air it (see above) and let it remain unfolded for a few days before returning it to storage.
- If you have a guest bedroom, this is an ideal space to leave the quilt spread out for a week to "unfold" before returning to storage.


Advertisement
Community Q&A
-
QuestionAfter wrapping quilts in cotton, can they be stored in a cedar chest?
 Miranda DugganCommunity AnswerYes, and the cedar wood may deter pests. The chest will also prevent sunlight from reaching the quilt, just make sure the room where you keep it is not excessively hot/humid.
 -
QuestionI have a very long table runner I want to ship to my brother in Chile. UPS wants over $300 to ship, as I had it loosely packaged. If it is shipped in a space bag, will the quilt fluff up again and not have permanent creases? It would be just for 4-5 days. I spent a lot of time and effort, and I don't want to ruin it!
 Community Answer4 to 5 days should not harm the quilt. Try to roll or fold it so that the stitching is not pulled too much in any one spot.
 -
QuestionShould a 130-year-old wool quilt be stored in the plastic bags that you can vacuum closed with a vacuum cleaner?Miranda DugganCommunity AnswerIf that is your only option, but this method is not desirable for a quilt of any age. Depending on the fabric, this method may create permanent creases, which is undesirable.
Advertisement
Warnings
- Not using a sealable bag or container could let in pests such as mice and moths.⧼thumbs_response⧽
- Do not leave your quilt stored in direct sunlight. This will cause it to fade with time.⧼thumbs_response⧽
Advertisement
Things You'll Need
- Quilt
- Suitable washing detergent (if washing)
- Large sheet or blanket for airing/drying
- Cotton bag/pillowcase/sheet for storage
- Acid-free paper


References
- Narelle Grieve, Starting Out, in Collecting Quilts, pp. 9-11, (1995), specialty magazine publication – research source
About This Article

Kerri Christensen
Cleaning & Organization Specialist
This article was co-authored by Kerri Christensen. Kerri Christensen is a Cleaning & Organization Specialist and the Owner of Busted Knuckles Cleaning. With more than seven years of cleaning experience, she specializes in helping others make their homes a cleaner place. Kerri holds a Bachelor’s in Human Resources Management and Services from Western International University. This article has been viewed 69,020 times.
Co-authors: 11
Updated: November 25, 2022
Views: 69,020
Categories: Featured Articles | Quilting
Advertisement