This article was co-authored by wikiHow Staff. Our trained team of editors and researchers validate articles for accuracy and comprehensiveness. wikiHow's Content Management Team carefully monitors the work from our editorial staff to ensure that each article is backed by trusted research and meets our high quality standards.
There are 8 references cited in this article, which can be found at the bottom of the page.
This article has been viewed 12,287 times.
Learn more...
Sewing your own bows is a quick and easy process! Both these bows take less than 10 minutes to make and need very few materials. Use these bows as decorations, stick them to a headband, or attach elastic to them to turn them into a bow tie. Enjoy hand-crafting your very own bows.
Steps
Making a Dickie Bow
-
1Fold a rectangle piece of material in half widthways. A 10 cm (3.9 in) x 20 cm (7.9 in) rectangle of fabric will make a bow that is approximately 10 centimetres (3.9 in) wide. To make a smaller or larger bow, simply vary the size of the fabric. Pull the short edge on the right of your piece of fabric over to meet the other short edge on the left. Then, smooth the fabric down so that it sits flat on the table.[1]
- Cotton, linen, and polyester fabrics work well for this task.
- This method creates a bow that looks similar to the bow that you would see on a bow tie.
-
2Sew the joined edges together but leave a 2.5 cm (0.98 in) gap in the middle. Use a running stitch to sew the top of the edges together, then leave a 2.5 cm (0.98 in) gap before sewing down the rest of the edge. It is really important to leave a gap, as this allows you to turn fabric square inside out later, which makes it look nice and tidy.[2]
- Always back stitch before you start each segment of sewing in order to stop the thread from coming loose.
- A running stitch is the default stitch on sewing machines.
Advertisement -
3Position the sewn edge in the middle of the fabric. Open up the loop that you have sewn and readjust the sewn edge to the left so that it sits in the middle. Press the fabric down to create a square shape that has folded edges on the left and right side.[3]
-
4Sew down both the open edges. Turn the fabric 90-degrees and sew a running stitch down the entire open edge to secure the fabric together. Then, repeat the same process on the other open edge. This will leave you with a completely sewn square, excluding a 2.5 cm (0.98 in) gap in the middle of one edge.[4]
- Place the sewing machine needle about 8 mm (0.31 in) away from the edge of the fabric, this helps to prevent you from accidentally tracking off the fabric.
-
5Turn the bow inside out using the small opening you created. Push all the fabric into the hole that created to turn it inside out. Then, flatten the fabric back into a square shape. This process hides all the sewn edges inside the square and makes it look professional and tidy.[5]
- Don’t force the fabric through the hole, as this can rip the threads. Instead, push the fabric gently and slowly through the gap.
-
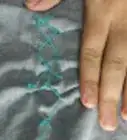
6Tie a thread around the middle of the square. This transforms the square into a dickie bow shape. Wrap the thread around the middle of the square and then knot it as tightly as you can. This will pinch the middle of the fabric together.[6]
- If possible, use a piece of thread that is the same colour as your fabric so that it blends in.
- Cut off the loose ends of the thread.
-
7Sew a loop of ribbon around the pinched section of the bow. Wrap a piece of ribbon right around the pinched section. This creates the middle part of the bow. Hand-stitch the ribbon together where it overlaps to secure it in place.[7]
- If you prefer not to hand-sew, secure the ribbon in place with hot glue instead.
- Use your finished bow as a decoration or attach it to a headband. Alternatively, attach a loop of elastic to the back of the bow to make a bow tie.


Creating a Stacked Bow
-
1Sew the short edges of a 25 cm (9.8 in) long ribbon together. Join the 2 short edges of the ribbon together to create a loop. Then, overlap them by about 1 cm (0.39 in). Run a basting stitch from the top of the overlapping edge to the bottom.[8]
- Fabric ribbon works best for this bow. Nylon, satin, velvet, and rayon fabrics all work well. Avoid using paper or silk ribbon, as this will rip when you sew it.
- Ribbon of any width works for this method.
- This method creates a flat looking bow, similar to what you might find on a hair band.
-
2Join the short edges of an 18 cm (7.1 in) long ribbon together. Sew this ribbon together using the same technique that you used to join the long ribbon into a loop. This will leave you with 2 loops – 1 big one and 1 slightly smaller one.[9]
- Stacked bows look best if both the ribbons are the same colour and width. However, if you want a less traditional look, feel free to vary the colour and width of the ribbons.
-
3Stack the smaller ribbon flat on top of the larger ribbon. Lay both the ribbons flat on the table with the connected edges facing downward. Then, place the smaller ribbon on top of the larger ribbon and position it in the centre.[10]
- If your ribbon isn’t sitting flat, rub a cool iron over it to smooth it down.
-
4Sew a vertical line down the middle of the ribbons to join them. Estimate the middle point of the ribbons. Then, use your sewing machine to join the loops of ribbon together with a vertical running stitch down the middle of the ribbons.[11]
- If you prefer, you can hand-stitch the ribbon loops together. It will create the same effect but will take a little longer.
- This creates the base of your bow.
-
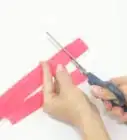
5Attach a loop of ribbon over the vertical line. Wrap a piece of ribbon around the vertical stitching on the bow and position the overlapping section of the ribbon at the back of the bow. Then, hand-sew the ribbon to the back of your bow using a back-stitch. Cut off any remaining ribbon with a pair of scissors.[12]
- Use the same coloured ribbon for a cohesive look or use a different colour to create contrast.
- This piece of ribbon only needs to be about 6 cm (2.4 in) long.
-
6Finished.


Things You’ll Need
Making a Dickie Bow
- Thread
- Fabric
- Scissors
- Ribbon
- Needle
Creating a Stacked Bow
- Sewing machine
- Thread
- A 25 centimetres (9.8 in) ribbon
- An 18 centimetres (7.1 in) ribbon
- Needle
- Scissors
- A 6 centimetres (2.4 in) ribbon

References
- ↑ https://youtu.be/Cyg-GQsPS8s?t=12
- ↑ https://youtu.be/Cyg-GQsPS8s?t=30
- ↑ https://youtu.be/Cyg-GQsPS8s?t=33
- ↑ https://youtu.be/Cyg-GQsPS8s?t=40
- ↑ https://youtu.be/LEYqBDEI1G8?t=94
- ↑ https://youtu.be/Cyg-GQsPS8s?t=107
- ↑ https://youtu.be/Cyg-GQsPS8s?t=128
- ↑ https://sewguide.com/make-fabric-bows/
- ↑ https://sewguide.com/make-fabric-bows/
About This Article