This article was co-authored by wikiHow Staff. Our trained team of editors and researchers validate articles for accuracy and comprehensiveness. wikiHow's Content Management Team carefully monitors the work from our editorial staff to ensure that each article is backed by trusted research and meets our high quality standards.
There are 7 references cited in this article, which can be found at the bottom of the page.
This article has been viewed 37,263 times.
Learn more...
Mounting ski bindings is something you can do yourself if you have the proper tools and know-how, including a drilling jig and a special drill bit. If you don’t have the right tools or aren’t confident in your ability to get the job done, it’s always best to have your bindings mounted by the professionals at a ski shop. Skis come with lines pre-marked on them that show you where the manufacturer recommends that you mount the bindings for different types of riding. In general, the further forward you set your bindings, the more control you have over the skis at low speeds. The further back, the more stable they are at higher speeds.
Things You Should Know
- To mount ski bindings yourself, you'll need a ski binding drilling jig and a special drill bit designed for skis.
- Measure the length of your ski boots in centimeters so you know how far apart to space the bindings.
- Set the ski binding drilling jig to your boot length, then secure it to one of your skis.
- Drill through the screw holes on the jig, then screw your bindings into place in the holes you drilled.
Steps
Positioning the Bindings
-
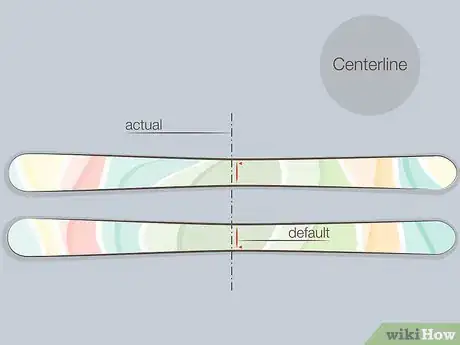
1Use the factory-recommended line if you don’t have a preferred skiing style. Skis have a default ski binding centerline marked on the top side just behind the actual center point. This is the default spot recommended to mount your bindings based for the best all-around performance. Mount your bindings here if you don’t want to optimize your skis for a certain type of riding or if you want to ride on all types of terrain.[1]
- The manufacturer’s recommended centerline is in slightly different places on different types of skis. For example, on all-mountain skis the mark is usually 2–3 cm (0.79–1.18 in) behind the true center of the skis.
-
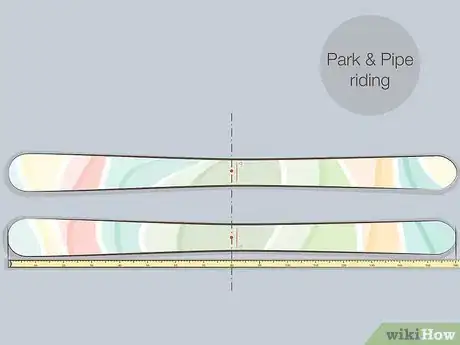
2Place your bindings at the true center point for park and pipe riding. Find the true center of your skis by measuring your skis from the tip to the tail and making a mark at the exact middle point. Mounting your ski bindings exactly in the middle of your skis helps you to do things that are common in park and pipe riding like skiing switch-style and balancing on rails.[2]
- Keep in mind that since the true mounting point is a few centimeters forward of the factory-recommended centerline, the skis will feel shorter and won’t be as responsive and stable at high speeds. However, they will be easier to maneuver at lower speeds, which is very helpful for park riding.
- Many skis have other lines pre-marked on them in addition to the manufacturer’s recommended centerline, so you might not have to measure your skis to find the true center mark. For park and pipe riding, there might be a line that says something like “freestyle.”
Advertisement -
3Put bindings 1–3 cm (0.39–1.18 in) back from the centerline for powder skiing. Measure 1–3 cm (0.39–1.18 in) back from the manufacturer’s recommended centerline and make a mark. Use this as your mounting point if you plan to mostly ski fresh powder or wet and slushy snow.[3]
- Mounting your bindings further back shifts your weight back and makes your skis more stable, which helps you “float” on top of fresh powder or deep, wet snow.
- For powder riding, your skis might have a line marked behind the recommended centerline that says something like “freeride.” You can use this for powder skiing instead of measuring yourself.
- Be careful not to confuse the freeride line with the freestyle line, as they are at opposite ends of the spectrum.
Mounting the Bindings
-
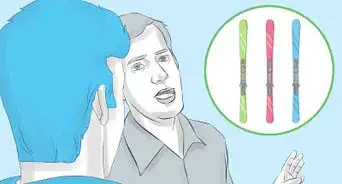
1Measure the length of your ski boots in centimeters. Use a tape measure to measure the length of your ski boots in centimeters from the tip of the toe to the back of your heels. This will allow you to drill the holes for the bindings the exact right distance apart.[4]
- If you have an old pair of boots and are mounting bindings on a new pair of skis, try your boots on first to make sure they still fit you and that you don’t need new boots as well.
-
2Set a ski binding drilling jig to your boot length and lock it onto a ski. Slide the jig’s screw hole guides closer together or further apart until they match the length of your boot. Position the jig onto one of your skis over your chosen mounting point guideline.[5]
- A ski binding jig locks securely onto your skis and has holes that you drill through to ensure you drill in the proper places to screw your bindings into the skis. You can purchase a jig online for about $250 USD.
- If you don’t have the proper tools for mounting your bindings on skis, including the jig and ski mounting drill bits, it’s best not to do it yourself. You could accidentally drill the holes in the wrong places or drill all the way through your skis and ruin them.
- You can get your bindings mounted at a ski shop for about $20-$30 USD or maybe even for free with a purchase.
- Note that you must do this whole process 1 time per ski.
-
3Choose a ski binding mounting drill bit based on the composition of your skis. Use a 3.5 mm by 9.5 mm bit for wood or composite core skis. Opt for a 4.1 mm by 9.5 mm bit if your skis have a metal core.[6]
- Ski binding mounting drill bits are special drill bits that only let you drill down to the proper depth. They prevent you from accidentally drilling all the way through your skis.
- You can buy a ski binding mounting drill bit online for about $20 USD.
-
4Drill the binding screw holes using ski binding mounting drill bits. Insert your chosen ski binding mounting drill bit into a power drill and tighten the chuck to secure it. Drill straight down through each hole in the jig into the ski.[7]
- The jig will guide your drill bit and the bit itself will assure you drill down to the right depth. This is why it’s essential to use the proper tools for installing your ski bindings.
-
5Put a dab of wood glue into each screw hole. Blow or knock out any wood chips from the holes in your skis. Squeeze a small dab of wood glue into each hole to help secure the bindings’ screws in the holes.[8]
- The glue will also prevent water from getting into the cores of your skis.
-
6Screw the bindings onto the skis using the screws they come with. Line up the screw holes in the bindings with the holes you drilled in your skis. Fit a screwdriver bit into your power drill and fix the bindings to the skis using the screws that are provided with them.[9]
- You can also use a hand-held screwdriver to screw the bindings onto your skis.
Warnings
- Don’t attempt to mount ski bindings yourself if you don’t have the proper tools and skills to do the job. You could end up ruining your skis. Spend a few dollars to have them mounted professionally at a ski shop.⧼thumbs_response⧽
Things You’ll Need
- Measuring tape
- Ski boots
- Skis
- Ski bindings
- Power drill
- Ski binding drilling jig
- Ski binding mounting drill bit
- Wood glue
References
- ↑ https://www.theadventurejunkies.com/how-to-mount-and-adjust-ski-bindings/
- ↑ https://www.coalitionsnow.com/blogs/tips/mounting-your-ski-bindings
- ↑ https://www.theadventurejunkies.com/how-to-mount-and-adjust-ski-bindings/
- ↑ https://www.evo.com/guides/how-to-choose-and-size-ski-boots
- ↑ https://www.youtube.com/watch?v=w5YyvV7RGF8&feature=youtu.be&t=20
- ↑ https://theskimonster.com/blog/posts/how-to-mount-ski-bindings/
- ↑ https://theskimonster.com/blog/posts/how-to-mount-ski-bindings/
- ↑ https://www.youtube.com/watch?v=w5YyvV7RGF8&feature=youtu.be&t=90
- ↑ https://www.youtube.com/watch?v=w5YyvV7RGF8&feature=youtu.be&t=120
