This article was co-authored by Meredith Juncker, PhD. Meredith Juncker is a PhD candidate in Biochemistry and Molecular Biology at Louisiana State University Health Sciences Center. Her studies are focused on proteins and neurodegenerative diseases.
This article has been viewed 53,350 times.
Science students at all levels create scientific posters to show the results of their research. They display their posters at scientific gatherings so attendees can see what they've been working on and stop for more information only if they are interested in the student's work. A scientific poster must contain all the elements of a scientific paper in condensed form and should be as professional in appearance as possible.
Steps
Including the Right Content
-
1Create a short title. Scientific papers may have lengthy titles. Shorten yours so that it adequately conveys what your research is about and your experimental method but takes up no more than 2 lines at the top of your poster.
- If you can, make your title "catchy" so it will attract interest from passersby, but don't try to make it funny.[1]
-
2Write an introduction. Place your research in the context of previous work as well as why it’s an important topic to work on, then introduce an interesting hypothesis.
- Make sure the introduction is different than your abstract.
- Keep your introduction to under 200 words so it can be read quickly. You can add a photograph or other visual aid to make it more interesting and eye-catching.
- Don't clutter your introduction with definitions, background information or anything else that will only bog down the narrative and cause passersby to lose interest.
Advertisement -
3Describe your experimental approach. Briefly, describe your method, taking no more than 200 words and using illustrations if they're helpful. Flow charts are especially good for this section.
- Leave off abstracts. The content of poster should create a visual abstract of your scientific experiment instead of being a copy of your report.[2]
- Know your audience. Just as you would when you write a paper, make the information included on your poster will give the appropriate depth of information. It should be understandable even to a reader that is not specialized in the same particular field.
-
4Give your results. Do this with 2 brief paragraphs of text and a clearly labeled table so passersby can understand your results at a glance. Use clear and succinct graphs that are labeled so a passerby can understand. Most will skip the other sections and just study your results, so take extra care with this section.
- In the first paragraph, state whether your experiment worked or not.
- In the second paragraph, analyze your results in terms of your hypothesis and indicate how many times you replicated the research.
- Include relevant figures from your study.
-
5Include some discussion of your conclusions. In about 200 words, tell the reader why your research was important and relevant, both to the field of study and the real world. Discuss which direction you want to take your research in the future.
- Remind the reader of your result and whether your initial hypothesis was supported.
- Try to convince your reader that your results are conclusive and interesting.
-
6List any previously published research you used. Cite any journal articles you read that support your research or any research that is referenced in your study. Use the correct format prescribed for researchers in your field to note your sources.
-
7Thank everyone who assisted and supported you. Don't list the titles of people who supported you, but do list what specific assistance or support they provided.
- If there was any actual or potential conflict of interest or commitment regarding your research, list it in this section.
-
8Give your contact information. Provide your name, email address, website if you have one, and a place where readers can download a copy of your poster.
- You may want to create a handout-sized version of your poster with your information so your audience can go back to review your study later and can easily follow up with you at a later date.


Creating a Strong Presentation
-
1Determine the size of your poster. You can figure out the size you need by how much text in your report, the number of images or graphs you plan to include.[3] If your report is under 5 pages and has less than 7 pictures or graphs a 36X48 should work. If your report has more information you can adjust your size accordingly.
- Check with any poster size requirements for your event. You may have space limitations for your display, and sometimes your poster size may be restricted.
- Be sure you have adequate supplies to display your poster.[4] Usually, display stands or clips may be provided for you on site, but it is best to check ahead to make sure you bring everything you need.
-
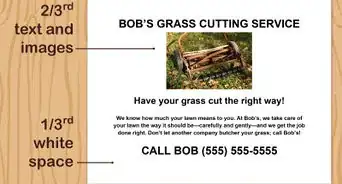
2Carefully select what to put on your poster. Many students try to include everything in their research paper, but this is a serious mistake. You can leave off the abstract and large areas of text tend to dissolve into visually cramped, boring, gray spaces that are intimidating to an audience.[5] Posters that have too much text on them will be passed over in favor of those that are easier to read.
- Highlight the key details and share the extraneous details verbally.
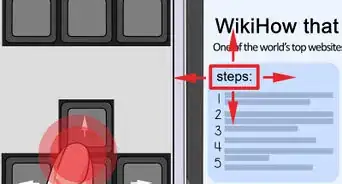
- Use columns to organize and structure your presentation in a logical manner.[6]
- Clearly label any sections, graphs or images.
-
3Use software designed for making slide presentations and software that manipulates images to create your poster. If you know how to use Powerpoint, Keynote or design programs like Photoshop, you can make some stunning visual aids that can combine your text and graphics into a professional looking display.
- Once you've created all your sections and illustrations, transfer the files to portable document format (PDF) so you can be certain how they will look when printed.
- Use either PC or Mac platform for everything so you don't run into compatibility problems when moving files between the two.
-
4Look at your poster from a distance of 6 feet (2 m) away. Check your graphs, charts and other illustrations to make sure a reader can make out the details at that distance. Take another couple steps back. Your poster title should be readable from 10 feet (3 m) away.
- Use a large font for all text. Paragraph text should be between 18-24 pt. font. You can use a different font style for titles to help distinguish them, but otherwise, you should keep the font consistent.[7]
- Use color to attract the eyes of your audience. 2-3 colors can help your various titles to stand out. Avoid adding too many, though, so it doesn't become overwhelming.
- Avoid using 3D illustrations unless it's absolutely necessary. If you do use 3D illustrations, print stereoscopic versions on the poster and provide readers with 3D glasses.
- Don't settle for poor-quality images. Go to the trouble of finding image files that will still look sharp when blown up to place on your photo. You may have to take your own digital photos.
-
5Add audio and video files if appropriate. There are a number of ways to do this, from using the devices found inside recordable greeting cards to attaching your personal media player to your poster.
- You can place a quick response (QR) code on your poster that readers with smartphones and similar devices can scan to access a website that will show photographs, play sound files or display other media on their devices.
-
6Assemble a rough draft of your poster. Place your information so it is in an easy to follow sequential order. Evaluate how the information is organized and if the poster is visually appealing.
- Ask for feedback from fellow students and teachers. Use the feedback to create the final version.
-
7Store your poster safely. You may want to purchase a cardboard tube to store and protect your poster until your presentation. You don't want all your hard work to go to waste.
- If you don't want to purchase a container, consider rolling the poster up and wrapping a rubber band loosely around each end to keep it closed until your presentation.
-
8Consider having a professional printing service create your poster. You can use a local printing service or find one online that specializes in creating scientific posters.
- If you are traveling to a scientific gathering, you can have a printing service create your poster and have it waiting for you when you arrive. Conference organizers often make agreements with printing services to make and deliver posters as a courtesy to students.
- If you plan to use a poster printer at your university, see if they have a place to sign up. During crunch time, many people may be trying to print off their work.
-
9Make a "Back in 5 Minutes" sign that can hang next to your poster. For many events, a presenter should be present to answer client questions or give additional information as needed. It's a good idea to have a sign on hand in case you need to step away to get a drink or use the restroom. This can help reduce the chance you miss any interested visitors.
-
10Bring any additional reference materials you may need. A good poster may still not include every bit of relevant information. You should be prepared to answer any questions with all your available information. Bring note cards that you can refer to in a pinch. You may also want to get a binder to carry along any other information that might be requested.
- Practice your presentation multiple times before taking it to the public. This will make you more confident and engage the listeners.


References
- ↑ http://colinpurrington.com/tips/poster-design
- ↑ http://hsp.berkeley.edu/sites/default/files/ScientificPosters.pdf
- ↑ http://www.posterpresentations.com/html/what_size_to_make_a_presentation_poster.html
- ↑ https://www.utexas.edu/ugs/our/poster/present
- ↑ http://guides.nyu.edu/posters
- ↑ http://www.dartmouth.edu/~ugar/undergrad/posterinstructions.html
- ↑ http://www.dartmouth.edu/~ugar/undergrad/posterinstructions.html
About This Article

To make a scientific poster, put the key details from your research paper on your poster, and leave off the rest so your poster doesn't look cluttered. Also, separate the information on your poster into columns so it looks organized, and make sure all of your sections, graphs, and images are clearly labeled. You should also keep in mind that people will be viewing your poster from about 6 feet away, so use an 18-24 point font, crisp images, and 2-3 colors in your title to help it stand out. To learn how to choose the right content to put on your scientific poster, keep reading!