wikiHow is a “wiki,” similar to Wikipedia, which means that many of our articles are co-written by multiple authors. To create this article, 18 people, some anonymous, worked to edit and improve it over time.
This article has been viewed 32,415 times.
Learn more...
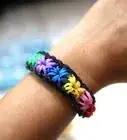
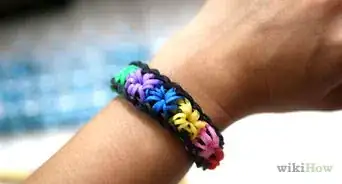
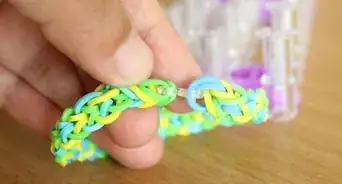
A rainbow loom fishtail is a fun and cute craft that can be done easily with a loom or your fingers. You can create so many different things with a loom fishtail, but some simple projects you can try are a bracelet or a keychain. For most loom projects you will just need rubber bands, a loom, and a hook. Make a fun loom fishtail design for yourself or as a gift for a friend.
Steps
Making a Fishtail Bracelet with a Loom
-
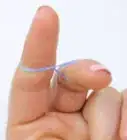
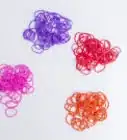
1Choose your rubber bands. This rainbow loom fishtail can consist of all of the colors in the rainbow or a few colors. Choose the colors you would like to go in your fishtail. You can create a pattern by alternating different colors, or you can do a section of one color and then a section of another color. Making a fishtail with a loom will also require a hook, like a crochet hook.
- You can use your fingers instead of a hook if you don't have a hook on hand. However, a hook will be easier because it can better grab the rubber bands and you don't risk popping them on your fingers.
- For the rubber bands, you'll need to use the ones specific for rainbow loom. You may be able to find them at your local craft store or online. You should also be able to find your loom online at a loom store.
-
2Place your first rubber band on the loom. Face your loom so that the two pegs you will be working with are at the bottom right corner of your loom. Your loom should be facing so that it is long horizontally and short vertically and the arrow on the loom should point to the left. Take your rubber band and twist it into an eight. Then place one side of the eight on the first peg, and stretch the other side over to place on the second peg.[1]
- Once you have placed your rubber band, slide it down onto the pegs so that you have more room to add other rubber bands.
- On a loom the pegs will alternate between short and tall. You will be using two tall pegs, which will have a very short peg in between them. You never use the short pegs -- they are just there to create space between the pegs you do use.
- If you want a thicker bracelet, each time you are supposed to place one rubber band, place two instead. You'll be repeating the same steps, but working with double the amount of rubber bands.[2]
Advertisement -
3Place your second rubber band over your first. Taking your next color, or your next rubber band, place it over the first two rubber bands. Then, take your next color or rubber band and place it on top of the previous rubber band you just added, making sure you stretch the rubber bands from the right peg to the left peg.[3]
- At this point you should have three rubber bands on your first two pegs. The first one should be a figure eight, but the second and third should just be regularly shaped, with no criss cross in the middle.
-
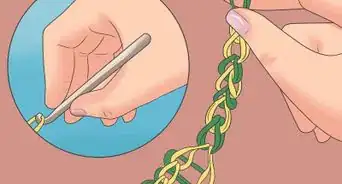
4Use your hook to pull the bottom rubber band over the top. Taking your hook, grab hold of the right side of the bottom rubber band. Pull it up and over the top two rubber bands and then up and over the peg. It should then create a loop over your top two rubber bands. Repeat on the left peg, taking the rubber band and pulling it up and over the top two rubber bands and up and over the peg.[4]
- At this point, you should have two loops around your pegs with the first rubber band you placed now creating two loops around the middle of the remaining rubber bands, holding them together.
- Once you have done this, push the rubber bands down the loop so that you have more space to work.
-
5Place your next rubber band on the loom. Take your next color or rubber band and place it on your looms, wrapping it around the two pegs you are working with. As you are working with your loom you should always have three rubber bands on the loom.[5]
-
6Take the bottom rubber band and bring over the top. Like you did in the previous step, you will use your crochet hook to bring the very bottom rubber band over the top rubber bands. Grab the bottom band around the right peg and bring it up and over the top two bands and then up and over the peg. Repeat on the left side.[6]
- After this step you may need to tug on your rubber bands a little bit so that they are evenly stretched over each other. Then, push your rubber bands down and continue working.
-
7Continue this process until you have your desired length. You will continue making fishtails by adding one rubber band above the extra two. You will then take the hook and move the very bottom rubber band over the top two. Then, you will add another rubber band and continue to repeat these steps until you have your desired fishtail length.[7]
- Don't forget to push the rubber bands down after you've added them so that you have extra room to work. If you allow the rubber bands to reach the top of your loom you may risk them popping off, which can mess up your chain. Also, don't forget to pull your fishtail every so often to readjust the rubber bands.
- At first, your fishtail won't look like anything but after you've added six or so chains you'll begin to see what your finished work will look like.
- If you are making a bracelet, make sure it is big enough to fit around your wrist. However, since it is a stretchy bracelet, you don't want it too big that it won't stay on your wrist. When you think it is the right size, take your wrist and wrap your fishtail around it. If you have overlapping chain, you've added too many rubber bands. The rubber bands should barely meet each other -- when you have this length you can finish off your bracelet.
-
8Take your fishtail off the loom. Grab your fishtail in the middle, making sure the rubber bands don't come apart. Then, gently slide it off your loom, holding it with a tight grip. Once you have taken it off you should still have the two rubber bands creating two sets of loops. Your fingers should be on top of the rubber bands in the middle of the fishtail.[8]
-
9Remove the two rubber bands. Looking at your fishtail you should see what was previously explained -- you should see your chain and at the end of the chain you'll have the two rubber bands you just removed from the pegs. Holding tight to the middle rubber bands, gently slide the two rubber bands out of the middle rubber bands. You can slide them to the left or the right. When you remove them you should just have your looped rubber band that was holding them together.[9]
-
10Add a C clip to your bands. Use a plastic C clip and hook it to the end rubber bands you are holding. Take the lower part of the C and stick it through the first rubber band loop, and then the second. Then attach it to the other side by sliding the rubber bands on the opposite end of your fishtail over the top hook of the C.[10]
- If your bracelet doesn't fit at this point, you can always go back and add more rubber bands or remove some of the rubber bands from the bracelet until it is your desired size.


Creating a Fishtail Bracelet without the Loom
-
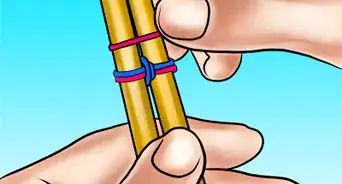
1Gather your supplies. As before, you'll need to decide what colors you want for your bracelet. You can choose lots of different colors or just a few different colors. You'll need them in the specific loom rubber bands. You'll also need something to serve as your loom. Two pencils work the best, but you can also use your fingers. You'll also need a C or S clip to connect your bracelet together.[11]
- If you use pencils, which will give you the closest thing to an actual loom, try to use dull or unsharpened ones. With sharpened pencils you risk stabbing yourself as you move the rubber bands over the looms.
- If you find it too difficult to hold the pencils, you can try using your fingers. However, using your fingers might be a bit uncomfortable and it may be easier for the bands to slide off.
-
2Create a figure eight with your first band. Take your first rubber band and twist it into an eight. Then place one loop of the eight on the right pencil and the other loop on the left.[12]
- You can use double the rubber bands to create a thicker bracelet. Instead of placing just one rubber band on your pencils, you can twist two or three rubber bands into a figure eight and place them on your pencils.
-
3Place two rubber bands over the first rubber band. As you did in the previous method, pick your next two rubber bands and place them one by one on top of your other rubber band. You will loop them around both pencils by stretching them across the outside of one pencil to the outside of the other. For a thicker bracelet, you can place three rubber bands instead of two.[13]
-
4Bring the bottom rubber band over the top. Using your fingers, grab the bottom rubber band, or rubber bands, and bring it (or them) up and over the top rubber bands you just placed. Take the right rubber band first, bringing it up and over the rubber bands and the top of the pencil. Then repeat on the left side.[14]
- Tug on the rubber bands to readjust them and push them down lower on your pencils to keep working.
-
5Place the next set of rubber bands on your pencils. Take your next color or colors and place one or two rubber bands on your pencils (depending on how thick you want your bracelet to be). Then, bring the bottom rubber band over the top rubber band you just placed as you did in the previous step.[15]
- If you are doing the simple method, using only one rubber band instead of sets of rubber bands, you should just see two loops on your pencils. Bring the bottom loop up and over the top loop on each of your pencils. If you are using multiple rubber bands to create a thicker bracelet, just make sure you are still bringing the bottom rubber bands over the top rubber bands. You should see a separation in the rubber bands by the middle loops.
-
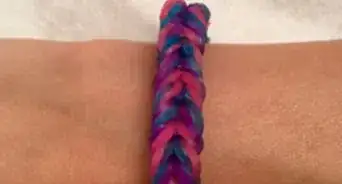
6Reach your desired length. Continue to repeat this process until you have your desired length. Then, attach the S or C clamp to the bottom of your chain, looping the hook through the rubber band loops.[16]
-
7Pull the rubber bands off your pencils. Take the rubber bands that are still wrapped around your pencils and gently pull them off, making sure you don't lose any of them. You can hold the middle rubber band loop, or you can grip the two side loops.[17]
-
8Tie off your rubber bands and create your bracelet. Taking the two loops you just pulled off, stick one loop through the other loop. Then, pull the loop you just stuck through tightly, letting go of the other loop. This should create a nice knot at the end of your chain with one loop. Finally, connect that last loop to the S or C clamp and then you should have your finished bracelet![18]


Making a Fishtail Keychain with a Loom
-
1Gather your supplies. For this project you will need your loom, different colored rubber bands, a hook, a keychain ring, and some letters with rings to attach to your bracelet. Use the same amount of letters as you do the colors of your rubber bands. For a simplified version, choose three letters and three colors.
- You can usually find letters like these in the jewelry section of a craft store or craft department. The rings are usually what go on the chain of a necklace or bracelet, but you will be inserting the rubber bands into the rings.You could do your initials, or spell out "mom" or "bff." Get creative with it and do whatever letters you want.
-
2Position your loom. To do this particular project, position your loom so that it is long vertically. Turn it so that the arrow on the loom points toward you and then pop out the middle row of pegs. Take the pieces underneath your pegs that are holding them together and pop them out. Then position them so that they are three pegs away from the end of your loom. You will be working with the bottom four pegs.[19]
- At this point you should see two rows of pegs with a wide gap between them. The pegs are shaped like a horseshoe, and the opening of the horseshoe should be facing you.
-
3Place your first letter on the rubber band. Take your rubber band and slide it through the ring of your first letter. Your letter should be in the middle of your rubber band and two loops of your rubber band will be on each side of your letter.
- If you don't want to use letters, simply twist your rubber band to a figure eight shape and place the bottom of the eight on the bottom left peg, and the top of the eight on the top left peg. You can continue to do this with the other bands, twisting your rubber bands into figure eights instead of adding the letters. You basically just need something in the middle of the band to hold it together.
-
4Place your rubber band on the pegs. Take the left side of your rubber band and place it on the bottom left peg. Then, stretch it across, with the letter still in the middle of it, until you reach the top left peg. Then, place your next letter through another one of your rubber bands, using the same color rubber band.[20]
-
5Place your second rubber band on the pegs. Take the left side of your second rubber band and place it on the top left peg, on top of your previous rubber band. Then, stretch it over to the top right peg and place the right side of your rubber band on that peg, leaving the letter in the middle.[21]
- At this point the only peg you should have left is the bottom right peg. You should have a rubber band stretching from the bottom left up to the top left, and then, from the top left over to the top right. You should then have your first letter between the left pegs, and your second letter between the top left and right peg. Your final letter will be between the two right pegs.
-
6Place your final letter. Using the same color rubber band, place it through your last letter. Then, place the left side of the rubber band on the top right peg, over the previous rubber band. Finally, take the right side of your rubber band and stretch it down to the bottom right peg, keeping the letter in the middle.[22]
- Push your rubber bands down once you have added all three so that you can begin your next set of rubber bands. The letter charms should be pointing towards the middle.
-
7Add your final lower band. Take a rubber band of the same color and twist it into a figure eight shape. Then, place the bottom of the figure eight on the bottom right peg. Stretch the top of the figure eight across to the bottom left peg. At this point you should have created a square around your four pegs.[23]
-
8Place your next set of bands. Take your next color of bands and place them across the pegs. Stretch your first band from the bottom left peg to the top left peg. Stretch the second band from the top left peg to the top right peg. Then, stretch the third band from the top right peg to the bottom right peg. And finally, stretch your last peg from the bottom right peg to the bottom left peg.[24]
- As you are placing your rubber bands, simply add them on top of the bands you have already placed. Each band that you place should be placed above the previous band you just placed.
-
9Add your third color. Repeat the same step, but with your third color. Stretch a band from the bottom left to top left peg. Then, stretch one from the top left to the top right peg. Stretch your third band from the top right to the bottom right peg. Finally, stretch your fourth band from the bottom right to the bottom left peg.[25]
-
10Move the bottom bands over your bands. Taking the very bottom band of your bottom left peg, bring it up and over all of your other rubber bands and over your peg using your hook. Then, take the bottom band on your top left peg and move it up and over all of the rubber bands and the peg.[26]
-
11Bring the next band up and over. Staying on that same top left peg, take the next bottom band (it should be the same color as the first bottom band) and bring it up and over the top rubber bands and the top of your peg. Repeat this step on the top right peg and the bottom right peg, bringing the bottom rubber band up and over and then the remaining bottom band up and over.[27]
-
12Grab the last bottom color band. On your bottom left peg you should still have one remaining band of the first color your used. Bring that band up and over the top rubber bands and then over the top of your peg. At this point you should have four loops of rubber bands left on each one of your pegs.[28]
- Once you do these steps, push your rubber bands down so that you can create more space to continue working.
-
13Add your next set of rubber bands. Use the same color you used for your very first set of rubber bands, and add a layer above the rest of your bands. Place the first band on your bottom left peg and then stretch it to your top left peg. Place another on your top left peg and stretch it to your top right peg. Place a third on your top right peg and stretch it to the bottom right peg. Finally, place a forth from your bottom right peg to your bottom left peg.
-
14Bring the bottom rubber bands over the top rubber bands. Repeat the same step as before, bringing the first bottom rubber band on your bottom left peg over all of your rubber bands and over the peg. Then, on the top left peg bring the bottom rubber band up and over and then bring the next bottom rubber band up and over. On the top right and bottom right peg you will do the same thing. Then, finally on the bottom left peg bring the last bottom band up and over.[29]
- On this step you should be bringing the second color you originally added up and over the rest of your colors. If you get confused as to what rubber bands to bring up and over, just pay attention to the colors. Make sure you are just working on one color. You shouldn't be messing with any of the other colors until the next step.
- Once again, push your rubber bands down to continue working.
-
15Add the next rubber bands and continue the process. You will now do this same process until you have your desired length. Add your next layer of rubber bands, using the same color as the color you just brought up and over the rubber bands. Then, bring the bottom rubber bands up and over and add the next color. Continue to repeat the steps to create a long chain.[30]
- You will always add a layer of rubber bands that matches the previous layer of rubber bands you just used. If color three was just on the bottom and you brought it up and over the pegs, you will then add a layer of color three rubber bands, stretching them from the bottom left pegs all the way around and back to the bottom left peg.
- Remember when you start to bring the bottom rubber bands over the pegs to move only one on the first bottom left peg. You will move both of the bottom bands on the next three pegs. Then you will move the final bottom band on the left peg up and over. Make sure to do this throughout.
-
16Finish off your chain. Once you have your desired length, bring the bottom row of bands up and over the top as you normally would. Then, instead of adding another layer of rubber bands, take the next bottom rubber bands and bring them up and over, repeating the same up and over process as you normally would.[31]
- After you have completed this step you should only have one color of rubber bands left on your pegs. This set of rubber bands is what you will use to connect your key ring.
-
17Place your hook through the remaining rubber bands. Take your hook and stick it under the rubber bands on the bottom left peg, moving the hook upwards. Then, once the rubber bands are secure around the hook, gently bring them up over the peg, keeping them on the hook. Then, place your hook under the rubber bands on the top left peg and bring them up and over the peg, keeping them on the hook. Repeat this step on the last two pegs.[32]
- Once you have finished this step you should have eight loops of rubber bands around your hook, with no bands left on the pegs.
-
18Place your keychain ring through the bands. Open up your key ring, as if you are about to put it on another key ring, and place the open end through the bands on your hook. Make sure you get all of the bands on the ring, because if you don't your chain could begin to fall apart. Once they are on the ring, slide them around and then pull your hook off. Now you have a cute keychain!


Community Q&A
-
QuestionHow do I make a starburst rainbow loom?
 Community AnswerCheck out the article on How to Make a Starburst Bracelet Using the Rainbow Loom.
Things You'll Need
- Rainbow Loom
- Rainbow Loom rubber bands
- Two pencils
- Rainbow Loom crochet hook
- C/S clip
References
- ↑ http://www.loomlove.com/fishtail/
- ↑ http://artzycreations.com/triple-fish-tail-rainbow-loom-bracelet-using-two-pencils/
- ↑ http://www.loomlove.com/fishtail/
- ↑ http://www.loomlove.com/fishtail/
- ↑ http://www.loomlove.com/fishtail/
- ↑ http://www.loomlove.com/fishtail/
- ↑ http://www.loomlove.com/fishtail/
- ↑ http://www.loomlove.com/fishtail/
- ↑ http://www.loomlove.com/fishtail/
- ↑ http://www.loomlove.com/fishtail/
- ↑ http://artzycreations.com/triple-fish-tail-rainbow-loom-bracelet-using-two-pencils/
- ↑ http://artzycreations.com/triple-fish-tail-rainbow-loom-bracelet-using-two-pencils/
- ↑ http://artzycreations.com/triple-fish-tail-rainbow-loom-bracelet-using-two-pencils/
- ↑ http://artzycreations.com/triple-fish-tail-rainbow-loom-bracelet-using-two-pencils/
- ↑ http://artzycreations.com/triple-fish-tail-rainbow-loom-bracelet-using-two-pencils/
- ↑ http://artzycreations.com/triple-fish-tail-rainbow-loom-bracelet-using-two-pencils/
- ↑ http://artzycreations.com/triple-fish-tail-rainbow-loom-bracelet-using-two-pencils/
- ↑ http://artzycreations.com/triple-fish-tail-rainbow-loom-bracelet-using-two-pencils/
- ↑ https://www.youtube.com/watch?v=4rIQ77bpNEo
- ↑ https://www.youtube.com/watch?v=4rIQ77bpNEo
- ↑ https://www.youtube.com/watch?v=4rIQ77bpNEo
- ↑ https://www.youtube.com/watch?v=4rIQ77bpNEo
- ↑ https://www.youtube.com/watch?v=4rIQ77bpNEo
- ↑ https://www.youtube.com/watch?v=4rIQ77bpNEo
- ↑ https://www.youtube.com/watch?v=4rIQ77bpNEo
- ↑ https://www.youtube.com/watch?v=4rIQ77bpNEo
- ↑ https://www.youtube.com/watch?v=4rIQ77bpNEo
- ↑ https://www.youtube.com/watch?v=4rIQ77bpNEo
- ↑ https://www.youtube.com/watch?v=4rIQ77bpNEo
- ↑ https://www.youtube.com/watch?v=4rIQ77bpNEo
- ↑ https://www.youtube.com/watch?v=4rIQ77bpNEo
- ↑ https://www.youtube.com/watch?v=4rIQ77bpNEo
About This Article
To make a rainbow loom fishtail bracelet, choose rubber bands in several different colors. Next, twist the first rubber band into an eight, put one side of the eight on the first peg, and stretch the other side over onto the second peg. Then, stretch two rubber bands onto the pegs without crisscrossing into an eight shape. Use your hook to pull the bottom rubber band over the top and push them down. Continue this pattern until you reach the desired length, then pull the bracelet off the loom and add a C clip for the closure. For tips on creating this design without a loom, read on!