wikiHow is a “wiki,” similar to Wikipedia, which means that many of our articles are co-written by multiple authors. To create this article, 72 people, some anonymous, worked to edit and improve it over time.
This article has been viewed 1,124,893 times.
Learn more...
Rainbow Looms are cheap, fun bands that you can get at many craft stores around the world. A fun hobby for anyone, weaving bracelets on a Rainbow Loom is easy and the items make great gifts or just accessories for family and friends.[1] You'll find three methods in the article below. Get started with Step 1 below or see the table of contents above to find a method that sounds fun for you!
Steps
Basic Bracelet
-
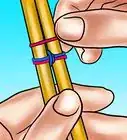
1Set up your Rainbow Loom kit. Read the instructions that came with your loom and set it up like the directions say. Make sure the U-shaped pegs are facing up. The arrows should be facing away from your body.
-
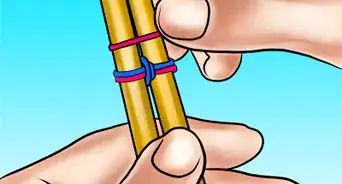
2Place the first band diagonally. Place your first rubber band diagonally on a peg. Starting with the first middle peg is recommended. It doesn't matter what side you go to when you move the band diagonally, but stick with it.Advertisement
-
3Place a second band. Place the second band diagonally from the first band, with the last peg you placed a band on serving as the starting point.
-
4Repeat the process. Repeat those steps, reversing the direction of the diagonal each time, until you have what looks like a zig-zag all the way down the loom.
-
5Flip the loom. Flip the rainbow loom so now the pegs are facing downwards. The arrows should be pointing towards your body. This will help you grab the bands to weave them.
-
6Use the hook. Use the hook to grab the second band on the first middle peg from underneath the first band.
-
7Place the band. Flip the band on your hook so that it bends in half (bent over the band above it) and place it over the second peg in the next row. Whether it is to the left or right depends on what you chose earlier.
-
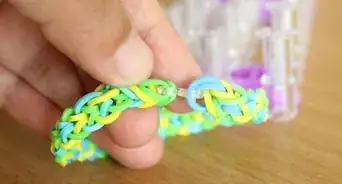
8Repeat this process. Continue the process across the whole Rainbow Loom. You should end up with something that looks like the image above (like a series of connected circles).
-
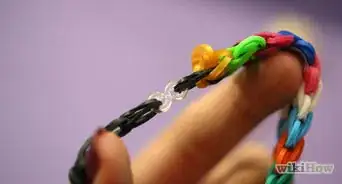
9Add the clip. Get a C-clip or an S-clip from your kit. Hook it onto the last rubber band.
-
10Remove the bands from the loom. Remove the rubber bands from the loom, carefully. Stretch the bracelet out.
-
11Connect the ends. Connect the end of the bracelet to the C-clip.
-
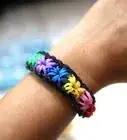
12Done! Enjoy your new bracelet. Now that you're finished, keep making more!


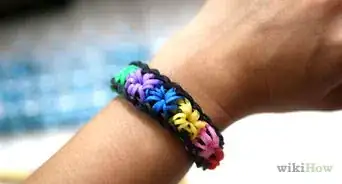
Starburst Bracelet
-
1Make the perimeter bands. With the arrows pointing up, loop a band from the first center peg to the first left peg.
- Next, loop a band from the first left peg to the second left peg, then the second to the third.
- Continue down the left line until you reach the second to last peg.
- Then loop a band from the second to last peg diagonally to the last middle peg.
- Go back to the beginning and repeat this for the other side, until you have bands all around the perimeter of the loom. [2]
-
2Make the first burst. Push all of the perimeter bands down.
- Then, place a band in Color A (whatever color you want) on the second peg of the middle row and the second peg of the right row. Then place five more bands going from the middle row peg to each of the surrounding pegs, in a clockwise motion. This should leave you with a starburst or asterisk shape.
- Push down all bands as you go.
-
3Make the next bursts. Place a band from the fourth peg of the middle row diagonally to the fourth peg of the right row. Do the clockwise bands again until you have another burst with a bottom that overlaps with the top of the first burst. Continue doing this until the whole loom is filled (inside the perimeter).
- Keep pushing down the bands each time.
- You can change the colors of the burst as you go.
-
4
-
5
-
6Weave all of the bursts. Next, starting from the center of the burst and moving counter-clockwise, use your hook to grab the first half of each band and loop it onto the peg it starts on (going center, peg, center, peg, center, peg, and so on). Always be careful not to dislodge the other bands on the center peg. You should be left with something that looks like a flower or a sun. Do this process for all of the bursts.
-
7Weave the perimeter. Starting with the band that goes around the bottom right and bottom center pegs, grab the end that's wrapped around the bottom center peg and pull it down (without dislodging the other bands)
- And over the bottom left peg, so that both ends of the band are on that peg. Then, do the same for the band which wraps around the bottom right and second to left pegs.
- Proceed until the entire left side is done, ending when you hook the last left side band onto the last middle peg.
- Then go back to the start and do the right side of the loom.
-
8Add the end loop. Reach your hook down through all of the bands on the last middle peg.
- Grab a new band that you hold in your fingers, pull it up through the bands, and then slide your hook through the loop of the new band, so that it's completely wrapped around the hook.
- Then, holding the hook in your hand with the loop still around it, pull the whole bracelet off of the loom.
-
9Add the extension. Add new bands onto the loom, around five of them all down one side.
- Loop the band from the first peg onto the second peg, then the second peg onto the third, third onto the fourth, and so on. Then, take the first loop on the end of your bracelet (on the side without the hook) and treat it like another rubber band, adding it to the chain you've started on the loom. Next, chain the bands from the end with the bracelet all the way down to the first band.
-
10Add the C clip. Add a C or s clip to the last band on the loom, take the whole thing off of the loom, and then clip the C or s clip onto the loops on your hook. Take your hook out and you're done![3]
-
11Enjoy your new bracelet.


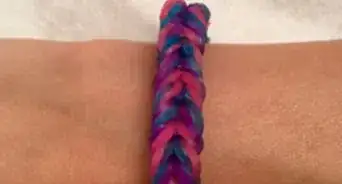
Triple Single Bracelet
-
1Set up your loom so that the rows are in the shape of a "v".
-
2Take a colored band and take it from the bottom peg and stretch it up to the peg right above it. Do the same on all of the bottom pegs.
-
3Color banding: Continue doing the same thing all the way up the loom.
-
4Center banding: Take a neutral color and, skipping the first set of pegs, place it on the loom so it looks like an upside-down triangle.
-
5
-
6Continue hooking. Do the same thing on all of the rows above the first one until you reach the end if the loom.
-
7Once you reached the end gently hook the band on both pegs and transfer the bands on the last middle peg.
-
8Add the end loop. Reach your hook down through all of the bands on the last middle peg. Grab a new band that you hold in your fingers, pull it up through the bands, and then slide your hook through the loop of the new band, so that it's completely wrapped around the hook.
- Then, holding the hook in your hand with the loop still around it, pull the whole bracelet off of the loom.
-
9Add the extension. Add new bands onto the loom, around 8-10 of them all down one side.
- Loop the band from the first peg onto the second peg, then the second peg onto the third, third onto the fourth, and so on. Then, take the first loop on the end of your bracelet (on the side without the hook) and treat it like another rubber band, adding it to the chain you've started on the loom. Next, chain the bands from the end with the bracelet all the way down to the first band.
-
10Add the C or S clip. Add a C or S clip to the last band on the loom, take the whole thing off of the loom, and then clip onto the loops on your hook.[4]
-
11Take your hook out and you're done!


Connect'd Tail Bracelet
These steps have the same step as the fishtail but for this one, you just need 2 rubber bands each fold, while the fishtail uses 3.
-
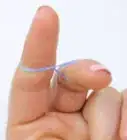
1Take any color of rubber band.
-
2Twist it into the number 8. Put it on your thumb and your index finger.
-
3Add another rubber band on top of the 8 formal band but this time you don't need to make it 8 formal. Just make it normal.
-
4Take the 8 formal band upper to the normal band carefully from the thumb and the index finger.
-
5Add another band put it on the upper part and take the lower part to the upper.


Inverted Fishtail Bracelet
-
1Make a rubber band into the shape of an 8. Put one loop on each finger.
-
2Repeat two more times.
-
3Put the middle band down to the bottom.
-
4Bring the new middle band over your fingers.
-
5Put another band over on your fingers. However, this time, do not place it in the shape of an 8.
-
6Repeat steps 3 and 4.
-
7Keep on repeating steps 3, 4, 5 and 6 until the band is the right size. You can test this by getting the end of it then putting it at the top of the band.
-
8Gather all the bands on one finger. Then put them on the other finger.
-
9Get your "S" or "C" clip. Clip it to all of the bands on the finger.
-
10Clip the other end of the clip to the other end of the bracelet. Now you're done![5]


Single Loop Bracelet
-
1Grab between 10 and 20 bands any color. Make sure you have an S clip.
-
2Grab your first band. Cross it like an X.
-
3Once you have crossed the first band, add another on top of the crossed band.
-
4Carry on doing that until you reach the desired finish length of your bracelet.
-
5Grab the S clip. Put the S clip on. Done. That's all there is to the single loop.


Ladder Bracelet
-
1Make sure your loom arrow is facing away from you. Make sure you have an S or C clip.
-
2Place your perimeter bands on the loom.
-
3Place your bands that go straight across the loom.
-
4Place your bands that go through the middle set of pegs on your loom.
-
5place a cap band on the last middle peg. twist your cap band in a figure 8 and turn one part upon itself. now, we are ready to loom!!
-
6Loom the Middle bands.
-
7Place the bands across the loom again.
-
8Loom the Outer bands.
-
9Slip your hook down through the area and grab your extra band and slip it through the channel.
-
10Create your extension for your wrist. and there you go! that's how you make a ladder bracelet.


Tutu Bracelet
-
1Set up your loom so that the rows are straight. Do not use the third column, if possible.
-
2Follow steps 2 to 5 of the triple single bracelet without the third column.
-
3Start hooking like you would with the triple single bracelet.
-
4Follow steps 7 to the end of the triple single bracelet to complete!
Adding an Attached Ring
Community Q&A
-
QuestionWhere can I get a loom kit?
 Community AnswerYou can get them at craft stores (like Michael's or Hobby Lobby), or at Walmart. You can also buy them on Amazon (and usually they have pretty good deals).
 -
QuestionI'm stuck on step eight for the basic bracelet.
 Fufflet06Community AnswerJust do step seven until you get to the end of the loom.
 -
QuestionHow can I connect rainbow loom bands?Community AnswerPut one through the other and connect them at the top. Keep repeating this process, and when you are done, take your S or C clip and both of the end bands in it.
Warnings
- Be careful not to be too rough with the bands or catch them on anything sharp (like the corners of the pegs). This can break the band and ruin your bracelet!⧼thumbs_response⧽
References
- ↑ https://www.mirror.co.uk/news/uk-news/what-loom-bands-everything-you-3794285
- ↑ https://www.youtube.com/watch?v=RI7AkI5dJzo
- ↑ https://www.youtube.com/watch?v=Hlq_1TEYpwI
- ↑ https://www.rainbowloompatterns.com/rainbow-loom-patterns/bracelet/Triple-Single
- ↑ http://www.loomlove.com/make-inverted-fishtail/
About This Article
To make a basic Rainbow Loom bracelet, stretch a rubber band diagonally from the first center peg of the loom to the first left peg. Add a second band onto the first left peg, stretching it diagonally to the second center peg, then add more rubber bands in a zig-zag all the way down the loom. Turn the loom upside down, then use your hook to grab the second rubber band and stretch it over and around the first, hooking it back onto the outside peg. Repeat this process all the way down the loom, then connect the ends of the bracelet with an S-clip. To learn other designs of loom bracelets, such as a starburst or inverted fishtail, keep reading!