wikiHow is a “wiki,” similar to Wikipedia, which means that many of our articles are co-written by multiple authors. To create this article, 9 people, some anonymous, worked to edit and improve it over time.
This article has been viewed 46,357 times.
Learn more...
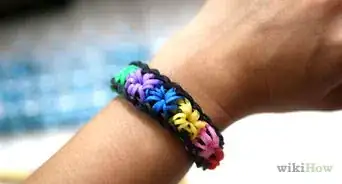
Rubber band loom bracelets are easy and cheap to create, making them a great option for the penny-pinching, fashion-conscious consumer. However, there are many different methods to make loom bracelets, varying from simple to complex, and the sheer number may be bewildering to beginners. Read further to see how to make a couple simple, beautiful designs that will make your friends jealous, and whet your appetite for more creativity!
Steps
Preparing your Workspace
-
1Think about the sort of colors you would like to wear. Do you have blue eyes? Match your bracelet to your eyes with an alternating blue/green, or blue/yellow bracelet. Are you planning on wearing a red outfit? Make a predominantly red bracelet. Maybe you don't want to match at all. You are versatile and unique, so why not make your bracelets the same?
- Many websites sell multiple different colors, from monochrome bands to multicolored, tie-dye, and glow in the dark. Mix and match to your heart's content.
-
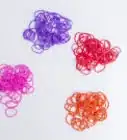
2Gather all your supplies. To make the most basic bracelets, you will only need rubber loom bands, a loom, and a metal hook tool to attach them together. However, the quality and style of these products differ wildly. Browse at a few sites to see which ones you like the most.
- You can buy silicon, jelly, latex-free, and other types of loom bands. If you are allergic to latex, the type of band you buy is incredibly important to avoid allergic reactions. Make sure you get the correct looms for your project, and your health.
- C-hooks are necessary to make bracelets that are easily removable. You will attach these to the end of your loom bracelet when you have finished attaching all the loops. It will attach to the other end of the bracelet, and permit you to put on and remove the bracelet at will. These also come in many different colors.
- Making loom bracelets is possible without a loom, but it is more difficult to do. As these are relatively cheap, it is definitely a good investment to buy one, especially if you are planning to make many loom bracelets.
- It is also possible to work without a hook tool, by using your finger or a common household item, like a pen or a screwdriver. Metal hook tools are also cheap, though, and the long hooked apparatus is very useful for getting in the small spaces in and around a loom to hook the rubber band loops. It is best to invest in one of these, if you plan to make many bracelets, as it reduces the time and hassle of your work.
Advertisement -
3Set up your workspace. You will need a clean, well-lit, and flat area to do the most productive work on your future bracelets.
- Try to pick an open area to work in, such as a clean kitchen table or a large desk. Working on the couch may be more comfortable, but if you drop your looms, you'll have to dig through the cushions to find them again. If you drop them on a table, they're still right there in front of you.
- Working at a large, open space is also enticing to other people, who may want to join you. If you enjoy group projects, this is a great way to get your friends or family involved. If not, then pick a smaller space.


Using the Double-Band Fishtail Loop
-
1Set up your workstation. Take your loops, your loom, and your metal hook tool and set them on your working area, such as a desk or a table.
-
2Take two loops and make an infinity loop on the lower left rungs of your loom.
- Your loom should be facing away from you, and the direction of your bracelet making should run away from you, up the loom.
-
3Take four more loops and put them on top of the first loop, without making them into infinity loops.
- If you are making a multi-colored bracelet, make sure you alternate the colors here. If you have red and white, for the first infinity loop, place two reds, then for the second regular loop two whites, and for the third regular loop, another two reds.
-
4Take your metal hook tool. Placing it underneath the right loops of the infinity loop, wrap it over the right rung and on top of all three loops.
-
5Do the same thing for the left loops of the infinity loop. Now, both loops should be wrapped around the upper two, regular loops.
- Press down on all three loops so that they sink to the bottom of the two rungs, lest they spring off and ruin your work!
-
6Add another two loops on top of all three loops.
-
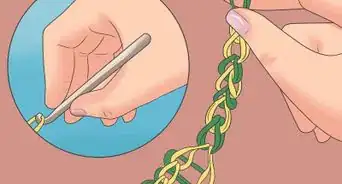
7Using your metal hook tool, take the two loops of the same color at the bottom of the structure and pull them up and over, as in steps 4 and 5.
-
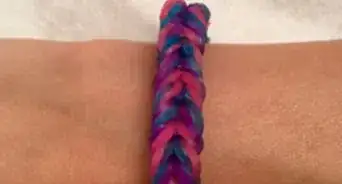
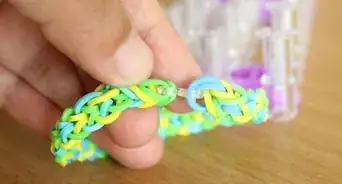
8Repeat step 7 until you have a "fishtail" like looped structure of the size that you want. Continually repeating step 7 will pull the fishtail out and increase its length.
- Be mindful of your wrist size when you are doing this, as the circumference of your wrist will determine the size of your bracelet.
-
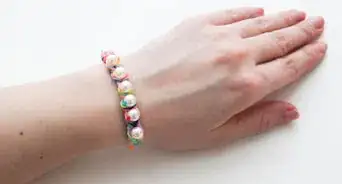
9Remove the bracelet from the loom. Take your thumb and your index finger and wrap them around the loops of the bracelet still attached to the loom. Carefully edge it upwards until it is fully removed.
- Make sure the bracelet is the correct size for your wrist, or the wrist of the person you are making it for, before removing it. It will be difficult to resize once you've finished making it.
-
10Remove the bands that are sticking out from the end. Be careful not to remove the integral bands, though, which are necessary for the bracelet's structure.
-
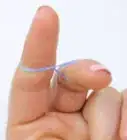
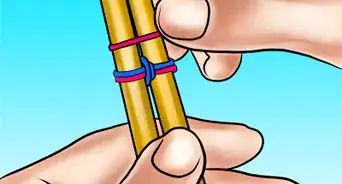
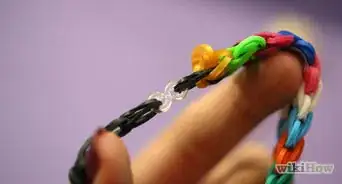
11Add a C-hook to the end of the bracelet. Bringing the two heads of the remaining open loops together, insert your index finger through the space and then enlarge the opening. Insert the C-hook here.
-
12Attach the C-hook to the other end of the bracelet. Huzzah! You're finished!


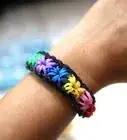
Mining for a Diamond Bracelet
-
1Set up your workstation. Take your loops, your loom, and your metal hook tool and set them on your working area, such as a desk or a table.
- You can use either staggered or even position for your loom, but even position is superior. Take the middle row of the loom and place it in the center, so that it is equidistant from the other two rows.
- Remember that you are placing loops from right to left.
-
2Take your first color loop and place it diagonally on two rungs in the first and middle rows. Starting from the second-to-last rung on the first row, place this on the last rung of the middle row, on the rightmost edge.
-
3Take your second loop of the same color and place it horizontally on two rungs of the middle row. One rung should be the middle row rung that the diagonal loop is also on, so start from the edge of the loom and move one rung out.
-
4Take your third loop of the same color and place it diagonally on two rungs in the middle and third rows. Starting from the last rung of the middle row, place it on the second to last rung of the third row.
-
5Take three loops and place them horizontally on each row, moving left. Do this starting from the second-to-last rungs of each row, so that they are on top of one of the rungs of the first three loops and ending on the third-to-last rungs of each row.
- This is a good time to introduce a second color, if you are planning to use one.
-
6Repeat step five. Starting from the third-to-last rung of each row, place one loop horizontally on the fourth-to-last rung, so that the first half of loop is on top of the previous loop, and the second half is on a new rung.
- This is a good time to introduce a third color, if you are planning to use one.
-
7Continue repeating step 5, placing loops leftwards until near the end of the loom. Make sure you continue introducing new colors as you desire, as well as alternating the colors to form a pattern.
- Do not place any loops on the very last rungs of the loom.
-
8Repeat steps two, three, and four. You should form a mirror image of the first, diagonally placed loops.
- Ideally, you will have alternated all your colors in a certain pattern, so that the color at the beginning is identical to the color at the end.
- You could also form a wave pattern with the colors. It is up to you how to pattern your loop bracelet.
-
9Make an infinity loop, double it back over itself, and place it on the final rung of the middle row on the lefthand side of the loom.
-
10Place loops vertically across the first, middle, and third rows of the loom. Starting from the second-to-last rungs on the right side, move down the loom until you have reached the second-to-last rungs on the left side.
- You can use whatever colors you want, or you can use a single color to add a uniform layer on top of the pattern you have created.
-
11Turn the loom around 180 degrees. The right side will now be the left, and the left the right. The single, doubled loop that you placed at the end will now be closest to you.
-
12Take your metal loop tool and with the open side of the hook facing away from you, push back the single, doubled loop on the last middle rung and grab the top, colored band beneath it.
-
13Loop the top, colored band diagonally back onto itself by placing it on the second-to-last rung of the first row.
- This will form a teardrop shape between the second-to-last rung on the first row, and the last rung on the middle row.
-
14Grab the bottom bands of all subsequent rungs on the first row, looping them back over themselves while moving leftwards down the loom.
- Like with the first looping back, you will have to reach underneath the top band with your metal loop tool to reach the bottom band, which you will then loop over itself onto the next rung moving leftwards.
- The loop of the second-to-last rung of the first row to the left will be looped diagonally onto the last rung of the middle row to the left.
-
15Repeat steps 12 through 15, except looping the bands of the middle row horizontally while moving leftwards.
- The teardrop shape will be indicative that you are doing it correctly while looping the bands of the middle row back on themselves.
-
16Repeat steps 12 through 15, except looping the bands of the third row first while moving leftwards.
- The first loop should move from the middle row to the third row diagonally, then horizontally, as in steps 12 through 15.
- The teardrop shape will be indicative that you are doing it correctly while looping the bands of the middle row back on themselves.
-
17Take your hook tool and push it beneath all the loops on the last rung of the middle row to the left.
-
18Place another band on the hook tool and pull it through all the loops.
-
19Loop this band back onto your hook tool, so that both ends of the band are now on the hook. Then, move the bands backwards onto the thick part of the tool above the hook.
-
20Remove the bracelet. Slowly and carefully pulling upward with the hook tool, take the bracelet off the loom.
- Avoid pulling too hard, as this may stretch your bracelet or even break some of the loops.
- Make sure to leave your hook tool attached to the loop at the end, as it will be necessary later.
-
21Extend the length of the bracelet. Your bracelet will probably be too small for your wrist, so estimate the number of loops you will need and begin extending the bracelet. You can do this by putting loops horizontally on the rungs going left, doubling up on each end.
- For a smaller wrist, such as that of a child's an additional six bands will be sufficient. If your wrist is larger, add as many as necessary.
- You can continue using one color, or you can add multiple colors, depending on whether you want to continue with the pattern or just extend the size of the bracelet.
-
22Attach the end loop of the bracelet to the end rung of your new row of loops. Stretching out the final loop of the bracelet, simply attach it on top of the final rung of the new loop row.
-
23Turn your loom around so that the bracelet and the row of loops is facing away from you.
-
24Take your hook tool and loop the new row of loops back on themselves. This is just like when you were making the main body of the bracelet.
- Move all the way down the loom to the end.
- You know you've done it right when the loops make a teardrop shape.
-
25Add a C-hook to the final loop of the new row of loops. Stretching the final loop to the vertical rung directly above it to make room, attach a C-hook to the end of the loop facing outwards.
-
26Take the new row of loops off of the loom.
-
27Attach the C-hook the other end of the bracelet. You're done!


Community Q&A
-
QuestionHow do I get more looms?
 Community AnswerYou can get them in shops and stores nearby or you can find them online.
 -
QuestionIf I want, can I make it with any colors?
 Community AnswerYes, you can try with any colors you like. There are no rules for what colors you should use.
About This Article
To make a loom bracelet, you'll need rubber loom bands, a loom, and a metal hook tool. Get started by making an infinity loop on the lower left rungs of your loom using 2 bands. Then, place 4 more bands on the same rungs, but this time don't make an infinity loop with them. Next, use your metal hook tool to pull the bottom 2 bands up and over the rungs, and add another 2 loops on top. Finally, pull the bottom 2 loops up and over the rungs, and repeat the process until your bracelet is long enough. To learn how to make a diamond loom bracelet, scroll down!