This article was co-authored by wikiHow staff writer, Travis Boylls. Travis Boylls is a Technology Writer and Editor for wikiHow. Travis has experience writing technology-related articles, providing software customer service, and in graphic design. He specializes in Windows, macOS, Android, iOS, and Linux platforms. He studied graphic design at Pikes Peak Community College.
The wikiHow Tech Team also followed the article's instructions and verified that they work.
This article has been viewed 260,209 times.
Learn more...
Roblox is a large, social gaming platform. Roblox Studio is used to make games within the Roblox platform that other players can play online. Some games like MeepCity and Jailbreak are good examples of what you can create! This wikiHow teaches you how to create your own place in Roblox.
Steps
Getting Started in Roblox Studio
-
1Go to https://www.roblox.com/ in a web browser. You can use any web browser on PC or Mac. If you are logged in, you will see the Roblox dashboard.
- If you aren't automatically logged in to your Roblox account, click Log In in the upper-right corner of the website and sign in with the username and email address associated with your Roblox account.
-
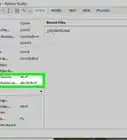
2Click Create. It's the third tab at the top of the Roblox dashboard. This displays a list of your creations.Advertisement
-
3Click Edit next to your place. You should have at least one creation called [Your username's] Place. Click Edit next to this (or any other creation you have) to open the creation in Roblox Studio.
- If you want to create a new game in Roblox, click Create New Game at the top of the menu.
- If you have not installed Roblox Studio, a pop-up will appear in the center of the screen. Click the button that says "Download Roblox Studio" to install Roblox Studio.
-
4Look around your place. Your place starts off as a pre-made creation. It has many basic creations on display. Use the following steps to navigate the 3D environment and have a look around your place:
- Press W to move forward, and S to move backward.
- Press A to move left, and D to move right.
- Press E to move Up, and Q to move down.
- Hold Shift to move slowly.
- Right-click and drag the mouse to rotate your view.
- Click the mouse wheel and drag to pan your view from side-to-side.
- Roll the mouse wheel to zoom in/move forward fast.


Adding Objects and Placing Objects in Your Place
-
1Click Home. It's the first tab at the top of Roblox Studio. This displays panel of basic controls at the top of the studio.
-
2Open the Toolbox. Click the icon that resembles a toolbox in the panel at the top to toggle the Toolbox on and off. The toolbox allows you to search for creations that you and other people have made. Ensure the Toolbox is toggled on.
-
3Click Marketplace in the toolbox. It's the first tab at the top of the Toolbox. The Marketplace is where you can search for objects that other players have made.
- By default, the Toolbox is displayed in a panel to the right in Roblox.
-
4Enter the name of an object in the search bar. You can search for any object you want to add to your place. The marketplace contains everything from furniture, decorations, vehicles, characters, and even fully furnished buildings. You can make a cool place in Roblox using nothing but objects from the Marketplace.
-
5Click and drag an object you want to add. When you see something you like in the Marketplace, click and drag it to add it to your place.
-
6Click an object to select it. Selected items are highlighted with a blue box. You must select an item to move or modify it.
- To select multiple objects, click and drag a box around the objects you want to select.
-
7Click the Move icon. It's the icon that resembles a cross arrow. It's in the Tools panel in the upper-right corner. This tool allows you to move an object.
-
8Click and drag an object. To move an object with the Move tool, simply click and drag it. To move the object along a specific axis, click and drag the green, red, or blue arrows outside the selected object.
-
9Click the Scale icon. It's the icon that resembles a square with an arrow pointing out of the corner. It's in the Tools panel in the upper-right corner. This tool allows you to make objects bigger or smaller.
-
10Click and drag one of the colored spheres around the selected object. With the Scale tool select, this enlarges or shrinks the object depending on the direction you drag the sphere. For most objects, this will scale the object proportionally regardless of which sphere you drag.
-
11Click the Rotate icon. It's the icon that has a circular arrow around a dot. It's in the Tools panel in the upper-right corner.
-
12Click and drag one of the colored spheres around the selected object. With the Rotate tool selected, you will see the colored spheres attached to corresponding colored circles around the object. Click and drag one of the spheres along the colored circle to rotate the object. By default, objects snap to 45-degree angles.
-
13Press Delete to remove an object. If you want to remove an object, simply click an object to select it and press the "Delete" key to remove it.
- Alternatively, you can use the options in the "Clipboard" panel in the upper-right corner to copy and paste and object, cut and paste an object, or duplicate an object.


Modifying the Terrain
-
1Click Home. It's the first tab at the top of Roblox Studio. This displays panel of basic controls at the top of the studio.
-
2Open the Terrain Editor. Click the icon that resembles hills and mountains in the panel at the top to toggle the terrain editor on and off.
-
3Click Create (optional). When you open your place in Roblox, you will already have some terrain already created. If you want to change the terrain, click the Create tab at the top of the Terrain Editor.
- By default, the Terrain Editor displays in a panel to the left.
-
4Generate new terrain (optional). If you want to generate new terrain, use the following options to generate new terrain.
- Enter the position of the terrain for each axis under "Map Settings" (advanced users only).
- Enter the size of the terrain for each axis under "Map Settings" (advanced users only).
- Toggle the biomes you want to generate. Possible biomes include "Water", "Plains", "Dunes", "Mountains", "Arctic", "Marsh", "Hills", "Canyons", "Lavascape".
- Use the slider bar next to "Biome Size" to adjust the size of the biomes.
- Click the toggle switch next to "Caves" to generate caves.
- Click Generate and allow some time for it to finish generating terrain.
-
5Click the Edit tab. It's the third tab at the top of the Terrain Editor. This tab contains all the tools used to modify the terrain.
-
6Click a tool. The tools have icons that resemble terrain being modified at the top fo the Edit menu in the terrain modifier. The tools are as follows:
- Add: This tool creates new chunks of terrain.
- Subtract: This tool cuts away chunks of terrain.
- Grow: This tool increases the elevation of the terrain.
- Erode: This tool decreases the elevation of the terrain.
- Flat: This tool increases the elevation of the terrain and caps it off with a flat surface.
- Smooth: This tool smoothes out elevation differences in the terrain.
- Paint: This tool allows you to change the material of the terrain.
-
7Select a brush shape. The Brush is the 3D shape that is used to modify the terrain. Click one of the shapes below "Brush Settings" to select a brush shape. You can select a sphere, a cube, or a cylinder.
-
8Adjust the brush size. To adjust the brush size, click and drag the slider bar next to adjust the brush size, or enter a number for the brush size in the box next to the slider bar.
-
9Adjust the brush strength. The brush strength affects how fast the brush modifies the terrain. Click and drag the slider bar next to "Brush Strength" to adjust the strength of the brush.
- This option is not available for the "Add", "Subtract", or "Paint" tools.
-
10Select the position of the brush. Click one of the boxes next to "Pivot Position" to select how the brush sits on top of the existing terrain. The 3 options are as follows:
- Bot: This option places the bottom of the brush on the top of the terrain.
- Cen: This option places the center of the brush on the top of the terrain.
- Top: This option places the top of the brush on the top of the terrain.
-
11Enable "Snap to grid" (optional). This option forces the brush to snap to the grid. Click the toggle switch next to "Snap to Grid" to enable this feature.
-
12Enable "Ignore water" (optional). If you don't want the brush to affect water formations, click the toggle switch next to "Ignore water".
-
13Select a material. To select a material, scroll down to the bottom of the Brush menu and click one of the material icons. The terrain menu has a variety of material options, including, grass, dirt, brick, cobblestone, pavement, water, glacier, lava, snow, and more.
-
14Click and drag to modify the terrain. With a terrain tool selected, click and drag the terrain to modify it.
-
15Create a sea level (optional). If you want to create a static sea level for your world, use the following steps:
- Click Edit in the Terrain Editor.
- Click the Sea Level tool.
- Enter the position of the sea level for each axis below "Map Settings" (advanced users only).
- Enter the size fo the sea level for each axis below "Map Settings."
- Click Create.


Building Objects
-
1Click Model. It's in the menu bar at the top of the Roblox Studio. This displays a panel of build tools at the top of Roblox.
-
2Click the drop-down menu below Part. This displays a drop-down menu with the 4 basic parts you can add.
-
3Add a part. Click one of the block shapes in the Parts menu to add a part. The four basic parts you can add are as follows:
- Block
- Sphere
- Wedge
- Cylindar
-
4Select the part. To select a part, simply click it.
-
5Use the Move and Rotate tools to position the part where you want it. Just like you would with any other object, you can use the Move and Rotate tools in the Tools panel at the top to move and position your parts to the exact position you want them.
- If you find grid snapping to be too restrictive, click the checkbox next to Move and Rotate in the "Snap to Grid" panel at the top to turn off Snap to Grid for "Move" and "Rotate". Alternatively, you can lower the number next to "Move" and "Rotate" so that it snaps to the grid in smaller increments. For example, you can change "Move" to "0.5" instead of "1". This will snap to the half a grid space, instead of whole space. You can also change "Rotate" to 30 degrees or another angle.
-
6Use the Scale tool to modify the shape of your part. The Scale tool works a little differently depending on the part you have selected. The Scale tool can modify shapes in the following ways:
- Blocks: The Scale tool allows you to change the length, width, and height of rectangle blocks. You can use the Scale tool to create a small cinderblock or a large wall.
- Sphere: The Scale changes the size of a sphere proportionally. No matter what size, it will always be a perfect sphere.
- Wedge: The Scale tool allows you to change the length, width, height, and steepness of the incline of a wedge.
- Cylindar: The Scale tool allows you to change the length and size of a cylinder, but it will always be perfectly round.
-
7Select a color for a block. Use the following steps to change the color of the block:
- Click a block to select it.
- Click the drop-down menu below "Color" in the Parts panel at the top.
- Click one of the colored swatches to change select a color for the part.
-
8Select a material for the block. Materials give the block a realistic looking texture. Textures include, plastic, metal, wood, concrete, granite, slate, and more. Use the following steps to select a material for a block.
- Click a block to select it.
- Click the drop-down menu below "Material".
- Click a material to select it.
-
9Combine shapes together. You can combine these four basic shapes to create more complex shapes. For example, you can place a cylinder along the edge of a block to create a block with a rounded edge. Or you can place a sphere on the top of a cylinder to create a cylinder with a rounded top.
-
10Click Union to join combined shapes. When you have combined blocks together into a shape you like, make sure you have all the blocks in the shape selected and click Union in the Solid Modeling panel at the top to combine the blocks into a single shape.
-
11Use Negate to cut a hole in a block. Sometimes you may want to cut a hole in a block in order to create a more complex shape. Use the following steps to cut a hole in a block.
- Create a block that intersects with another block.
- Select the intersecting block.
- Click Negate in the Solid Modeling panel at the top. The intersecting block will turn red.
- Click the red block and the block it intersects.
- Click Union in the Solid Modeling panel at the top. The red block will cut a hole in the block it intersects.
-
12Click Separate to un-join blocks. If you need to separate blocks that have been joined for any reason, click the blocks that have been joined together, and then click Separate in the Solid Modeling panel at the top to separate the blocks. This includes blocks with holes cut in them using the Negate option.


Saving and Publishing Your Place
-
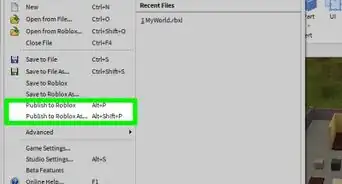
1Click File. It's in the menu bar at the top.
-
2Click Save to File as. It's in the File menu at the top. This option saves a copy of your world to your computer. That way you have a local copy saved to your computer.
-
3Enter a name for your level. Use the space next to "File Name" to enter a name for the level.
-
4Click Save. This saves a copy of your world to your computer.
-
5Click Save to Roblox. It's in the File menu at the top. This will save your world to the Roblox servers without them being publicly available for anyone to play.
-
6Click Publish to Roblox. It's in the File menu at the top. This publishes your world on Roblox so others can search and play your world.


Community Q&A
-
QuestionHow would I make an Enter Badge?
 AnimebreadTop AnswererYou could place a badge giver on the spawn point and make it invisible. They won't be able to see it, but will still achieve the badge.
 -
QuestionHow do I get Robux?
 Community AnswerCreate game passes in your game so people could buy things in the game or use real money to buy it.
 -
QuestionHow do I access the Roblox Studio?
 Community AnswerGo to Develop and click "Create New Place" (or, if you have a place already, click 'Edit"), and it will load.
Warnings
- If you save your place and then later you find that you liked it the way it was before, go to "Configure this Place", go to the bottom of the page, and select the version you want to revert it to.⧼thumbs_response⧽
- Save it to your computer. If Roblox didn't save it, your computer does.⧼thumbs_response⧽
- Save your place often (a good time between every save is 30 minutes) so you don't lose the place you were building in.⧼thumbs_response⧽
- Don't overuse free models. Although Roblox encourages the use of free models, many top developers consider it as a sign of a lack of creativity and people won't visit your game often⧼thumbs_response⧽
- When making a fan game on Roblox, make sure you get permission from the owners/IP Holders of the original game. Game development businesses are right now cracking down on fan games.⧼thumbs_response⧽
- When you're ready to publish your game, turn on Filtering Enabled. This can be found in the properties tab of the workspace. Leaving this off can let hackers mess with your game's servers.⧼thumbs_response⧽
About This Article

1. Log in at https://www.roblox.com/.
2. Click Create at the top of the screen.
3. Click Edit next to your place.
4. Click an object to select it.
5. Use the Move and Rotate tools to position an object.
6. Click Toolbox in the panel at the top.
7. Click the Marketplace tab.
8. Use the search bar to search for objects you want to add to your place.
9. Click and drag an object to add it to your place.