X
wikiHow is a “wiki,” similar to Wikipedia, which means that many of our articles are co-written by multiple authors. To create this article, 9 people, some anonymous, worked to edit and improve it over time.
This article has been viewed 32,849 times.
Learn more...
A cloth bow can be used for all sorts of decorative purposes, including craft projects, hair accessories, gift wrapping and household decoration. There are various ways to make bows from cloth, and some suggestions are provided in this article to inspire your own creations.
Steps
Method 1
Method 1 of 3:
Basic cloth bow
-
1Find suitable fabric for the bow. Choose fabric according to the end use for the bow. For example, you might choose fabric that matches an outfit, suits a party theme or goes with the wrapping paper.
- Scrap fabric is ideal for practicing with, and for making any cloth bow with.
-
2Cut the fabric into a strip. For a larger bow, cut a wide strip; for a smaller bow, cut a narrow strip. Ensure that it is cut to a good length too; you can always cut off excess if needed but can't add more if you didn't cut it long enough to begin with.Advertisement
-
3Lay the fabric strip down on a flat surface. Pick up the fabric in two places, at an even distance from the center of the fabric strip. Using these sections to draw up the ribbon, form two half-loops each side.
- The left side loop becomes "A", while the right side loop becomes "B" (or vice versa, whichever way you're most comfortable with).
-
4Wrap loop A around loop B. Then bring loop A back through the middle. This forms the basic bow shape, and a middle knot forms in the center.
-
5Draw the loops together firmly. This tightens the bow and allows it to hold its shape. You may also need to pull on the tail ends of the bow. Adjust to be even both sides.
-
6Trim the tails. Either cut the tails in a "V' shape or diagonally. This looks neater and prevents the fabric from fraying.
-
7Done. You can make as many as you need using the same method; the more you make, the easier this becomes.


Advertisement
Method 2
Method 2 of 3:
Two-toned cloth bow
-
1Choose two fabric ribbons or fabric strips. One ribbon or fabric strips needs to be wider than the other.
-
2Cut the ribbons or fabric strips twice the length of the desired bow length. The length is determined by the size of the bow you want to make. Both ribbons or fabric strips should be of the same length.
-
3Make a complete loop from the wider piece of ribbon or fabric strip. Affix the ends together using glue.
-
4Wrap the narrower piece of ribbon or fabric strip around the wider loop. Center it as you do so. Secure it with glue.
-
5Flatten the loop once dried. Glue it at the center. This forms two loops either side of the center.
-
6Cut another piece of ribbon or fabric strip from the same ribbon used for the smaller ribbon or fabric strip on the loop. Wrap this around the center of the loop and tie firmly in place.
-
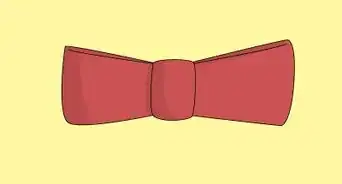
7Pull the tails of the wrapped ribbon or fabric strip tightly. The bow is now formed.
-
8Trim off the ends of the wrapped central ribbon or fabric strip to neaten. Secure with glue to ensure that it won't unravel.
-
9Done. The two-toned cloth bow is now ready for adding to a hair accessory, craft project or to be used as gift wrapping.


Advertisement
Method 3
Method 3 of 3:
Floral cloth bow
-
1Choose fabric that has strength to it, such as a ribbon, scrap linen or heavy cotton. If using fabric, cut or tear into a long strip.
-
2Choose the length for the tail of the floral bow. Twist the fabric strip at the length desired, facing the fabric the right side up.
-
3Form one loop, then twist the fabric strip. Hold this twist between your thumb and index finger. Make another loop but this time, in the opposite direction (keep it the same size). Twist the loop toward you.
-
4Work about a total of 10 loops, fashioned in the same way. The amount of loops you make depends on how full you want the loop to be and on how much fabric strip you've allowed for the project.
-
5Secure the loops together into a floral bow. Measure a length for the second tail (which holds the bow together and serves to attach it to the gift). Cut out a narrow strip of fabric or ribbon to this length. Wrap this around the center of the loops (where they all meet as twists). Tie both tail ends together at what is going to be the back of the bow.
- Leave the narrow tails alone, as they will be used for attaching the bow and should not be shortened.
-
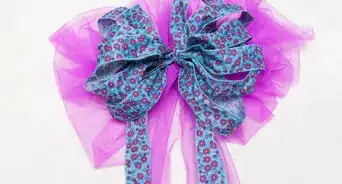
6Adjust the loops to ensure fullness and the effect of a flower. Trim the ends of the fat tails diagonally to neaten.
-
7Attach the bow to a gift or other object. Use the narrow tails to tie or tape onto the gift.


Advertisement
Things You'll Need
Method 1:
- Fabric length
- Scissors
- Flat work surface
Method 2:
- 2 different types of fabric length or ribbons
- Scissors
- Glue suitable for fabric
Method 3:
- One long piece of strong scrap fabric or ribbon (the longer it is, the more loops you can make but it gets trickier the longer it is too, so experiment a bit to begin with)
- Thin piece of ribbon or fabric strip in addition
- Scissors suitable for fabric (sharp and clean)

About This Article
Advertisement