X
wikiHow is a “wiki,” similar to Wikipedia, which means that many of our articles are co-written by multiple authors. To create this article, 22 people, some anonymous, worked to edit and improve it over time.
This article has been viewed 73,563 times.
Learn more...
Stilts are a great way to add a few feet you your height. Whether you need to get something off the top shelf, or just like the fun of it, stilts are not that hard to build. As long as you have some basic tools, some wood, and plastic piping, you can make stilts in a few hours.
Steps
Part 1
Part 1 of 3:
Making the Poles of Your Stilts
-
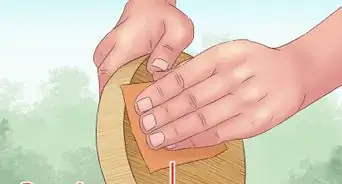
1Cut your two foot beds. These will be trapezoid pieces of wood which will hold your feet. Get a piece of 1/2 inch plywood, and draw two triangles using a pencil. The triangles should have the following dimensions: 10 inch base, two 8 inch sides (use a ruler). It is best to use the edge of the plywood as the 10 inch base, that way one side of the triangle is already smooth and sanded.[1] [2]
- Use a table saw to cut out the two triangles. When you have them cut out, measure down 1 inch from where the two 8 inch sides meet (top point). Make a mark one inch down on both of the 8 inch sides.
- Connect these two points using a pencil and a ruler. Take your table saw out again and cut along the line. Make sure you do this to both triangles.
- Finally, take a piece of sand paper and smooth over the edges. You should now have two trapezoid shapes with 10 inch bases, and 7 inch sides (triangle with the top cut off).
-
2Make your legs and support beams. Purchase two 48-inch 2X2 boards at your local hardware store. Lay the boards down on a flat surface. Mark the middle point of each of the two boards (24 inches) with a ruler and pencil. Use a table saw to cut the boards along the mark you just created. You should now have four pieces of 2X2 wood, each 24 inches long.[3] [4] [5]Advertisement
-
3Line your four 2X2 boards flush with one another. Do this so that the four long sides are next to one another. Use a clamp to press the boards together to make the next few steps easier. Go to one end of your four boards. Make a mark 1 inch down and 5 inches down on one of the boards using a pencil and ruler. Do this again on another one of the boards.[6] [7]
- Take your ruler and line up the two 1 inch marks. Draw a line connecting them which runs across all four boards.
- Take your ruler and line up the two 5 inch marks. Draw a line connecting them which runs across all four boards.
- On two of your boards, draw an extra dash 6 inches down the board.
-
4Lay your boards on top, together. Take two boards (one with the 6 inch mark and one without). Lay the 6 inch marked board on the table, with the pencil lines facing up. Take the board without the 6 inch mark and turn it around 180 degrees. Lay it on top of the bottom board, also with the pencil lines facing up.[8] [9]
- The edge of the top piece should lay right on the 6 inch line of the bottom board. The 1 and 5 inch marks of both boards should run parallel with one another. Note: there is only 6 inches of total overlapping board.
- Clap these two boards together in between the 1 and 5 inch marks of the top board.
-
5Drill holes into your boards. Make a mark between the 1 and 5 inch marks of the top board. Since they are 2X2 boards, the middle of those lines should be 1 inch. Take a drill and make a hole on those two middle marks. Drill all the way down until you go through both boards. [10] [11] [12]
- Make sure that you are doing this on a sturdy work bench as you don't want to drill down and damage a nice table.
- Once you have drilled the holes, lay down a washer over each hole and then slide 4 1/2 inch bolts into each of the holes.
- Take off the clamp once the bolts are all the way through.

Advertisement
Part 2
Part 2 of 3:
Creating Foot and Leg Supports
-
1Take out one trapezoid piece. This is the piece you cut earlier. Place it underneath the two connected 2X2 boards so that the short edge of the trapezoid is parallel with the edge of the top board. Take out a hammer and gently tap on each of the bolts. This will make two marks on the trapezoid where you will drill holes into.[13] [14]
- Separate the trapezoid from the other boards. Use your drill to drill holes where the two marks are.
- Place the trapezoid back underneath the boards in the same position, only this time feed the bolts through the two holes you just drilled.
- Put two washers on the ends of the bolts (side of the trapezoid) and then place a nut on each of the bolts. Use a wrench to tighten and secure the nuts all he way down to the face of the trapezoid.
-
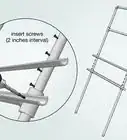
2Make a footbed. Use the table saw to cut another piece of plywood that is 10 inches long and 4 inches wide. Smooth over the edges using a piece of sandpaper. Flip your attached 2X2 boards around so that the trapezoid is facing up. Place the flat side of the board against the long, 10-inch edge of the trapezoid and the 2X2 board it is parallel with. Drill a hole through the rectangle down into the board underneath.[15] [16]
- Then take a 2 inch screw and place it in the hole. Use a screwdriver to attach the rectangle to the underlying board.
- You can add as many screws as you would like for added durability. Add a screw to each of the side of the rectangle where only the trapezoid is underneath. Always pre-drill the holes so that the plywood doesn't split.
-
3Adjust the stilts to your leg length. Bend your knee so it's at a 90° angle. Measure from 1 1/2 inches below your knee to the floor. Label this length Z. Measure length Z from your footing, up the length of the stilt. Make a mark using a pencil. Then, take your table saw and cut at this mark.[17] [18]
- Doing this will make sure the stilts will be suited to your particular leg length.
-
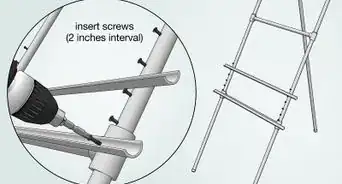
4Create some upper leg supports. Purchase plastic piping from your nearby hardware store. The piping should have a 4-5 inch diameter. Once you have purchased the pipe, mark 3 inches down from the edge of the pipe. The pipe should have grooves which will allow you do draw a line all the way around the pipe 3 inches down. You should use a Sharpie or magic marker to make the line.[19]
- Take your table saw and cut along this marker line. You can also use scissors if your plastic piping is thin enough
-
5Cut the piping in half. Cut your 3-inch pipe piece in half along the top (not the side) with a table saw. One of these halves will go on one stilt, while the other half will go on the other stilt. Take one of the halves and place it above the footing, about 1 inch from the top of the stilt, so the pipe curls inward. Pre-drill two holes into the pipe, halfway through the 2X2 inch board.[20]
- Place nails into each of the holes and screw them in using a screwdriver.
- Make sure to add the piping to the other stilt as well.


Advertisement
Part 3
Part 3 of 3:
Finishing Your Stilts
-
1Grab a pair of old shoes. It's best to use shoes that are rather thin. Place each shoe on the appropriate footing and clamp the shoes down to secure them. Take out your drill and drill 3-4 holds through the inside-bottom of the shoe into the footing below. Make sure not to drill holes through the heel, which could make it uncomfortable to stand in.[21]
- Place a screw in each of your holds you just drilled. Take a screwdriver and screw each of them all the way into your footing.
- Wiggle your shoe slightly to make sure that it is secure. You don't want it to slip off when you stand up in them.
-
2Attach one-wrap velcro. Drill a hole into each of your stilts on the upper part of the backside stilt boards. This hole should be in the middle of the plastic pipe, but on the reverse side. Then, cut a piece of one-wrap velcro that is about 2 inches longer than the circumference of your calf.[22]
- Take the end of the strap of velcro and place it overtop the pre-drilled hole. Then place a fender washer overtop of the overlap. Drill again through to the pre-drilled hole to make a hole through the velcro.
- Place a wood screw into the hole, and screw it in using a screwdriver.
- Make sure that both stilts get a piece of velcro.
-
3Put the stilts on your legs. It is best to sit high-up, like on a bar stool, when you put your stilts on. Also, make sure that the stool is next to a higher structure, such as the edge of your house, or a fence, so that when you stand you have something to hold onto. Sit on the stool and put on each of the stilts on one at a time.[23]
- Place your foot in the appropriate stilt. Slide it into the shoe and tie the shoe. Then, wrap the velcro around your leg tightly, and attach it around (the velcro sticks to itself).
- You do not want to wrap too tightly, otherwise you could lose circulation.
-
4Practice walking around with your stilts. Get out of your stool and stand up on your stilts, as you lean against a taller structure (fence, house, etc.) Walk back and forth slowly, holding onto the structure, to get used to how they feel. Once you feel comfortable enough, let your hands go, but continue to walk near the tall structure in case you fall.[24]
- It is best to have an extra person nearby to catch you if you fall in the opposite direction.
- After you have mastered walking near your structure, begin to venture out. Continue to have someone follow you just in case you fall. It is best to walk around in your yard, in case the worst happens your fall won't hurt so bad.
-
5Take your stilts off. Once you are done walking around, sit back down on the stool. Undo the velcro strips, and step out of the shoes. You are now free to decorate your stilts if you would like. Add a coat of paint to them or stain the wood to protect it from moisture. You can even add stickers or pen designs. The possibilities are endless, and all up to you!

Advertisement
Warnings
- Always take safety precautions when handling equipment. Wear gloves and goggles when sawing or drilling. Never put your hands near where you are cutting or drilling.⧼thumbs_response⧽
- Be careful when first learning to walk on stilts. You are farther off the ground and will land harder if you lose your balance.⧼thumbs_response⧽
Advertisement
Things You'll Need
- Plywood
- Two 2X2 inch boards, 48 inches long
- 4 inch diameter plastic piping
- Table saw
- Tape measure
- Ruler
- Four nuts
- Four 4 1/2 inch bolts
- Four washers
- Multiple 2 inch nails
- Hammer
- One-wrap velcro

References
- ↑ https://www.youtube.com/watch?v=hFNXlPLUcvc
- ↑ http://www.thisoldhouse.com/toh/how-to/overview/0,,20176012,00.html
- ↑ https://www.youtube.com/watch?v=hFNXlPLUcvc
- ↑ http://boyslife.org/hobbies-projects/projects/636/easy-to-make-stilts/
- ↑ http://www.thisoldhouse.com/toh/how-to/overview/0,,20176012,00.html
- ↑ https://www.youtube.com/watch?v=hFNXlPLUcvc
- ↑ http://www.thisoldhouse.com/toh/how-to/overview/0,,20176012,00.html
- ↑ https://www.youtube.com/watch?v=hFNXlPLUcvc
- ↑ http://www.thisoldhouse.com/toh/how-to/overview/0,,20176012,00.html
- ↑ https://www.youtube.com/watch?v=hFNXlPLUcvc
- ↑ http://www.thisoldhouse.com/toh/how-to/overview/0,,20176012,00.html
- ↑ http://boyslife.org/hobbies-projects/projects/636/easy-to-make-stilts/
- ↑ https://www.youtube.com/watch?v=hFNXlPLUcvc
- ↑ http://www.popularmechanics.com/home/how-to-plans/how-to/a15451/how-to-build-stilts/
- ↑ https://www.youtube.com/watch?v=hFNXlPLUcvc
- ↑ http://www.popularmechanics.com/home/how-to-plans/how-to/a15451/how-to-build-stilts/
- ↑ https://www.youtube.com/watch?v=hFNXlPLUcvc
- ↑ http://www.popularmechanics.com/home/how-to-plans/how-to/a15451/how-to-build-stilts/
- ↑ https://www.youtube.com/watch?v=hFNXlPLUcvc
- ↑ https://www.youtube.com/watch?v=hFNXlPLUcvc
- ↑ https://www.youtube.com/watch?v=hFNXlPLUcvc
- ↑ https://www.youtube.com/watch?v=hFNXlPLUcvc
- ↑ https://www.youtube.com/watch?v=hFNXlPLUcvc
- ↑ https://www.youtube.com/watch?v=hFNXlPLUcvc
- Videos provided by iCreatables
About This Article
Advertisement