This article was co-authored by wikiHow Staff. Our trained team of editors and researchers validate articles for accuracy and comprehensiveness. wikiHow's Content Management Team carefully monitors the work from our editorial staff to ensure that each article is backed by trusted research and meets our high quality standards.
There are 8 references cited in this article, which can be found at the bottom of the page.
The wikiHow Video Team also followed the article's instructions and verified that they work.
This article has been viewed 187,855 times.
Learn more...
Chocolate dipped spoons are simple and sweet, and a delightful gift for the dessert lovers in your life. When you use the spoon to stir a hot drink such as coffee or hot cocoa, the chocolate melts and adds a sweet mocha-like flavor. Whether you make them for yourself or for the chocolate lovers on your holiday gift list, chocolate dipped spoons are perfect for mixing with drinks or enjoying on their own during the holiday season.
Ingredients
- 1 cup (150 g) semi-sweet chocolate chips
- 3/4 cup (113 g) milk chocolate chips
- 1 cup (150 g) white chocolate chips
- Chocolate sprinkles (optional)
- Toffee bits (optional)
- Candy cane pieces (optional)
- Coarse sugar sprinkles (optional)
Steps
Melting and Dipping the Chocolate
-
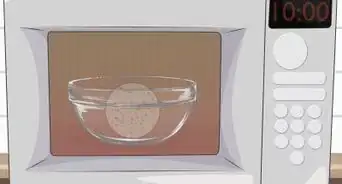
1Place 1 cup (150 g) of semi-sweet chocolate chips into a microwave-safe bowl.[1] Don't mix in the other types of chocolate yet, as you will need to use the milk chocolate and white chocolate chips for decorations later on. Make sure to use a bowl large enough to hold all of your chocolate chips.
- Look for a symbol shaped like a microwave with three wavy lines on the bottom of tupperware and glass containers to see if they are safe to use in the microwave.
-
2Microwave the chocolate chips for 2 to 3 minutes, in 30 second bursts. Keep a close eye on the chocolate while it is melting in the microwave to prevent overheating or burning the chocolate. Pull out the bowl every 30 seconds to give the chocolate a light stir, to prevent the chocolate from burning or bubbling. When every chocolate chip has melted, stir the liquid chocolate until it is smooth with a wooden spoon.[2]
- If you don't have a microwave, you can place the bowl on top of a boiling saucepan full of water to heat up the chocolate with hot steam.[3] This works in the same way that heating fondue works. Be sure to completely cover the saucepan with the bowl to prevent steam from coming out of the edges.
Advertisement -
3Stir the melted chocolate until the mix is smooth and even. Using a wooden spoon, gently stir the mix while you look for unmelted chunks of chocolate. If the rest of the chocolate is hot, the chunks should melt within a few seconds, but if the chunks are particularly large you may need to microwave it for another 30 seconds.
- Do not dilute the mix with water or butter as this can separate the chocolate and ruin its consistency.
-
4Dip each spoon into the chocolate so it covers the front bowl. Avoid getting chocolate too far up the handle of the spoon or the person using it may get chocolate on their fingers, and it can be more difficult to handle during the cooling process. Aim to get a thick coating of chocolate only on the head of the spoon by dipping it straight down into the melty goodness.[4]
- If you accidentally dip one too far, use a wet paper towel to wipe away the excess chocolate from the handle. Be careful not to wipe the bowl of the spoon.

Cooling and Storing Spoons
-
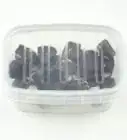
1Lay wax paper on a cookie sheet and place the spoons face-down. Use a cookie sheet large enough to hold every spoon, and place each one face-down so it balances on the tip of the handle and the edge of the bowl.[5]
- The curve of the spoon should be raised above the paper to minimize the amount of chocolate touching the wax paper.
-
2Refrigerate the chocolate spoons until the chocolate hardens completely. This can take anywhere from 5 to 15 minutes, depending on how hot the chocolate was when the spoons were dipped in it and how thick that layer is.
- If you want to add any toppings to the spoons, do that before you place them in the refrigerator, or the chocolate on your spoons may not hold them together. [6]
-
3Remove the tray from the fridge and wrap each spoon. Wrap each spoon carefully in plastic wrap or paper with the handle poking out so it resembles a lollipop. Take care to prevent too much of the chocolate from touching the plastic wrap or paper, and try to seal the opening on the handle with either a zip tie or a ribbon.
- Don't wrap the plastic wrap or paper tightly, instead try to allow a pocket of air in between the spoon and the wrap to cushion it against hard surfaces.
-
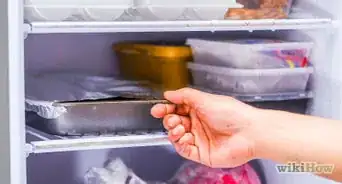
4Store the chocolate spoons in the fridge or a cool, dry place. To prevent the chocolate from melting, be sure to store the spoons in a cool cupboard or in the fridge.[7] You can store them in the freezer, but the chocolate may crack and dry out if it is left for more than a few weeks unsealed. If sealed, the chocolate should last for up to a year.[8]
- Keep the spoons in a sealed container if you choose to store them in the freeze to keep the chocolate from drying out.


Decorating and Accessorizing with Toppings
-
1Melt white and milk chocolate to drizzle over the spoons with a plastic bag. In two separate microwave-safe bowls melt the white chocolate chips and milk chocolate chips in the microwave for about 2 to 3 minutes each in 30 second bursts, and stir the mix regularly. Pour the melted chips into separate small plastic bags.
-
2Cut a small hole in one corner of each plastic bag. Let the melted chocolate fall to one side of the plastic bag, and cut a small hole in the opposite, empty corner with scissors.[9]
- Don't cut the corner with lots of chocolate or you may accidentally lose some of the melted chocolate.
-
3Drizzle white chocolate and milk chocolate onto 12 spoons apiece. Squeeze the bag towards the cut-out hole to drizzle a thin strand of white and milk chocolate onto different spoons. Drizzle a zig-zag or crosshatch pattern onto each spoon, or a single thick drop in the center of each spoon, whichever seems more visually appealing to you.[10]
- Be sure to drizzle the white and milk chocolate before you cool the spoons, or the topping layer could separate from the spoon.
-
4Consider sprinkling coarse sugar, sprinkles, toffee, or candy onto each spoon. These little decorative additions are entirely optional but can add a visual appeal to your spoons. As with other decorative additions, you should sprinkle these toppings onto each spoon before you cool them. [11]
- Coarse sugar is perfect for coffee, sprinkles and toffee bits are great for hot cocoa, and candy cane pieces mix perfectly with any hot wintery drink.[12]
- Decorate 6 spoons with each topping to make your spoons more aesthetically diverse, and feel free to mix and match toppings together.
-
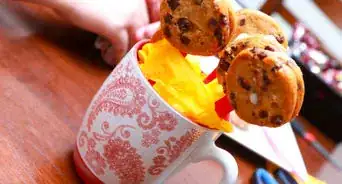
5Pair your spoons with drink mixes and mugs for the perfect holiday gift. If your spoons are a gift for somebody else, find out what kind of hot drinks they like and include a drink mix with your spoons. You can put them all into a little straw basket, or if you include a large mug with the spoons, you can place the spoons and drink mix in the mug itself as a self-contained gift.[13]
- Wrap the whole gift with a red or green ribbon, and voila — the perfect gift for the coffee or hot cocoa lover in your life.


Community Q&A
-
QuestionCan I add powdered mocha coffee to the chocolate?
 Community AnswerYes you can. It will change the taste, though.
 -
QuestionWill all plastic spoons work with chocolate coating & not melt?Community AnswerThe higher-priced clear spoons work for this.
-
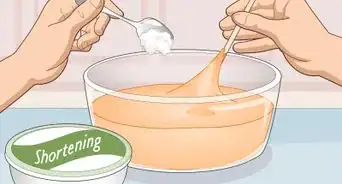
QuestionWhat should I do if this recipe tastes too much like shortening?
 Erik PetrovichCommunity AnswerYou don't need to use shortening to make the spoons. Shortening can help keep it together, but it unnecessary.
Things You'll Need
Melting and Dipping the Chocolate
- 1 microwave-safe bowl
- 24 heavy-duty plastic spoons
- Wooden mixing spoon
- Saucepan (optional melting alternative)
Cooling and Storing Chocolate Spoons
- Large cookie tray
- Wax paper
- Plastic wrap or paper
Making Other Decorative Additions
- 2 microwave-safe bowls
- 2 small plastic bags
- Scissors
- Colored ribbon


References
- ↑ https://www.allrecipes.com/recipe/16112/chocolate-spoons/
- ↑ https://www.allrecipes.com/recipe/16112/chocolate-spoons/
- ↑ http://dish.allrecipes.com/how-to-melt-chocolate/
- ↑ http://www.bijouxandbits.com/2016/03/chocolate-spoons/
- ↑ https://www.allrecipes.com/recipe/16112/chocolate-spoons/
- ↑ https://www.tasteofhome.com/recipes/chocolate-dipped-beverage-spoons/
- ↑ https://www.allrecipes.com/recipe/16112/chocolate-spoons/
- ↑ https://www.stilltasty.com/articles/view/47
- ↑ https://www.allrecipes.com/recipe/16112/chocolate-spoons/
About This Article

To make chocolate dipped spoons, start by microwaving some semi-sweet chocolate chips in 30-second intervals until they're fully melted. Then, dip some spoons in the melted chocolate, being careful not to go too far up the handle so you don't get chocolate on your fingers when you use them. Finally, place the dipped spoons face down on a lined baking sheet and refrigerate them for 5-15 minutes, or until the chocolate on them hardens. To learn how to decorate your chocolate dipped spoons, scroll down!