This article was co-authored by wikiHow staff writer, Jessica Gibson. Jessica Gibson is a Writer and Editor who's been with wikiHow since 2014. After completing a year of art studies at the Emily Carr University in Vancouver, she graduated from Columbia College with a BA in History. Jessica also completed an MA in History from The University of Oregon in 2013.
The wikiHow Video Team also followed the article's instructions and verified that they work.
This article has been viewed 2,245,779 times.
Learn more...
You probably learned the knit stitch when you first picked up your knitting needles. In order to follow patterns or make knitted projects, it's important to know how to purl. Fortunately, it's easy to create this basic stitch that has a small bump at its base. Once you know the purl and knit stitch, try simple patterns, such as the stockinette or seed stitch.
Steps
Learning the Purl Stitch
-
1Cast on as many stitches as you like. Since you're practicing the purl stitch, you can work with as many stitches as you want. To make it easier to see your purl stitches, you might want to knit with larger needles and bulky yarn.
- Once you're comfortable with making the purl stitch, you can use any size of needles and yarn.
-
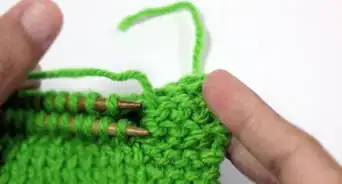
2Bring the working yarn to front. Instead of holding the yarn behind the left needle, bring it in front so it's close to you. If you forget and put the yarn behind, the stitch on your left needle will look like 2 stitches instead of 1.
- Don't worry about making mistakes as you work on this practice swatch. Pay attention to the mistakes you make, so you know how to prevent them in the future.
Advertisement -
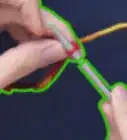
3Insert the working needle into the front of the first stitch on the left needle. Slide the tip of the working into the front loop of the first stitch. Your needles should now look like a large X with the working needle in front.[1]
- Keep in mind that when you're making a knit stitch, you want to insert the needle into the back of the stitch.
Variation: If you're left-handed, you could hold the working yarn in your left hand. This continental style of knitting is thought to be faster since it minimizes your hand movements.
-
4Wrap the yarn counterclockwise around the needle. Use your thumb and index finger to hold the needles in place while you hold the working yarn taut with your other hand. Wrap the yarn counterclockwise around the needle that's closest to you.[2]
- The yarn will still be in the front once you've wrapped it around the needle.
- Ensure that you're only wrapping the yarn around the working needle and not both of the needles.
-
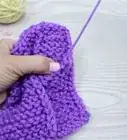
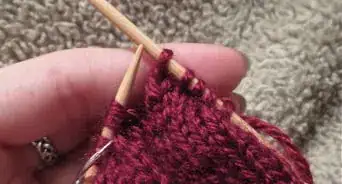
5Pull the loop down and off of the needle to complete the purl stitch. Keep your left index finger on the first stitch so the yarn doesn't slide off of your needle. Then, slowly bring the working needle down so the tip is at the base of the stitch. Move the tip of the needle to the back of the stitch and keep moving up so the stitch slides onto the working needle.[3]
- The working yarn should still be at the front of the needle.
- The purl stitch on your right needle will look like a knit stitch that has a small bump at its base.
-
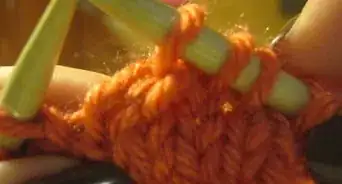
6Tug on the yarn before starting your next purl stitch. To keep your stitches tight, pull on the working yarn so the purl stitch on your right needle is secure. Then, keep the working yarn in front and insert the right needle into the front of your next stitch on the left needle. Remember to wrap the yarn counterclockwise around the needle before pulling off the purl stitch.[4]
- Follow your pattern or just practice making a few rows of purl stitches so you become comfortable.

Trying Basic Patterns
-
1Practice alternating between knit and purl stitches. Before you start a pattern that uses both of these basic stitches, you need to know how to move the working yarn. When you're purling, the yarn is held in front. If you'd like to knit a stitch, you'll need to move the working yarn to the back before you knit. To make another purl stitch, bring the yarn in front.[5]
- Remember that the working yarn is close to you for a purl stitch and away from you for a knit stitch.
-
2Make a simple rib stitch for scarves or blankets. To make a stretchy ribbed pattern on your fabric, cast on a multiple of 2. Then, knit 1 stitch and purl 1 stitch. Repeat this across the entire row and do it for each row. This will make a reversible pattern that has ribs on both sides of the fabric.[6]
- For a double rib, knit 2 and purl 2 for every row. This will create a slightly wider rib.
- If you're reading a pattern for a 1x1 rib stitch, it will look like this:
- Row 1: *k1, p1* (repeat)
-
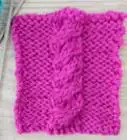
3Create a stockinette stitch by alternating knit and purl rows. The stockinette stitch is one of the easiest patterns to make once you've learned the purl stitch. Cast on as many stitches as you like and knit every stitch on your first row. Turn the work and purl every stitch of the following row. Keep alternating the rows so your fabric has a bumpy side and a smooth side.[7]
- The smooth side will show the knit stitches while the bumpy side shows the purled stitches.
- The stockinette stitch is referred to as "St st" in most patterns.
Tip: Keep in mind that stockinette tends to curl along the edges, so you may want to block the fabric or add a border so your fabric lies flat.
-
4Make the seed stitch by alternating knit and purl stitches. If you'd like to try a pattern that's slightly more challenging and has great texture, work on a seed stitch. Cast on an even number of stitches. Then, knit the first stitch and purl the following stitch. Continue to knit 1 and purl 1 all across the row. Turn your work and knit 1, purl 1, across the entire row. Keep working until you've made as many rows as you like.[8]
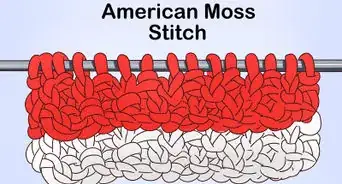
- If you're using a British knitting pattern, the seed stitch is the same as the moss stitch.

Community Q&A
-
QuestionWhat else beside knit goes with purl?
 Community AnswerThere is also garter stitch. Knit and purl and garter stitch. All others are based on them. Different combinations of these stitches create patterns.
 -
QuestionI did a regular knit for the first 10 rows, and then I did a purl/knit/purl/knit to have the flat side with the v's on the front. Then I did 10 more regular knit rows and am trying to purl again, but the flat side is now on the back. How can I make it on the front again?
 Community AnswerThe easiest fix would be to alternate your pattern. Do knit/purl/knit rather than purl/knit/purl. A knit stitch on one side is a purl on the other, so alternating it will switch the side it is on. Otherwise add or subtract one more knit row to change sides of the piece.
 -
QuestionEvery time I try to purl stitch I end up adding an extra stitch. I don't have this problem with knit. What's the reason for the extra stitch?
 Community AnswerMake sure the extra yarn is in the front (between your two needles) as opposed to in the back like a knit stitch.
Things You'll Need
- Knitting needles
- Yarn
- Scissors
References
- ↑ https://www.craftyarncouncil.com/mar06_purl.html
- ↑ https://www.craftyarncouncil.com/mar06_purl.html
- ↑ https://www.craftyarncouncil.com/mar06_purl.html
- ↑ https://youtu.be/lkb0YyrzPWA
- ↑ https://youtu.be/xc1nolkBY8A
- ↑ https://newstitchaday.com/how-to-knit-the-1x1-rib-stitch/
- ↑ https://blog.tincanknits.com/2013/06/14/basicstitches/
- ↑ https://theknittingspace.com/seed-stitch-vs-moss-stitch/
About This Article

To knit a purl stitch, first cast on as many stitches as you'd like. Then, bring the working yarn in front of your needle. Slide the tip of the working needle into the front loop of the first stitch so your needles make an "X." Wrap the working yarn counterclockwise around the working needle, or the needle that's closest to you. Now, keeping your left index finger on the first stitch so it doesn't slide off, bring the working needle down so the tip is at the base of the stitch. Move the tip of the needle to the back of the stitch and move the needle up so the stitch slides onto the working needle. Finally, pull on the working yarn to tighten the purl stitch on your right needle. To learn how to use the purl stitch to make different patterns, scroll down!