This article was co-authored by wikiHow Staff. Our trained team of editors and researchers validate articles for accuracy and comprehensiveness. wikiHow's Content Management Team carefully monitors the work from our editorial staff to ensure that each article is backed by trusted research and meets our high quality standards.
The wikiHow Video Team also followed the article's instructions and verified that they work.
This article has been viewed 255,380 times.
Learn more...
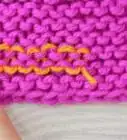
Knitting buttonholes is a crucial skill to have if you are knitting a sweater or other garment that you wish to fasten with buttons. There are a couple of different methods you can use to make button holes, which include the one row method and the two row method. Both techniques provide good results and they are both easy to learn. As you create buttonholes, it is also a good idea to keep some basic tips in mind to ensure that your buttonholes are strong.
Steps
Using One Row
-
1Slip two stitches and bind off. To start your buttonhole, take two stitches and slip them onto the opposite needle. Then, loop the first stitch you slipped onto the needle over the second stitch you slipped onto the needle.[1]
-
2Slip another stitch and bind off again. To continue binding off, you will need to slip another stitch over to the opposite needle. Then bind off the stitch by slipping the first stitch over the second stitch.[2]
- Continue slipping off stitches and binding off if you are making a larger buttonhole. For small buttonholes, you may only need to bind off a couple of stitches. But for larger button holes, you will need to bind off more stitches. Keep going until the button hole is the length that you need it to be.[3]
Advertisement -
3Turn your work and cast on two or more stitches. When you finish binding off the stitches, you will need to turn your work around. Turn the work so that the opposite side is facing you. Then, begin to cast on stitches in the direction of the buttonhole.[4]
- Cast on as many stitches as you bound off. For example, if you bound off four stitches, then cast on four stitches.
-
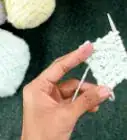
4Knit as usual. After you finish casting on, knit one stitch to connect the cast on stitches to the opposite side of the buttonhole. Then, turn the work around again and knit as usual.[5]
- If you only needed one buttonhole, then knit to the end of the row. If you need more than one buttonhole, then knit until you reach the next space for placing a buttonhole and repeat the process again.
Using Two Rows
-
1Knit two and pull the first stitch over the second. For the first row, you will be binding off the stitches to create one side of the buttonhole. Begin by knitting two and then pull the first stitch you knit over the second one to bind off the first stitch.[6]
- Continue binding off by knitting one and pulling the first stitch over the second stitch.
- Continue to bind off as many stitches as you need to create your buttonhole.
-
2Resume knitting as before. When you finish binding off your required stitches for the buttonhole, resume knitting. Finish knitting to the end of the row or until you need to make another buttonhole.[7]
-
3Bind off enough stitches to make the length of the buttonhole. When you come back around to the space where you started the buttonhole, you will need to cast on additional stitches to cover the length of the buttonhole.[8]
- For example, if you bound off three stitches, then you will need to cast on three stitches.
-
4Continue knitting. After you cast on enough stitches to cover the area of the buttonhole, resume knitting as usual. On your next round, knit across the stitches you cast on in the same manner as the other stitches.[9]
Creating Strong Buttonholes
-
1Check the size of your buttons first. Don't make the buttonholes too large or too small for your buttons. Measure the buttons and try to make the buttonholes slightly smaller than the buttons.[10]
- Try holding up the buttons against the buttonholes as you create them. This will help to ensure that you do not make them too large or too small.
-
2Identify where the buttonhole will be placed. It is important to know where you want each buttonhole to be. Measure the area and place stitch markers so you will know where to place each buttonhole as you go.
- You can also mark the placement spots with a small safety pin or paper clip.
-
3Maintain good tension to ensure tight buttonholes. As you bind off, cast on, and knit over the areas with buttonholes, it is important to keep good tension. This will help to ensure that your buttonholes will be secure. Hold the yarn taut as you create the buttonholes to ensure that your buttonholes will be tight.
-
4Reinforce or adjust the buttonholes if needed. If you do end up with buttonholes that are loose or too small, then you can use a knitting needle and some extra yarn to reinforce the buttonhole. Using a "yarn needle" and the same yarn that you are using to knit your item, stitch around the edges of the buttonhole, using the same "buttonhole stitch" that is used when sewing on fabric. This will reinforce the buttonhole. Or if your buttonhole is too long, stitch across one or both of the ends to make the buttonhole shorter.[11]
Community Q&A
-
QuestionWhen the pattern says "yarn forward," which way is that?
 LibraryMouseCommunity AnswerTowards you.
 -
QuestionIs work 2tog the same as knit 2tog?
 Community AnswerIt depends on the pattern. It might be either knit 2tog or purl 2tog depending on what comes before and after the 2tog.
 -
QuestionHow do I start the first round to start the circle?
 crochet 4 beginnersCommunity AnswerMake ch4 and join to make a circle. Ch3 as first dc, make another 11 dc in the circle. Join last dc to first dc with a slip stitch, this is first row. Now in every row increase by 12 stitches.This way you get a flat circle. Increase in every row should be number of stitches you made in first row.
Things You'll Need
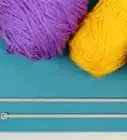
- Yarn
- Knitting needles, size according to instructions
- Stitch markers or small safety pins to mark areas for buttonholes
- Buttons
References
- ↑ https://www.youtube.com/watch?v=gLT7eb2W0kw
- ↑ https://blog.tincanknits.com/2015/04/27/one-row-buttonholes/
- ↑ https://blog.tincanknits.com/2015/04/27/one-row-buttonholes/
- ↑ https://blog.tincanknits.com/2015/04/27/one-row-buttonholes/
- ↑ https://www.youtube.com/watch?v=gLT7eb2W0kw
- ↑ http://www.vogueknitting.com/pattern_help/how-to/beyond_the_basics/buttonholes
- ↑ http://www.vogueknitting.com/pattern_help/how-to/beyond_the_basics/buttonholes
- ↑ http://www.vogueknitting.com/pattern_help/how-to/beyond_the_basics/buttonholes
- ↑ http://www.vogueknitting.com/pattern_help/how-to/beyond_the_basics/buttonholes
About This Article

Start your buttonhole by taking two stitches and slipping them onto the opposite needle, then looping the first stitch over the second stitch. Continue binding off in this manner, slipping another stitch over to the opposite needle, then slipping the first stitch over the second stitch. When you’ve reached a good length for your buttons, turn your work so the opposite side is facing you, then cast on as many stitches as you bound off in the direction of the buttonhole. Finish by knitting a stitch to connect the cast on stitches to the opposite side. To learn some tips to make your buttonholes durable, keep reading!