This article was co-authored by wikiHow Staff. Our trained team of editors and researchers validate articles for accuracy and comprehensiveness. wikiHow's Content Management Team carefully monitors the work from our editorial staff to ensure that each article is backed by trusted research and meets our high quality standards.
There are 8 references cited in this article, which can be found at the bottom of the page.
This article has been viewed 24,545 times.
Learn more...
Finishing the binding on a quilt is important to conceal the raw edges of your binding and ensure that they do not create a bulky area on the edge of the quilt. You can use a technique to hide the raw edges as you sew them, or you can sew the ends together before sewing your quilt binding in place. Either way, your result will be a quilt with neat, finished binding.
Steps
Hiding Overlapping Binding Ends
-
1Line up the raw edge of the binding with the raw edge of your quilt. Lay your binding on the edges of your quilt so that the raw edges of the binding line up with the raw edges on the first side of the quilt that you will be working. Make sure that the print side of your binding and the print side of your quilt are facing each other. Also, make sure that your binding is folded in half, not spread open.[1]
- The raw edges are the cut edges of your fabric.
-
2Fold the first corner of the binding over to form an angle. Take the outer corner of the binding where you will begin sewing and fold the corner towards the edge of the quilt. This forms a diagonal line and hides the raw starting edge of the binding strip. Place a pin to hold the edges together.[2]Advertisement
-
3Sew a straight stitch 0.5 inches (1.3 cm) from the edges of the quilt. Use your sewing machine to sew this stitch. Make sure to sew through both layers of the binding. This ensures that the raw edges will be hidden already when you turn the fabric over to the other side of the quilt.[3]
-
4Stop sewing and cut the thread 0.25 inches (0.64 cm) from the corner of the quilt. When you are 0.25 inches (0.64 cm) from the first corner, stop the sewing machine. Then backstitch a few stitches by pressing the lever on the side of your machine and gently pressing the pedal. This secures the corner stitches. Sew forward again to the point where you stopped before, stop the machine again, and sever the thread.[4]
-
5Turn the quilt and fold the binding at the corner. To work around the corner of the quilt with the binding, turn the quilt and fold the binding up and away from the edge you have been sewing. Then, fold the strip down in the new direction you will be sewing so that the folded edge of the binding is even with the edge of the quilt. Lower the presser foot of your sewing machine over this corner to sew through the fold from the edge of the quilt and down along the new edge.[5]
-
6Continue to sew all the way around the binding. Keep repeating the process of sewing through the binding and quilt edges and making folds at the corners until you have attached the binding on all 4 sides of your quilt.
-
7Tuck the binding end into the diagonal pocket. When you get back to where you started, you should have some overlapping binding, which you will need to hide for a seamless finish. Tuck the end of the binding strip into the diagonal pocket that you created when you started sewing the binding into place. Then, sew across the end of the binding along the edge of the quilt to secure the end and hide it.[6]
-
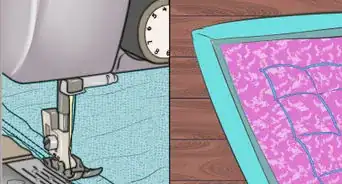
8Fold over the edges and stitch in the ditch to finish the binding. After you have hidden the end of your binding, the first side of your quilt binding is finished. All you need to do to finish the binding is to fold over the binding to the other side of the quilt and then sew into the seam that you created with the first round of stitching. This is known as stitching “in the ditch.” Sew along the seam to finish your binding.[7]
- Fold the binding at the corners to ensure a neat finish.


Connecting Overlapping Binding Ends
-
1Mark the binding 1.25 inches (3.2 cm) from the overlap for 2.5 inches (6.4 cm) binding. Take the overlapping ends and mark each of them 1.25 inches (3.2 cm) from where they overlap each other. Use a piece of chalk to make these marks.[8]
- If your binding is narrower or wider than 2.5 inches (6.4 cm), then use half the width to determine where to mark the ends.
-
2Cut the binding where you have marked it. Cut the binding at the marks to remove the excess fabric. Cut straight across the marks on the overlapping pieces.[9]
-
3Match up the print sides of the binding ends so the pieces are perpendicular. Unfurl the binding and then line the binding pieces up. Make sure the print sides of the binding strips are facing each other and the pieces are perpendicular to each other. The end of one strip should be even with the side of the other strip.[10]
-
4Stitch across the square from one corner to the other. The overlapping ends will form a square. Stitch a diagonal line across the square. This will create a diagonal stitch line that connects the two ends and creates a triangle of excess fabric that you can cut off. Do not stitch across the square going from the outside of the binding to the inside. Stitch across the square diagonally going from side to side.[11]
-
5Cut off the excess fabric and open up the binding. Cut just outside of the stitch line that runs diagonally across the square to remove the excess triangle of fabric. Then, open up the binding strips to reveal the right sides of the binding fabric again. Your strips should be connected by a diagonal seam, which allows you to sew the binding onto your quilt without the raw edges of the seam showing.[12]
-
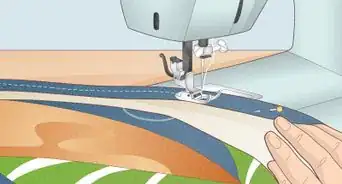
6Sew the binding onto the edges of your quilt. After you have finished closing up the binding, you will need to attach the binding to the edges of your quilt. Pin the binding to your quilt so that the right sides of the binding and the right sides of the quilt are facing each other. Then, sew a straight stitch 0.5 inches (1.3 cm) from the edges of the quilt going through the quilt and binding. After sewing the binding all the way around the quilt, fold the binding over to the opposite side of the quilt so there is an even amount of binding on both sides of the quilt. Then, sew a straight stitch into the seam you have created to secure the other side of the binding.


Things You’ll Need
Hiding Overlapping Binding Ends
- Binding
- Sewing machine
- Thread
Connecting Overlapping Binding Ends
- Binding
- Chalk
- Ruler
- Scissors
- Sewing machine
- Thread
References
- ↑ https://www.youtube.com/watch?v=xWh90tXr7g4&feature=youtu.be&t=2m55s
- ↑ https://www.youtube.com/watch?v=xWh90tXr7g4&feature=youtu.be&t=3m1s
- ↑ https://www.youtube.com/watch?v=xWh90tXr7g4&feature=youtu.be&t=3m37s
- ↑ https://www.youtube.com/watch?v=xWh90tXr7g4&feature=youtu.be&t=3m46s
- ↑ https://www.youtube.com/watch?v=xWh90tXr7g4&feature=youtu.be&t=4m6s
- ↑ https://www.youtube.com/watch?v=xWh90tXr7g4&feature=youtu.be&t=4m56s
- ↑ https://www.youtube.com/watch?v=xWh90tXr7g4&feature=youtu.be&t=5m50s
- ↑ https://so-sew-easy.com/perfectly-join-quilt-binding/
- ↑ https://so-sew-easy.com/perfectly-join-quilt-binding/
About This Article