This article was co-authored by wikiHow staff writer, Darlene Antonelli, MA. Darlene Antonelli is a Technology Writer and Editor for wikiHow. Darlene has experience teaching college courses, writing technology-related articles, and working hands-on in the technology field. She earned an MA in Writing from Rowan University in 2012 and wrote her thesis on online communities and the personalities curated in such communities.
This article has been viewed 17,738 times.
Learn more...
All Chromebooks come with cameras and microphones, but they might not work as intended. You may need to allow Chrome to access your camera or microphone before they can work properly. This wikiHow article will teach you how to enable the camera on a Chromebook and give you a few troubleshooting tips.
Steps
Using the Camera App
-
1
-
2Click the circular icon (to take a still picture). It's on the right side of your screen and will capture the image shown on your camera.
- If your Chromebook is in tablet mode, press the volume up or volume down button to take a picture.
Advertisement -
3Click Video (to switch to video mode). You'll see this on the right side of the screen above Photo.
-
4Click the record icon (to start recording). It looks like a red dot inside a larger white circle. You'll find it on the right side of your screen.
- Along with movement, you'll also want to test the microphone by speaking.
-
5Click the record icon again (to stop recording). Since you've started recording, this icon changes to represent a red square inside the white circle.
- If the camera and microphone work with this app, go to Chrome to see if you can use your camera through web apps.
- If you have a secondary camera connected via USB or another internal camera, click the Camera Switch icon (it's on the left side of your screen and looks like two curved arrows around a circle).
- To see the photos and videos you've taken, click the thumbnail of your most recent capture. It's in the bottom right corner of your screen.


Using Chrome Settings
-
1
-
2Enter
"chrome://settings/content/camera"into the address bar. This will navigate you to your camera settings in Chrome. -
3Click to select Sites can ask to use your camera under "Default Behavior." Your camera is disabled if the other circle is selected.
- If you want to check your microphone, go to
"chrome://settings/content/microphone"and make sure "Sites can ask to use your microphone" is selected. - You can revert these changes if you want to prevent Chrome from using your camera; go back to the camera settings and make sure "Block" is selected.
- If you want to check your microphone, go to
-
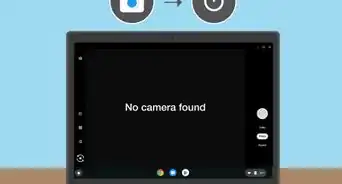
4Troubleshoot, if necessary. First, restart your Chromebook and try the app again. Next, try a different web app (like if you're using Meets and the camera isn't working, try Zoom). If your camera works in one but not the other, uninstall the original app, then reinstall it.
- If your camera still doesn't work, reset your Chromebook. Be aware that you'll lose all the data and settings stored on your Chromebook. Press Ctrl + Alt + Shift + R and select Restart. In the box that appears, choose Powerwash and your Chromebook will reset to factory settings.
- If this doesn't work to fix your camera, you'll need to contact your Chromebook's manufacturer.[1]


References
About This Article

1. Open the camera app.
2. Click the circular icon (to take a still picture).
3. Click Video (to switch to video mode).
4. Click the record icon (to start recording).
5. Click the record icon again (to stop recording).