This article was co-authored by wikiHow staff writer, Nicole Levine, MFA. Nicole Levine is a Technology Writer and Editor for wikiHow. She has more than 20 years of experience creating technical documentation and leading support teams at major web hosting and software companies. Nicole also holds an MFA in Creative Writing from Portland State University and teaches composition, fiction-writing, and zine-making at various institutions.
This article has been viewed 46,400 times.
Learn more...
This wikiHow teaches you how to submit a receipt to Expensify via email. Submitting a receipt is easy—you'll just need to forward it to receipts@expensify.com using the email address connected to your Expensify account. If you're an Expensify Copilot submitting a receipt for someone else, you'll also need to add the email address of the person you're submitting for in the Subject line of the email message.
Steps


Community Q&A
-
QuestionWhat is Expensify untagged?
 jacab smithCommunity AnswerExpensify is a financial management platform that helps businesses and individuals track, manage, and report on their expenses. It includes features such as expense tracking, receipt scanning, and integration with accounting software. "Untagged" in the context of Expensify could refer to expenses that have not been classified or assigned to a specific category or project within the platform. This may mean that the expenses have not yet been reviewed and approved, or that they have not been properly coded for accounting purposes. By keeping track of untagged expenses, users can ensure that all of their expenses are properly accounted for and reported.


-Step-04.webp)


References
About This Article

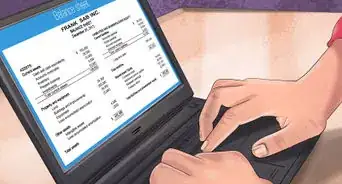
1. Open the email receipt.
2. Select the Forward option.
3. Address the email to receipts@expensify.com.
4. Enter the user's email address to the subject line if you're a Copilot.
5. Click Send.