This article was co-authored by wikiHow Staff. Our trained team of editors and researchers validate articles for accuracy and comprehensiveness. wikiHow's Content Management Team carefully monitors the work from our editorial staff to ensure that each article is backed by trusted research and meets our high quality standards.
There are 21 references cited in this article, which can be found at the bottom of the page.
This article has been viewed 15,535 times.
Learn more...
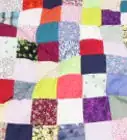
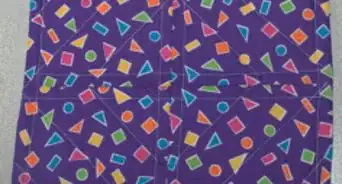
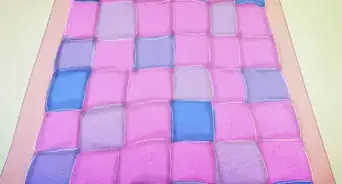
Fabric squares are useful for making quilts with colorful, grid-like designs. Squares are also the easiest quilting shapes to make, so this is a great option for making your first quilt. However, you can also use fabric squares to make intricate designs on a quilt, so you might also need them if you are a more advanced quilter. Cut quilting squares with a cutting mat and rotary cutter, or mark and measure your fabric and cut out the squares with a pair of scissors.
Steps
Using a Clear Ruler and Rotary Cutter
-
1Place the fabric on a cutting mat with gridlines and fold it in half. Using a mat with gridlines will make it easier to get straight lines on your squares. The mat will also protect your surfaces from the rotary cutter's blade. Smooth out your fabric to ensure there are no lumps or bumps, and then fold it in half widthwise. Ensure that the bottom edge is the folded edge.[1]
- You can purchase fabric cutting mats with gridlines at a craft supply store or online.
- The fabric can be any size.
- If the fabric is wrinkled or if it is a fabric that may shrink, such as cotton, then wash and dry it before cutting out the squares. You may also want to iron the fabric to ensure that it is crisp.
Tip: Cotton and flannel are the best choices for making a quilt because they will not stretch and you can machine wash them. Choose fabric in the colors and prints you want to make your quilt squares!
-
2Line up the corner of a clear square-edged ruler with the folded corner of your fabric. Place a 6 in (15 cm) clear ruler over the fabric so that the folded edges forming the corner of the fabric and the corner of the clear ruler are perfectly aligned. This will ensure that you are starting with a right angle.[2]
- If the fabric is perfectly even with the edge of the ruler on both sides of the corner, then the fabric is already squared. If not, then you will need to cut the fabric to square it.
- You can purchase a clear ruler that is meant for quilting at a craft supply store.
Advertisement -
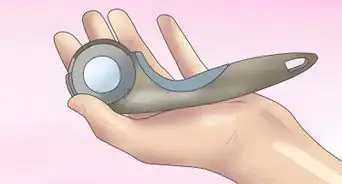
3Cut off about 0.5 in (1.3 cm) of fabric to square the corner, if needed. If the fabric is not perfectly aligned with the ruler at the corner, then move the ruler inwards from the raw edge of the fabric by about 0.5 in (1.3 cm), while keeping the bottom edge of the ruler aligned with the folded fabric. Cut along the edge of the ruler with the rotary cutter to remove about 0.5 in (1.3 cm) of fabric from the raw edge.[3]
- This should leave you with a perfect 90-degree angle at the corner of the fabric, with edges that align with the side and bottom of the ruler.
- You don’t have to cut exactly 0.5 in (1.3 cm) of fabric off the edge. This is just an estimate. You can cut a little more or a little less if needed.
-
4Smooth out the fabric and line up the edges with the gridlines. Leave your fabric folded in half and make sure that there are no lumps or bumps. Smooth out the fabric if needed, and then line up the folded and raw edge of the fabric with the gridlines on your mat.[4]
- Do not worry about the other edges of the fabric. Only use the edges that you squared as your guides.
-
5Position the ruler to create the desired size square. Place the clear ruler over the corner of your fabric again so that the corner of the ruler and the fabric are lined up. Then, slide the ruler over as needed to get the desired size squares. Combine the length and width of the size squares you want to make plus 0.5 in (1.3 cm) for the seam allowance.[5]
- For example, if you want to create 5 in (13 cm) squares, then you will need to cut the strip to 5.5 in (14 cm).[6]
-
6Cut along the opposite side of the ruler to create a strip. Once you have the ruler positioned over the fabric at the desired distance from the edge, press the rotary cutter into the fabric starting at the folded edge and roll it upwards. This will leave you with 1 long strip of fabric.[7]
- Keep the rotary cutter right next to the edge of the ruler as you cut. This is to ensure that you get a straight, even line.
- Make sure to apply firm pressure so you only have to make 1 cut. Otherwise, you may end up with frayed or jagged edges.
- Repeat the process to create additional fabric strips.
-
7Turn the strip 90 degrees and smooth it out. Take 1 of the strips you have created and unfold it. Lay it on the cutting mat so that it is spread out in a long strip in front of you. This strip will be the right width for the squares you want to create, but you will still have to cut the strip into squares.[8]
- The whole strip may not fit on your cutting mat and that is okay. You will move the strip onto the mat as you cut it.
-
8Line up the edge of the ruler and the strip to clean up the edge. Keep the bottom edge of the ruler aligned with the bottom edge of the fabric. Then, move the ruler in from the short edge by about 0.5 in (1.3 cm) or more if needed. Run the rotary cutter across the fabric to remove the edge of the fabric.[9]
- You may want to clean up the edge of the fabric if it is a different color from the rest of the fabric or if the edges are frayed.
-
9Reposition the ruler and cut along the edge to make the first square. Move the ruler into position to create the desired square size plus seam allowance. This will be the same as your strip width. Keep the bottom edge of the ruler aligned with the bottom edge of the fabric, but move the ruler so that it is the desired distance from the short edge. When the ruler is in position, cut along the edge to create the first square.[10]
- For example, if you want to create a 5 in (13 cm) square, then align the ruler and cut 5.5 in (14 cm) from the raw edge.
-
10Continue cutting squares until you have the desired number. Follow the same process to cut more squares from your fabric strips. Keep making squares until you have the desired number for your quilt.[11]
- Remember to press down hard so you can make each of the cuts in 1 pass.
- The number of squares you will need depends on the desired size of your quilt. For example, if you want to create a quilt that is 80 by 80 in (200 by 200 cm) using 5 in (13 cm) squares, then you will need 16 squares per row for a total of 256 squares (16 x 16 = 256).


Measuring and Marking the Fabric to Create Squares
-
1Fold the fabric in half to match up the raw edges. Smooth out your fabric to ensure that there are no lumps or bumps. Then, fold the fabric in half so that the raw edges are lined up. Position the fabric so the long edges are on the top and bottom.[12]
- It does not matter which side of the fabric is facing out.
Tip: You may also iron the fabric if desired to ensure that your squares will be flat and crisp. However, this is optional. If the fabric does not look wrinkled or creased, then you can skip this.[13]
-
2Pin the raw edges of the fabric together. Insert a pin about every 2 to 3 in (5.1 to 7.6 cm) along the fold and raw edges of the fabric. Position the pins about 0.5 in (1.3 cm) from the edges. This will help to keep the fabric from moving around while you measure and mark it, which is especially important if the fabric is slippery.[14]
- Insert the pins so that they are parallel to the fabric to keep them out of your way as you mark and cut the fabric.
-
3Draw a dotted line 1 in (2.5 cm) from the folded edge of the fabric. Place the ruler over the fabric so that 1 edge of it is about 1 in (2.5 cm) from the folded edge. Keep the ruler parallel to the fold. Then, use a piece of chalk, or a fabric pen or marker to make a dotted line on the fabric right along the edge of the ruler.[15]
- You can purchase a fabric pen or marker in a craft supply store.
-
4Draw a vertical line going up from the dotted line. Next, measure straight up from the horizontal dotted line. Position the ruler so it is going up toward the top edge of the fabric where the 2 raw edges meet. Measure about 5 in (13 cm) up from the dotted line using your ruler. Make another dotted line that follows the edge of the ruler so that it is perpendicular to the first dotted line.[16]
- Make sure that the horizontal line and vertical line form a right angle. You can use a protractor to check if you want to be precise.
-
5Measure the desired square size from the horizontal line and mark the fabric. Make a mark about every 10 to 12 in (25 to 30 cm) across the fabric so that you can connect the marks using the edge of your ruler. These marks are separate from the square-sized marks and they only serve to help you find the right position for the square marks. Mark the fabric with the desired dimensions of the square plus the seam allowance.[17]
- For example, if you want squares that are 5 in (13 cm) with a 0.5 in (1.3 cm) seam allowance, then measure and mark 5.5 in (14 cm) from the horizontal line.
-
6Connect the marks to form another horizontal line. Use the marks that you made as your guides and place the ruler over the fabric so that 1 edge is lined up with 2 of the marks. Draw a dotted line between the 2 marks to connect them into another horizontal line that is parallel to the first one.[18]
- The distance between these 2 lines will create a strip. However, don’t start cutting yet.
-
7Measure and mark along the horizontal lines. Starting at the first vertical line you made, measure the same distance as you did to create the second horizontal line. Then, measure from this new line again and keep doing this all the way to the end of the first horizontal line. Repeat for the second horizontal line.[19]
- Make sure to use the same measurement to make these marks as you did to create the second horizontal line. For example, if you are making 5 in (13 cm) squares with a 0.5 in (1.3 cm) seam allowance, then measure and mark 5.5 in (14 cm) from the vertical line.
-
8Draw vertical lines between the marks on the horizontal lines. Connect each pair of parallel marks into a vertical dotted line. Use the ruler as your guide and draw a dotted line along the edge of it.[20]
- Keep going until you have connected all of the marks and the strip is divided into squares.
-
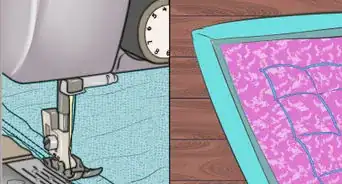
9Cut along the lines to create your quilting squares. Insert a pin along each of the edges of the squares before you cut them. This will keep the fabric from moving and make it easier to cut. Then, use a sharp pair of fabric scissors to cut along the lines.[21]
- Follow the lines exactly and do not cut inside or outside of them.
- Keep cutting until you have the desired number of quilting squares.


Things You’ll Need
Using a Clear Ruler and Rotary Cutter
- Fabric
- Cutting mat with gridlines
- Clear plastic ruler
- Rotary cutter
- Iron (optional)
Measuring and Marking the Fabric to Create Squares
- Fabric
- Pins
- Ruler
- Chalk or fabric pen or fabric marker
- Fabric scissors
References
- ↑ https://www.youtube.com/watch?v=Ju-8ZdcmC8s&feature=youtu.be&t=8
- ↑ https://www.youtube.com/watch?v=c8QhWh5KrYU&feature=youtu.be&t=90
- ↑ https://www.youtube.com/watch?v=c8QhWh5KrYU&feature=youtu.be&t=105
- ↑ https://www.youtube.com/watch?v=Ju-8ZdcmC8s&feature=youtu.be&t=25
- ↑ https://www.youtube.com/watch?v=c8QhWh5KrYU&feature=youtu.be&t=170
- ↑ https://sew4home.com/tips-resources/sewing-tips-tricks/quilt-basics-quilt-blocks-squares-rectangles-triangles-part-3-5
- ↑ https://www.youtube.com/watch?v=c8QhWh5KrYU&feature=youtu.be&t=180
- ↑ https://www.youtube.com/watch?v=c8QhWh5KrYU&feature=youtu.be&t=210
- ↑ https://www.youtube.com/watch?v=c8QhWh5KrYU&feature=youtu.be&t=222
- ↑ https://www.youtube.com/watch?v=c8QhWh5KrYU&feature=youtu.be&t=227
- ↑ https://www.youtube.com/watch?v=c8QhWh5KrYU&feature=youtu.be&t=230
- ↑ https://www.youtube.com/watch?v=Mp6kDT26ETg&feature=youtu.be&t=105
- ↑ https://www.youtube.com/watch?v=Ju-8ZdcmC8s&feature=youtu.be&t=85
- ↑ https://www.youtube.com/watch?v=Mp6kDT26ETg&feature=youtu.be&t=115
- ↑ https://www.youtube.com/watch?v=Mp6kDT26ETg&feature=youtu.be&t=178
- ↑ https://www.youtube.com/watch?v=Mp6kDT26ETg&feature=youtu.be&t=185
- ↑ https://www.youtube.com/watch?v=Mp6kDT26ETg&feature=youtu.be&t=270
- ↑ https://www.youtube.com/watch?v=Mp6kDT26ETg&feature=youtu.be&t=290
- ↑ https://www.youtube.com/watch?v=Mp6kDT26ETg&feature=youtu.be&t=315
- ↑ https://www.youtube.com/watch?v=Mp6kDT26ETg&feature=youtu.be&t=330
- ↑ https://www.youtube.com/watch?v=Mp6kDT26ETg&feature=youtu.be&t=360
- ↑ https://sew4home.com/tips-resources/sewing-tips-tricks/quilt-basics-quilt-blocks-squares-rectangles-triangles-part-3-5
About This Article