This article was co-authored by wikiHow Staff. Our trained team of editors and researchers validate articles for accuracy and comprehensiveness. wikiHow's Content Management Team carefully monitors the work from our editorial staff to ensure that each article is backed by trusted research and meets our high quality standards.
There are 14 references cited in this article, which can be found at the bottom of the page.
The wikiHow Video Team also followed the article's instructions and verified that they work.
This article has been viewed 30,132 times.
Learn more...
Using wax to seal containers, scrolls, and envelopes is a practice that dates back to early civilizations.[1] Whether you want something special for wedding invitations or you just like the way it looks, wax seals add an extra element of class and beauty to any piece of mail. By knowing the right wax to use and the right way to use it, you can start practicing your wax sealing skills in no time at all.
Steps
Sealing with a Wax Candle
-
1Trace around your seal to create a target for the wax. Place the seal in the center of your paper where you plan on placing the wax seal. Use a pencil to lightly trace around the seal to give you a better idea of the placement and amount of wax you will need.[2]
- As you feel more confident in your wax sealing abilities, you shouldn’t need to do this. It will provide a good guide, but isn’t needed to complete the sealing process.
-
2Hold a sealing wax candle at a 45-degree angle and light it. Place the end of the candle around 2 inches (5.1 cm) over the center of the paper you want to seal. Use a lighter or match to set one end alight, and hold it at an angle to allow the flame to melt the wax.[3]
- While regular candle wax can work for sealing, it will be more brittle and may break open if not handled carefully. Use sealing wax where you can for a much more durable and flexible wax seal.[4]
- You may be able to find sealing wax candles at your local craft store. Otherwise, you can find them online in a huge array of colors and types.
- Sealing wax candles can come with wicks built into them, or without a wick at all. If your candle does not have a wick, use a lighter, torch, or another source of heat to melt the wax over the letter.
Advertisement -
3Rotate the candle slightly to let the wax drip onto the paper. Rotating the candle will allow more wax to be melted and reduce the amount of time the process takes. Slowly rotate the candle, making sure to keep the lit end over your targeted area. Continue melting the wax until you have a puddle around the same size as your stamp.[5]
- Don’t worry if your wax doesn’t form a perfect circle in the middle of your paper. Pressing the wax seal into it will spread the wax around, and any extra wax around the edges will only give your seal more character![6]
-
4Spread the wax around with the unlit end of the candle. This will help evenly distribute the wax on your paper, smooth it out, and get rid of any air bubbles. Make small circles in the wax with the other end of the candle until it is a uniform shape and thickness.[7]
- This may be easier if you extinguish the other end of the candle first. If you need more wax to complete the seal, you can always relight it.
- Once you stop adding wax, it will start solidifying. While you do not need to work at an incredible pace, make sure you do not let the wax set before you can press the seal into it.
-
5Rub the face of the seal with an ice cube for a few seconds. This will cool the end of the seal slightly, making it more effective at setting the warm wax. As the ice cube melts, it will also create a natural barrier of moisture on the seal, which will make lifting it out of the wax much easier.[8]
- Seals designed for wax can be found online and even custom-ordered with your own designs. If you don’t want to shop online, you could try asking at antique stores to see if they have any seals for sale.
-
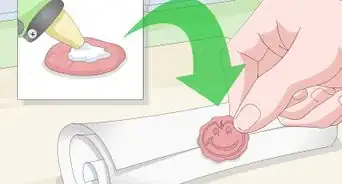
6Press the seal into the wax for 5 to 10 seconds. Hold the seal directly over the wax and lower it downward. Firmly press the seal into the wax and leave it to sit for around 10 seconds as the wax cools and hardens.[9]
-
7Lift the seal directly upward and away from the paper. You may need to hold the paper in place with one hand as you lift the seal away from the hardened wax. Make sure you lift it directly upward to avoid damaging the ridges of your finished wax seal.[10]
- If lifting the seal off is particularly difficult, it may be a sign that the wax has not hardened enough. Leave the seal to sit for another 30 seconds or so and try again.
-
8Leave the wax seal to harden fully. Put your paper aside for a few minutes to let the wax set up and ensure it will hold the shape of your seal. Once it has set, be careful not to expose it to any excess heat or leave it in the sun, as this will soften the wax.[11]


Using a Melting Spoon
-
1Cut a piece of wax around 3⁄4 inch (1.9 cm) in length. Sealing candles that do not have a wick in them will be the easiest for this, but you can also cut the wax from a candle with a wick as long as you take the wick out. Use a knife to trim a small piece off one end of the candle.[12]
-
2Put the wax in a melting spoon. Melting spoons are small metal spoons a little bit larger than a measuring tablespoon. The heat will transfer through the spoon and melt the wax, while the handle keeps your hand away from the flame.[13]
- You may be able to find a melting spoon for sealing wax at your local craft store or at some antique stores. If not, there are plenty available online.
-
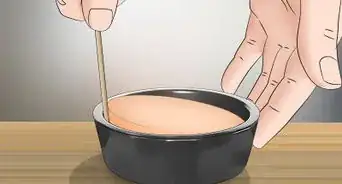
3Hold the spoon over a small candle until the wax melts. Keeping one hand firmly on the handle of the melting spoon, hold it around 1 in (2.5 cm) over the flame of a tealight or other small candle. As the wax melts, you can use a toothpick or the end of a match to stir it and make sure it all melts together.[14]
- Using a melting spoon gives you the ability to melt multiple colors of wax at once. Try combining two or more types of wax for some cool marbled wax seals.
- Melted wax should be around the same consistency as a thick honey. Give the wax a slight stir to check this consistency if you are unsure.[15]
-
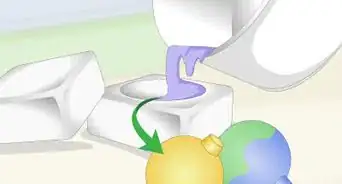
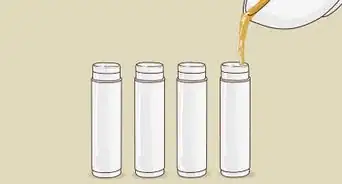
4Pour the wax onto the paper. Take the spoon away from the candle and immediately tilt it over the paper you want to seal. As you pour, move the spoon in small circles to distribute it evenly.[16]
- Keep the spoon around 1 in (2.5 cm) away from the paper to give you more control as you pour the sealing wax.
- The poured wax should be around the same size as the face of your wax seal.
-
5Press the seal into your wax. Hold the seal directly above your wax puddle and lower it down in one smooth motion. Apply a small amount of pressure to make sure the seal is imprinted in the wax before leaving it to harden. Once the wax has solidified, lift the seal upward away from the wax.[17]
- If the seal is difficult to lift away from the paper, let the wax harden for another 30 seconds before trying again.
-
6Heat the spoon again to clean out the leftover wax. Hold the spoon over your small candle until the wax left on the inside has melted once again. Use a paper towel to wipe out the inside of the spoon and remove any leftover wax.[18]
- Make sure you let the spoon cool fully before putting it away. This is especially important if you are storing it with your wax.


Using a Sealing Wax Tube
-
1Place a sealing wax tube into a large hot glue gun. Sealing wax tubes are custom-made tubes designed to fit into and melt with a hot glue gun. With the glue gun turned off, insert a sealing wax tube as far as it can go.[19]
- Sealing wax tubes may be available at your local craft store. If not, you should be able to find a selection online.
- Using a sealing wax tube in a glue gun won’t produce a wax seal with the same handmade, organic look as a traditional wax seal. However, it will melt and harden a lot faster and is much easier to use.
-
2Let the glue gun heat up fully. Turn the hot glue gun on and leave it to heat up. This should take around 5 minutes, but you can leave it for a little longer to be safe. When the wax begins dripping out of the nozzle, your glue gun will definitely be ready to use.[20]
- Keep an eye on your hot glue gun as it heats up. If the heating element or nozzle comes in contact with any paper, it may catch on fire. A little smoke coming from the nozzle is OK, especially if it is a new glue gun.
- For the best results, use a glue gun that does not have any hot glue residue anywhere on or in it. This could also melt and mix into your sealing wax, which could stick to your seal or fasten too tightly to the paper.
-
3Squeeze a dollop of the melted wax onto your paper. Hold the nozzle of the glue gun directly over the center of your paper and begin squeezing the trigger firmly. Continue squeezing until you have a circle of wax on your paper around the same size as the face of your seal.[21]
- To be extra certain with the amount of wax you will need, you can trace around the edge of the seal with a pencil to give you a rough guide of the seal’s shape.
-
4Press the seal into the wax for 5 to 10 seconds. Hold the seal directly over the small pool of wax and lower it straight down. Apply slight pressure to the seal to push it into the wax, and let it sit for around 5 to 10 seconds or until the wax has hardened. Lift the seal out of the wax to finish your wax seal.[22]
- Sealing wax from a tube should harden slightly quicker and more uniformly than traditional sealing wax. If you find it difficult to lift the seal away, let the wax harden a little more and try again.


Warnings
- Always be careful when working with fire. Make sure not to burn yourself, and always extinguish the flame immediately after you have finished using it.⧼thumbs_response⧽
- Be careful not to touch the end of a hot glue gun that has been turned on. Give the gun plenty of time to cool down before you put it away.⧼thumbs_response⧽
Things You’ll Need
For Sealing with a Wax Candle
- Sealing wax
- Heat source, such as matches
- Seal
- Paper
For Using a Sealing Wax Tube
- Hot glue gun
- Sealing wax tube
- Seal
- Paper
References
- ↑ https://www.artofmanliness.com/articles/wax-seals-a-history-and-how-to/
- ↑ https://www.artofmanliness.com/articles/wax-seals-a-history-and-how-to/
- ↑ https://youtu.be/BkBPLOqa4EA?t=72
- ↑ https://honestlywtf.com/diy/diy-wax-seal/
- ↑ https://honestlywtf.com/diy/diy-wax-seal/
- ↑ https://youtu.be/BkBPLOqa4EA?t=263
- ↑ https://www.artofmanliness.com/articles/wax-seals-a-history-and-how-to/
- ↑ https://www.artofmanliness.com/articles/wax-seals-a-history-and-how-to/
- ↑ https://honestlywtf.com/diy/diy-wax-seal/
- ↑ https://www.artofmanliness.com/articles/wax-seals-a-history-and-how-to/
- ↑ https://www.artofmanliness.com/articles/wax-seals-a-history-and-how-to/
- ↑ https://youtu.be/2rTbanvxfEo?t=28
- ↑ https://youtu.be/2rTbanvxfEo?t=9
- ↑ https://youtu.be/BkBPLOqa4EA?t=227
- ↑ https://youtu.be/2rTbanvxfEo?t=115
- ↑ https://youtu.be/BkBPLOqa4EA?t=233
- ↑ https://youtu.be/BkBPLOqa4EA?t=242
- ↑ https://youtu.be/2rTbanvxfEo?t=158
- ↑ https://honestlywtf.com/diy/diy-wax-seal/
- ↑ https://youtu.be/Zj71LcW_sWI?t=76
- ↑ https://youtu.be/I7s5N_MqNdg?t=40
- ↑ https://youtu.be/I7s5N_MqNdg?t=60
About This Article