This article was co-authored by Jason Williams and by wikiHow staff writer, Christopher M. Osborne, PhD. Jason Williams is an AV & Security Specialist and the Owner of Williams AV & Security. With more than 35 years of experience, he specializes in home automation and home theater system installations. Jason is an AVIXA Certified Technology Specialist, a CEDIA Certified Cabling & Infrastructure Technician, a Pakedge Certified Network Administrator, and holds a Georgia Low Voltage Unrestricted License.
The wikiHow Tech Team also followed the article's instructions and verified that they work.
This article has been viewed 830,055 times.
A graphic equalizer, more commonly known as an EQ, is used to change the frequency response of selected sounds, such as particular instruments or vocals in an audio track. It can be used to enhance the bass, reduce the treble, highlight a saxophone, or just make your audio sound better overall. EQs can be used in home audio or live sound. An EQ can be connected to audio equipment or physical hardware, or it may be a program on your computer. Once you get a handle on the basic operation of your EQ model, you can use it to make simple audio adjustments, then get into more detailed audio fine-tuning. This wikiHow article teaches you how to use a graphic equalizer.
Things You Should Know
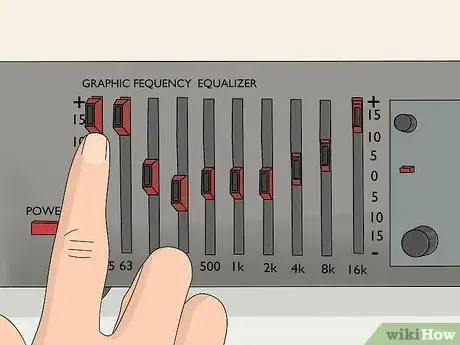
- Graphic equalizers have a series of sliders that control a frequency band within an audible range.
- The 30 Hz slider on the left controls the low bass, while the 20 kHz slider on the right controls the high treble. The rest control the frequencies in the middle.
- The best equalizer setting will vary depending on the sound or genre, as well as your audio equipment and the room you are in.
Steps
Familiarizing Yourself with Your EQ
-
1Identify the frequency range and control points for your EQ. Each of the sliders is called a "band." Each band controls a specific frequency within a range of audible sounds. The 20 hertz (Hz) band controls the low end (bass), while the 20 kilohertz (kHz) controls the high end (treble). Your EQ will most likely have 20 Hz marked on its left side, and 20 kHz marked on the right.[1]
- Between the low and high bands, an analog EQ will have a series of vertically-oriented (up-and-down) adjustment sliders. A digital EQ will have a series of marked points spaced out along the horizontal line.
- These sliders or control points are often set at 30 Hz, 100 Hz, 1 kHz, 10 kHz, and 20 kHz. Some models allow you to alter these control point settings, while others are permanently fixed at these frequencies.
-
2“Boost” upward to intensify a frequency, and “cut” downward to reduce it. With an analog EQ, pushing a slider upward above the horizontal line “turns up” sounds within that frequency range—this is called boosting. Sliding downward “turns down” the sounds in that frequency range, known as cutting. [2]
- With a digital EQ, you typically click on a control point and drag up to boost or down to cut.
- For example, if you wanted to boost audio in the 100 Hz frequency range, you’d either push the 100 Hz slider upward (analog) or click and drag it upward (digital). Or, to cut the 1 kHz frequency range, you’d slide or click and drag down below the horizontal line.
Advertisement -
3Understand low and high pass filters. Low and high pass filters allow you to block lower or high frequencies. For example, a low pass filter lets all frequencies below a certain bass frequency “pass-through” while blocking all frequencies above that frequency. A high-pass filter does the opposite. Some EQs have a built-in high and low pass setting. If they do not, you can set it yourself by lowering the high or low bands all the way down.
- For example, you could use a low pass filter to block all frequencies above 10 kHz. To do so, you would leave the 10 Hz band and below at their normal levels, and then gradually cut the bands after the 10 Hz band down to zero. For a high pass filter, you would do the opposite on the other side of the EQ.
-
4Understand what Q factor is. When you boost or cut a particular frequency, you also want to boost surrounding frequencies to lesser degrees—for instance, when boosting 100 Hz, you also want to boosts 75 Hz and 125 Hz to lesser amounts. This is called the Q factor. A larger Q-factor boosts a wider range of frequencies, while a smaller Q-factor boosts a narrower band of frequencies.[3]
- When boosting a range of frequencies, it's better to do this by boosting the bands in an arch shape, rather than boosting one particular band. For example, if you want to boost all frequencies between 40 Hz (low) and 10 kHz (high), you could do so by boosting the middle frequency (600 Hz) and then tapering off all the surrounding frequencies before and after 600 Hz. The range of the arch shape is the Q-factor.
Adjusting for Your Music and Listening Environment
-
1Check any EQ presets for the type of audio you’re listening to. Many stereos, TVs, audio players, and other devices with digital EQ capabilities come with a set of predetermined audio adjustments based on music or audio genre. For instance, your stereo or music app may have presets for “rock,” “jazz,” “classical,” and so on.[4]
- By selecting a preset, the various frequency control points will be “boosted” or “cut” to levels that are considered ideal for a particular type of music or audio.
- Presets provide a quick way to improve the sound of the audio coming through your headphones, earbuds, or speakers.
- Physical EQs don’t usually have presets, since you have to manually adjust the sliders yourself.
-
2Trust your own ears when making EQ adjustments. Presets are far from perfect, and should be considered starting points. So many factors go into making music sound “just right”—with personal preference at the top of the list—that you should always consider tinkering with any presets.[5]
- The ultimate goal for EQ adjustments is to make the audio sound as perfect as possible to your ears—so trust them! If your ears tell you that the bass needs boosted, adjust the lower frequencies no matter what the presets indicate.
-
3Alter your EQ settings when your equipment or conditions change. While personal preference is the number one factor in determining ideal audio, there are numerous other factors at play as well. These include—but aren’t limited to—the quality of your audio equipment, the size and shape of the room or space you’re in, atmospheric conditions, and ambient noises.[6]
- For example, you may find that adding a new carpet and couch to your den alters how the "jazz" preset sounds on your home stereo. You may have to do some tinkering to get the sound right again.
-
4Cut what you don’t want instead of boosting what you want. If you want to crank up the bass for your favorite rock album, your first instinct will be to boost the lower-end (for instance, 100 Hz) settings. However, you usually get better results by cutting the other settings and leaving the 100 Hz setting in a neutral position.[7]
- Boosting is more likely to add distortions to the audio, especially if you boost a particular frequency range to a significant degree. Cutting is far less likely to cause distortions.
- So, to crank up the bass at 100 Hz, leave it at neutral (or only slightly boosted), and cut the sub-bass at 30 Hz and mid-range sounds at 1 kHz.
- Use a light touch. Only boost or cut frequencies a couple of decibels.
-
5See if a personalized EQ app offers a simple solution for you. Fine-tuning your EQ settings is the best way to get the best audio for your circumstances. In a pinch, however, you might want to use a smartphone app that “learns” how you hear and makes adjustments for you.[8]
- These apps usually start by giving you a short “hearing test” to determine how well you pick up different frequency ranges. It will then create custom-made presets that will automatically adjust based on the type of audio and other factors.
- If you just want your music to sound “pretty good” whenever you put in your earbuds, this may be the best option for you.
Highlighting Different Instruments or Vocals
-
1Identify the frequency range of common instruments and vocals. Once you’ve mastered the basics of adjusting the sliders or control points of your EQ, you can make fine adjustments to highlight particular instruments or vocals. With practice, you’ll know where in the frequency range to look for a particular instrument or vocal, but until then, rely on charts like the following:[9]
- Female vocals: 150 Hz-1.6 kHz
- Male vocals: 60 Hz-500 Hz
- Saxophone: 100 Hz-700 Hz
- Guitar: 70 Hz-1.1 kHz
- Cymbals: 200 Hz-10 kHz
- Kick drum: 60 Hz-4 kHz
- Piano: 25 Hz-4.5 kHz
-
2Boost the bar in the chosen range to highlight an instrument. Once you know which frequency range to search in to find a particular instrument or vocals, boost the slider or control point that’s closest to the center of that range. If doing so brings the sound of that instrument/vocal to the forefront, try boosting the surrounding ranges a little to see if that helps or hinders the process.[10]
- You may have to do some searching by trial-and-error to find the instrument or vocal you’re looking to highlight, but keep at it—you will find it!
- As an example, you might boost the 100 Hz setting in search of an electric guitar, and find that it helps to boost the 1 kHz setting as well.
-
3Prioritize cutting over boosting once you’ve highlighted an instrument. Once you’ve found the sound you want to emphasize, don’t just maintain a significant boost on the range or ranges where you found the sound. Instead, bring those ranges back closer to neutral and cut the ranges that carry other sounds that you don’t want to highlight.[11]
- In other words: if you want to highlight the electric guitar, it’s better to “cut” the drums, saxophone, and vocals than it is to “boost” the electric guitar significantly.
- Large “boosts” tend to cause audio distortions, which isn’t a problem with “cuts.”
-
4Adjust the “Q” setting if your equalizer has the capability. Narrowing the Q-range decreases the frequency range that is being boosted or cut, while widening it increases the range. This kind of fine-tuning can help you pinpoint the exact instrument or vocals that you want to highlight.[12]
- Q-range is easier to visualize with a digital EQ. In this format, a boosted setting looks like a triangle or arch, with the apex representing the amount of the boost and the sloping sides representing the lesser boosting occuring at other surrounding frequencies. Narrowing the Q-range makes the triangle or arch “skinnier,” which means fewer surrounding frequencies are impacted; increasing Q-range does the opposite.
Community Q&A
-
QuestionWhich one is the mid?
 Community AnswerOn graphic equalizers, generally the center slider(s) control the midrange.
 -
QuestionCan an equalizer be used as amplifier?
 Community AnswerNot in the sense of making all of the audio more powerful, but you can create the illusion of a more powerful speaker system by changing the equalizer.
 -
QuestionAre there some presets for bass settings?
 Community AnswerYes, there are. Players with built-in equalizers typically have presets for many genres, some of which are very bass heavy. Of course, there is no such thing as one perfect preset. Every speaker and headset has its own equalization needs.
Warnings
- Start with your speaker volume at mid-range or lower before you start adjusting your EQ. Boosting frequencies while your speaker is at a high setting may cause damage to your speakers or to your hearing.⧼thumbs_response⧽
References
- ↑ https://www.digitaltrends.com/home-theater/eq-explainer/
- ↑ https://youtu.be/tsDfKk4YNrg?t=10
- ↑ https://flypaper.soundfly.com/produce/what-is-a-parametric-eq/
- ↑ https://www.digitaltrends.com/home-theater/eq-explainer/
- ↑ https://www.musicianonamission.com/approach-equalization-two-types-eq/
- ↑ https://www.soundguys.com/how-to-equalize-fine-tune-your-listening-experience-16410/
- ↑ https://www.soundguys.com/how-to-equalize-fine-tune-your-listening-experience-16410/
- ↑ https://www.soundguys.com/how-to-equalize-fine-tune-your-listening-experience-16410/
- ↑ http://www.guitarbuilding.org/wp-content/uploads/2014/06/Instrument-Sound-EQ-Chart.pdf
About This Article
To use a graphic equalizer, push the sliders up above the horizontal line to boost sounds within that frequency range. Similarly, push the sliders below the horizontal line to cut the sounds in that frequency range. For instance, if you want to turn up the bass in a song, push the lowest kilohertz slider upward. Alternatively, if there’s a saxophone solo you want to highlight, push the middle kilohertz sliders upward, and the kilohertz sliders on both ends downwards. While it may take some trial and error to get the sound you want, stick with it! Eventually you’ll find the perfect sound every time. To learn how to check your equalizer for presets, read on!

