This article was co-authored by Chiara Corsaro and by wikiHow staff writer, Hannah Madden. Chiara Corsaro is the General Manager and Apple Certified Mac & iOS Technician for macVolks, Inc., an Apple Authorized Service Provider located in the San Francisco Bay Area. macVolks, Inc. was founded in 1990, is accredited by the Better Business Bureau (BBB) with an A+ rating, and is part of the Apple Consultants Network (ACN).
There are 8 references cited in this article, which can be found at the bottom of the page.
The wikiHow Tech Team also followed the article's instructions and verified that they work.
This article has been viewed 816,371 times.
If you have a lot of pics on your iPhone, it might be time to back them up on your computer and free up some storage. Figuring out how to share your photos from your phone to your Mac can be tough, especially if you’ve never done it before. Fortunately, there are a few different ways you can import your photos, whether you want to send them all at once or just a few at a time.
Steps
Using the Photos App
-
1Connect your iPhone to your Mac. Plug one end of the iPhone's charging cable into the iPhone's charging port, then plug the USB end into one of your computer's USB ports.[1]
- If your phone isn’t connecting to your Mac, it might be the cable you’re using. Try using a new one to see if it fixes the issue.
-
2Open the Photos app. Click the multicolored flower-shaped icon in your Mac's Dock.[2]
- The Photos app may open automatically when you connect your iPhone. If so, skip this step.[3]
Advertisement -
3Select your iPhone. Click your iPhone's name in the left-side column of the window to select it. It's under the "Devices" heading.[4]
- Make sure your iPhone is unlocked first if it's not showing up in the "Devices" section on the left side.
- If your iPhone asks you if you trust this computer, select Trust to allow access to your photos.
-
4Select the photos you'd like to download. Click each photo and/or video that you want to import into your Mac.[5]
- If you want to import all photos that aren't already on your Mac, skip this step.
-
5Click Import Selected. It's in the upper-right corner of the window. This grey button will also display the number of selected imaged (e.g., Import 34 Selected).[6]
-
6Wait for your photos to finish importing. Once your iPhone's photos have imported to your Mac, you can click the My Albums section on the left side of the window to view them.[7]


Using AirDrop
-
1Enable AirDrop on your Mac. To do so, open the Finder, click AirDrop on the left side of the Finder window, click the Allow me to be discovered by link, and click Everyone in the resulting drop-down menu.[8]
- If you see a Turn On Bluetooth button in the middle of the AirDrop window when it first opens, click it to turn on your Mac's Bluetooth.
-
2Open your iPhone's Photos. Tap the Photos app icon, which resembles a multicolored pinwheel on a white background.[9]
-
3Tap Select. It's in the top-right corner of the screen. This will open up a popup menu where you can share your photos via email, text, or airdrop.[10]
-
4Select the photos you want to transfer. Tap each photo that you want to move onto your Mac. You should see a blue-and-white checkmark icon appear in the corner of each selected photo.[11]
-
5Tap "Share" . This arrow-shaped icon is in the bottom-left corner of the screen. A menu will appear.[12]
-
6Tap the "AirDrop" icon. This icon resembles a series of concentric circles near the top of the "Share" menu. Doing so will enable your iPhone's Bluetooth and Wi-Fi (if they were off) and display your Mac's name.[13]
-
7Tap your Mac's name. It's in the AirDrop menu. Your iPhone will automatically send an Airdrop message to your Mac with your photos attached.[14]
- Make sure you’re standing pretty close to your Mac so that the computer’s name appears as an option.
-
8Accept the files to save them on your Mac. In the upper right hand of your screen, you’ll get a notification that someone wants to Airdrop you a message. Click Accept to download the photos, then find them in your “Downloads” folder.[15]
- Make sure that you have WiFi and Bluetooth turned on for your iPhone and your Mac.


Using iCloud Photo Library
-
1Make sure that you have enough space. This method allows you to upload all of your photos to iCloud, at which point you can download them onto any computer with Internet access; however, your iCloud storage must exceed the amount of storage that your photos take up. You start with 5 gigabytes of free storage, but you may need to upgrade your storage before you can store your photos.[16]
-
2Open your iPhone's Settings. Tap the Settings app icon, which resembles a grey box with gears on it.[17]
-
3Tap your Apple ID. It's at the top of the Settings page.
- If you are not signed in, tap Sign in to iPhone, enter your Apple ID and password, and then tap Sign In.
-
4Tap iCloud. This is near the middle of the screen.[18]
-
5Tap Photos. You'll find this near the top of the "APPS USING ICLOUD" section of the page.[19]
-
6Tap the white "iCloud Photo Library" switch . It will turn green . Your iPhone's photos will begin uploading to iCloud.[20]
- The upload time will vary depending on how many photos you have, so just make sure that your iPhone is fully charged (or plugged into a charger) and connected to Wi-Fi.
- If you'd like to save storage space on your iPhone, tap Optimize iPhone Storage when prompted.
- You can ensure that future photos are uploaded to iCloud by tapping the white "My Photo Stream" switch on this page as well.
-
7Open your Mac's Apple menu . Click the Apple logo in the upper-left corner of the screen. A drop-down menu will appear.[21]
-
8Click System Preferences…. It's near the top of the drop-down menu. This will open the System Preferences window.[22]
-
9Click . You'll find this cloud-shaped icon on the left side of the System Preferences window.[23]
-
10Click Options. It's to the right of the "Photos" heading near the top of the page. A new window will open.[24]
-
11Enable Photos syncing. Check both the "iCloud Photo Library" box and the "My Photo Stream" box. This ensures that the photos from your iPhone will be available on your Mac.[25]
-
12Click Done. It's a blue button at the bottom of the window. Doing so saves your changes. You should now be able to view your iPhone's photos in the Photos app, though it may take some time for your photos to become available.[26]
- Any photos you take will now be automatically stored on both your iPhone and your Mac, including any edits you make.


Using Image Capture
-
1Connect your iPhone to your Mac with a USB cable. Make sure your iPhone is unlocked. If your iPhone asks you whether or not you trust this computer, click Trust to allow access to your photos.[27]
- If you’ve already trusted your computer, you might not have to hit trust again.
-
2Open the Image Capture app on your Mac. You can use your Launch Pad or find it in your Folders. It looks like a small picture of a webcam.[28]
- Using Image Capture gives you more control over where your photos are downloaded. Instead of being automatically put into your Pictures folder, you can send them elsewhere on your Mac.
-
3Select your iPhone from the Devices list. It’s on the left hand side of the screen. Click on your iPhone’s name to select it.[29]
-
4Click the Import To popup menu. When you select your iPhone, you’ll get a popup box asking where you’d like to save your images. Click on this box to customize your photo locations.[30]
- If you don’t see this box, try selecting your iPhone again from the devices menu.
-
5Choose where you’d like to save the images. You can save them in your Downloads, an existing folder, or a brand new folder. Look through your computer locations to figure out the best spot for you.[31]
- You can also choose which app you’d like to open the images once they’re downloaded.
-
6Select your images, then click Import. Click on each image to select it, then click Import. If you want to import all of your images, select Import All.[32]
- Once your images have been imported, you can delete them from your iPhone to free up storage space.


Using My Photo Stream
-
1Go to your iPhone’s Settings, then select Photos. The Settings app looks like a gray cog on a gray background. Tap this app, then head to the Photos section.[33]
- You can also use the search bar at the top of your Settings app to look for the Photos section.
-
2Turn on Upload to My Photo Stream. Toggle the sliding button to turn on My Photo Stream. If it’s already on, you can leave it in the “on” position.[34]
- My Photo Stream automatically shares your most recent photos on all of your iOS devices. You can see these photos in the “Albums” section of your Photos app on your iPhone.
-
3Open Photos on your Mac. It looks like a rainbow-colored flower on a white background.[35]
-
4Click on Photos > Preferences > iCloud. This will send you to your Photos and iCloud settings, which you can use to personalize your Photo preferences. You may have done this before to look at your iCloud settings.[36]
-
5Check the box beside My Photo Stream. This will turn My Photo Stream on so that you can access it on your Mac. Now, your most recent photos from your iPhone (ones you took in the last 30 days) will be shared directly to your Mac.[37]
- You can always turn this feature off on either your iPhone or your Mac if you realize you don’t like it.
-
6Right click on a photo, then select Save. In your My Photo Stream section of your Photos, right click on the photo you want to keep on your computer. Select Save to download it to your Photos app.[38]
- If you don’t save the photos on your Mac, they’ll disappear from your computer after 30 days, but they’ll still be saved on your iPhone.


Using an Email
-
1Open up the Photos app on your iPhone and click on a picture. The Photos app is a rainbow-colored flower on a white background. Tap on this app, then select the picture you’d like to share.[39]
- Sharing photos via Email is handy when you only want to download 1 or 2 photos.
-
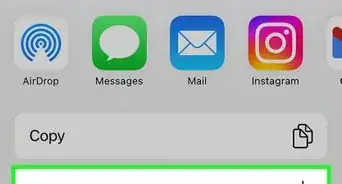
2Click on the share icon in the bottom left. It looks like a blue arrow at the bottom of your screen. This will open up a menu with a few different options for sharing.[40]
- If you want to select more photos to share, you can scroll to the right or left of your photo and tap on each one.
-
3Tap the Mail icon. It’s a blue square with a white envelope in the center. This will open up a blank email with your photo (or photos) attached at the bottom.[41]
- You can send up to 5 photos at a time via email.
-
4Enter your email address, then hit send. You can email the photos directly to your Mac by sending them to your email address. When you’re ready, click Send in the upper right corner.[42]
- You can now check your email on your Mac and download the photo(s) from your email.
- If you want to send the photos to friends and family members, enter their email addresses as well.


Expert Q&A
Did you know you can get premium answers for this article?
Unlock premium answers by supporting wikiHow
-
QuestionWhat is the easiest way to transfer all of my photos from iPhone to Mac?
 Chiara CorsaroChiara Corsaro is the General Manager and Apple Certified Mac & iOS Technician for macVolks, Inc., an Apple Authorized Service Provider located in the San Francisco Bay Area. macVolks, Inc. was founded in 1990, is accredited by the Better Business Bureau (BBB) with an A+ rating, and is part of the Apple Consultants Network (ACN).
Certified Apple TechnicianIf you're importing all of your iPhone's new photos, click the blue Import All New Photos button.
Support wikiHow by unlocking this expert answer.
-
QuestionI need storage on my iPhone. Now that they are synced, can I delete the images off of my iPhone without losing them on my Mac?
 wikiHow Staff EditorThis answer was written by one of our trained team of researchers who validated it for accuracy and comprehensiveness.
Staff AnswerwikiHow Staff EditorStaff AnswerYes, you can! If you've downloaded your photos to your Mac's Photos app, they'll stay there, even if you delete them from your iPhone.Support wikiHow by unlocking this staff-researched answer.
-
QuestionHow long will it take to transfer my photos form my iPhone to my Mac?
 Community AnswerIt depends on how old your phone and/or Mac is. It also depends on how many images you have, how big the images are and in what way you transfer them. It shouldn't take more than 10 minutes, though.


References
- ↑ https://support.apple.com/en-us/HT201302
- ↑ https://support.apple.com/en-us/HT201302
- ↑ Chiara Corsaro. Phone & Computer Repair Technician. Expert Interview. 12 December 2019.
- ↑ https://support.apple.com/en-us/HT201302
- ↑ https://support.apple.com/en-us/HT201302
- ↑ https://support.apple.com/en-us/HT201302
- ↑ https://support.apple.com/en-us/HT201302
- ↑ https://support.apple.com/en-us/HT203106
- ↑ https://support.apple.com/en-us/HT203106
- ↑ https://support.apple.com/en-us/HT204144
- ↑ https://support.apple.com/en-us/HT204144
- ↑ https://support.apple.com/en-us/HT204144
- ↑ https://support.apple.com/en-us/HT204144
- ↑ https://support.apple.com/en-us/HT204144
- ↑ https://support.apple.com/en-us/HT203106
- ↑ https://support.apple.com/en-us/HT204264
- ↑ https://support.apple.com/en-us/HT204264
- ↑ https://support.apple.com/en-us/HT204264
- ↑ https://support.apple.com/en-us/HT204264
- ↑ Chiara Corsaro. Phone & Computer Repair Technician. Expert Interview. 12 December 2019.
- ↑ https://support.apple.com/en-us/HT204264
- ↑ https://support.apple.com/en-us/HT204264
- ↑ https://support.apple.com/en-us/HT204264
- ↑ https://support.apple.com/en-us/HT204264
- ↑ Chiara Corsaro. Phone & Computer Repair Technician. Expert Interview. 12 December 2019.
- ↑ https://support.apple.com/en-us/HT204264
- ↑ https://support.apple.com/guide/image-capture/transfer-images-imgcp1003/mac
- ↑ https://support.apple.com/guide/image-capture/transfer-images-imgcp1003/mac
- ↑ https://support.apple.com/guide/image-capture/transfer-images-imgcp1003/mac
- ↑ https://support.apple.com/guide/image-capture/transfer-images-imgcp1003/mac
- ↑ https://support.apple.com/guide/image-capture/transfer-images-imgcp1003/mac
- ↑ https://support.apple.com/guide/image-capture/transfer-images-imgcp1003/mac
- ↑ https://support.apple.com/en-us/HT201317
- ↑ https://support.apple.com/en-us/HT201317
- ↑ https://support.apple.com/en-us/HT201317
- ↑ https://support.apple.com/en-us/HT201317
- ↑ https://support.apple.com/en-us/HT201317
- ↑ https://support.apple.com/en-us/HT201317
- ↑ https://support.apple.com/en-us/HT209462
- ↑ https://support.apple.com/en-us/HT209462
- ↑ https://support.apple.com/en-us/HT209462
- ↑ https://support.apple.com/en-us/HT209462
About This Article

1. Connect your iPhone to your Mac.
2. Open your Mac's Photos app.
3. Unlock your iPhone.
4. Select your iPhone in the Photos app.
5. Select the photos you want to upload.
6. Click Import Selected or Import All.