This article was co-authored by wikiHow Staff. Our trained team of editors and researchers validate articles for accuracy and comprehensiveness. wikiHow's Content Management Team carefully monitors the work from our editorial staff to ensure that each article is backed by trusted research and meets our high quality standards.
This article has been viewed 16,582 times.
Learn more...
A Marlinespike Hitch is an old sailor's knot, used to create a knot in the middle of a line that can actually hold on to small tools and objects. It was used by boatsmen to hold onto large nails called "marlinespikes." Interestingly enough, these nails and this not are actually where the fish name "marlin" comes from, after the large horn on a marlin's head. Marlinespike Hitches are also used to create temporary ladders, and to give you a better grip to yank on a rope.
Steps
Tying Your Marlinspike Hitch
-
1Make sure your rope is securely fastened on one end. The marlinespike hitch is generally used with a rope that is already attached to something. Though you could create the knot with a free-hanging rope, it is easier if one end is fastened down.
- If you're just practicing, tape some rope to hang over the edge of a desk, or have a friend hold it up.[1]
-
2Grab a thin object to form the hitch around. You'll need the object getting "hitched" to make a good knot. While practicing, anything roughly a half-inch thick and at least six inches long is a good start. Try out a wrench, drumstick, wooden dowel, etc.
- The thickness of the rope doesn't matter.[2]
Advertisement -
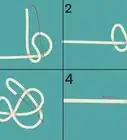
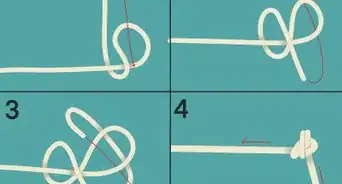
3Create a loop in the middle of the rope by pulling the bottom of the rope upwards. Pinch the rope with two fingers, then pull the bottom of the rope up and to the side so that you have a small, roughly 1" diameter loop at the bottom of your rope.
- Where you create this loop determines where your knot will be.
- Unless you're putting your hitch at the very bottom of the rope, you should still have free-hanging rope underneath your loop.
-
4Keeping the loop together with your other hand, flip the loop up so it is bisected by the rest of the rope line. Bisected means cut into two pieces. Flip the loop up so it lies against the remainder of the rope going upwards. Your fingers will be pinching the knot together from the bottom.
- The cross-over of the rope, the part you're pinching together, must be on the bottom or, the knot will fall apart.
-
5Slide the hitch (your wrench, nail, etc) over the first half of the loop. Take your long object and slide it into the right side of the loop, coming from the front.
-
6Slide the hitch behind the center line. Now, come back towards your body with the hitch.[3]
-
7Slide the hitch over the top of the left half of the loop. You'll be going over, under, and over again to thread the hitch into your rope. This ensures it won't be going anywhere if you tug on the rope.
-
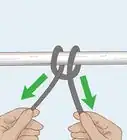
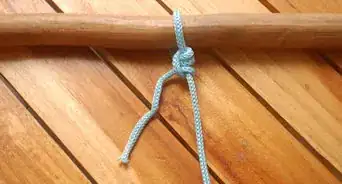
8Keeping the hitch in place, tug on the bottom of the rope to tighten the knot. Holding onto your hitch, pull the rope from below to tighten around your object You have just made your first marlinespike hitch!
- Make sure your "knot," the folded over rope is underneath the hitch, not above.[4]


When to Use a Marlinespike Hitch
-
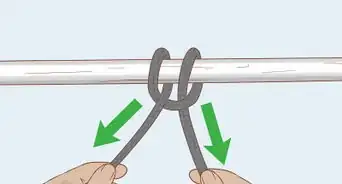
1Use a marlinespike hitch to get greater power pulling on a rope. Traditionally, marlinespike hitches are used to get a good grip on a rope. Instead of wrapping the rope around your hand and pulling, you create a handle with a wrench, dowel, etc. Since the knot is so quick and easy to make, you'll save a lot of time and energy for serious pulling, towing, or yanking.
- The knot is even used to tie other knots tighter. Instead of yanking on the end of a knot with your hands, tie in a marlinespike, tighten the knot, and then remove it.
-
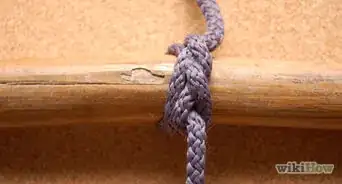
2Keep vital tools nearby by hitching them to your ropes. This is especially helpful at sea, where there is an abundance of rope but a serious risk of tools going overboard. Keep them secure and at an easily grabbed height with a marlinespike.[5]
-
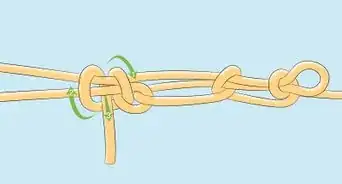
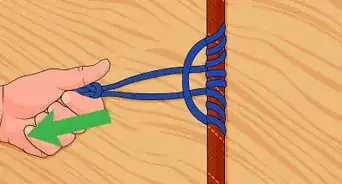
3Use two ropes to make a ladder, tying a hitch to the end of each rung. If you have two identical ropes hanging down, you can make marlinespike hitches at identical heights to create a rope ladder. The actual knots are the exact same, but you should test each set with a vigorous pull to ensure they are all weight bearing. Note, however, that You must start from the bottom up. The final hitch you tie needs to be your top rung for the greatest strength and durability.
- Test the ladder every time you use it. Over time, all knots may lose some of their strength and start to become loose.
- Secure the rungs, especially the top ones, with clamps that prevent the rungs from falling off for longevity and added safety.
- Ensure that your rungs are as horizontal as possible, with evenly spaced rungs.[6]


Warnings
- Make sure you test any crucial weight bearing knots (like a ladder) extensively before putting a full load on the knot.⧼thumbs_response⧽
References
- ↑ http://www.animatedknots.com/marlinspike/#ScrollPoint
- ↑ http://www.ropeworks.biz/reader/marlin.pdf
- ↑ http://www.animatedknots.com/marlinspike/#ScrollPoint
- ↑ https://www.youtube.com/watch?v=wf8wWMkcPXs&feature=youtu.be
- ↑ http://www.ropeworks.biz/reader/marlin.pdf
- ↑ http://www.animatedknots.com/marlinspike/#ScrollPoint
- Brion Toss, The Complete Rigger's Apprentice (Camden, Maine: International Marine, 1998), 10-13.
- Clifford W. Ashley, The Ashley Book of Knots (New York: Doubleday, 1944), pg 330.
About This Article


-Step-11-Version-2.webp)