This article was co-authored by Ricardo Mitchell. Ricardo Mitchell is the CEO of CN Coterie, a fully licensed and insured Lead EPA (Environmental Protection Agency) Certified construction company located in Manhattan, New York. CN Coterie specializes in full home renovation, electrical, plumbing, carpentry, cabinetry, furniture restoration, OATH/ECB (Office of Administrative Trials and Hearings/Environmental Control Board) violations removal, and DOB (Department of Buildings) violations removal. Ricardo has over 10 years of electrical and construction experience and his partners have over 30 years of relevant experience.
There are 10 references cited in this article, which can be found at the bottom of the page.
This article has been viewed 106,322 times.
Electricians and engineers regularly use multimeters to check the voltage of circuits. However, these handy tools are now widely available and affordable enough for anyone to buy one. You might want to use a multimeter to check the voltage of an outlet and ensure that the casing is safe. To test an outlet with a multimeter, read the instructions that came with your device first and be careful not to touch the metal prongs. If you do, you could be electrocuted. The process of checking an outlet’s voltage is quick and easy, and you can also check the casing of an outlet to make sure it’s safe.
Steps
Checking the Voltage of an Outlet’s Sockets
-
1Read the instructions that came with your multimeter before you use it. Even if you’ve used a multimeter before, the instructions of different models can vary and it’s important to read them to keep yourself safe. Read the instructions that came with your multimeter and check for specific information on how to safely test an outlet with the device.[1]
- It’s especially important to make sure that the multimeter is capable of testing the voltage of the outlet. If the voltage is too high for the multimeter to measure, you may break it by trying to measure it.
-
2Turn on the multimeter and switch the dial to the AC setting. AC stands for alternating current and it is usually represented by an A with a squiggly line beside or above it, such as ~A or A~.[2] Locate the power switch on the multimeter and switch it on. Then, turn the dial on the front of the multimeter to the AC setting. The dial may be clearly marked to indicate what the AC setting is, or you might need to check the manual if it uses symbols.[3]
- Check your multimeter’s manual if you are unsure of how to turn it on.
Advertisement -
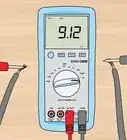
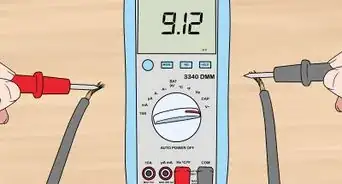
3Insert 1 prong into the left side and 1 into the right side of the outlet. The multimeter should have 2 prongs, one red and one black. Insert 1 of them into the left side of the outlet and the other into the right side of the outlet.[4]
- Even though the prongs are different colors, it doesn’t matter which one you put into each side of the outlet. The colors only matter for testing circuits and other types of electrical currents.[5]
Warning: Hold the prongs by the insulated parts only. Do not touch the metal parts or you may electrocute yourself![6]
-
4Check the reading on the multimeter to determine the outlet’s voltage. Once the prongs are in place, look at the front of the multimeter. If it’s a digital multimeter, the number will be displayed clearly on the screen. If it’s an analog multimeter, look at where the needle is pointing to get the reading.[7]
- A typical reading for a household outlet in the United States is 120 volts. However, if it’s lower or higher, the outlet may be malfunctioning.
- Pull the prongs out of the outlet and switch off the multimeter after you’re done checking the outlet.


Ensuring that the Casing is Grounded
-
1Switch on the multimeter and turn the dial to the AC setting. AC stands for alternating current and this setting measures the volts that an outlet is putting out. Find the power switch on your multimeter and switch it on. Then, locate the dial on the front of the multimeter and turn it to the AC setting. The dial may be marked to indicate the AC setting, such as with an A followed by a squiggly line.[8]
- Look at your multimeter’s instruction manual if you are not sure how to turn it on or select the AC setting.
-
2Press the black prong against a screw or other metal part of the fixture. To ensure that no electricity is reaching the outside of your outlet, hold the black prong by the insulated part. Then, press the metal tip of the prong against a screw or another piece of metal on the outlet fixture.[9]
- Do not touch the metal prong at any point while you’re doing this!
-
3Insert the red prong into the bottom hole of the outlet. Next, hold the red prong by the insulated part and insert the metal prong into the bottom hole of the outlet. This hole is round with 1 flat edge. If the hole is grounded as it should be, no electricity should come out of it.[10]
Tip: If you want, you can also check the left side of the socket while pressing the black prong against a screw. No electricity should come out of the left slot of your socket either. Only the right side of the socket should have an electrical current.
-
4Look for a reading of 0.001 on the multimeter screen. Once the red prong and the black prong are in place, look at the screen or analog dial on your multimeter. The reading should be 0 or 0.001 volts. This indicates that no electricity is reaching the outside of the outlet and it is well grounded. If the number is higher than this, the casing is a potential electrocution hazard. Call an electrician for assistance.[11]
- Remove the prongs from the outlet and switch off the multimeter when you’re done.


Expert Q&A
Did you know you can get expert answers for this article?
Unlock expert answers by supporting wikiHow
-
QuestionWhy are polyethylene outdoor Ethernet cables more resistant to damage from extreme temperatures than regular Ethernet cables?
 Ricardo MitchellRicardo Mitchell is the CEO of CN Coterie, a fully licensed and insured Lead EPA (Environmental Protection Agency) Certified construction company located in Manhattan, New York. CN Coterie specializes in full home renovation, electrical, plumbing, carpentry, cabinetry, furniture restoration, OATH/ECB (Office of Administrative Trials and Hearings/Environmental Control Board) violations removal, and DOB (Department of Buildings) violations removal. Ricardo has over 10 years of electrical and construction experience and his partners have over 30 years of relevant experience.
Electrician & Construction Professional, CN CoterieWell, the polyethylene cables are designed to be used outside, so they're better at withstanding extreme weather and temperatures. The polyethylene is just a tougher material than the stuff they normally use to make Ethernet cables.
Support wikiHow by unlocking this expert answer.
Warnings
- Hold the prongs on the multimeter by the insulated parts only. Do not touch the metal parts or you may electrocute yourself!⧼thumbs_response⧽
- Although multimeters are easy to use, it’s important to exercise caution when using your multimeter. Using it improperly may lead to injury or damage the multimeter.[14]⧼thumbs_response⧽


References
- ↑ https://www.bobvila.com/articles/how-to-use-a-multimeter/
- ↑ https://sciencing.com/read-multimeter-settings-8563799.html
- ↑ https://www.youtube.com/watch?v=cXlVVgsp64c&feature=youtu.be&t=30
- ↑ https://www.youtube.com/watch?v=cXlVVgsp64c&feature=youtu.be&t=65
- ↑ https://www.bobvila.com/articles/how-to-use-a-multimeter/
- ↑ https://www.bobvila.com/articles/how-to-use-a-multimeter/
- ↑ https://www.youtube.com/watch?v=cXlVVgsp64c&feature=youtu.be&t=72
- ↑ https://www.youtube.com/watch?v=cXlVVgsp64c&feature=youtu.be&t=30
- ↑ https://www.youtube.com/watch?v=cXlVVgsp64c&feature=youtu.be&t=105
- ↑ https://www.youtube.com/watch?v=cXlVVgsp64c&feature=youtu.be&t=111
- ↑ https://www.youtube.com/watch?v=cXlVVgsp64c&feature=youtu.be&t=115
- ↑ Ricardo Mitchell. Electrician & Construction Professional, CN Coterie. Expert Interview. 6 May 2020.
- ↑ https://www.familyhandyman.com/electrical/how-to-use-a-multimeter/
- ↑ https://www.familyhandyman.com/electrical/how-to-use-a-multimeter/
About This Article