wikiHow is a “wiki,” similar to Wikipedia, which means that many of our articles are co-written by multiple authors. To create this article, volunteer authors worked to edit and improve it over time.
This article has been viewed 75,619 times.
Learn more...
Many people know about the Rubik's Cube, a.k.a. the 3x3x3. Some even know about the 2x2x2, the 4x4x4, etc. Few know about the cuboids—i.e. the 2x2x1, 3x2x1, 3x2x2, etc. This tutorial covers how to solve the 3x3x2 using CrazyBadCuber's approach,[1] and it assumes you know the position of the colors on your 3x3x2. It also assumes your 3x3x2 has 9 yellow stickers and 9 white stickers (and 6 stickers of each other color). If your color scheme is different, simply follow along, but replacing, for example, white with red and yellow with orange.
Steps
Understanding the Notation
-
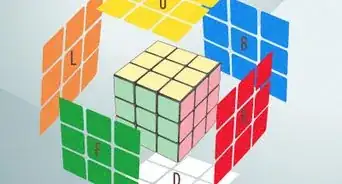
1Become familiar with the notation used here. Each letter refers to a 90-degree clockwise movement of a face. Holding the cube directly in front of you, these rules apply:
- If the letter is F, turn the layer facing you clockwise.
- If the letter is B, turn the layer opposite the layer facing you clockwise.
- If the letter is U, turn the layer furthest from the floor and parallel to the floor clockwise.
- If the letter is D, turn the layer closest to the floor and parallel to the floor clockwise.
- If the letter is L, turn the layer on your left clockwise.
- If the letter is R, turn the layer on your right clockwise.
-
2Know that a tick mark represents a counterclockwise movement. For example, F' (read F prime) represents a 90-degree counterclockwise movement of the layer facing you.Advertisement
-
3Know that a 2 represents a 180-degree movement. For example, U2 represents a 180-degree movement of the layer furthest from the floor.
-
4Know that a number before an algorithm in parentheses means repeat the algorithm that many times. E.g., 2(R2 U2 F2) is executed the same as R2 U2 F2 R2 U2 F2.


Building the Bottom Layer
-
1Make the cross. For people who know how to do this on a 3x3x3, skip this step (although keep in mind that you cannot do any 90 degree turns except on the U and D layers). For everyone else, put the layer containing a white sticker at the bottom. Follow these steps:
- 1. Find an edge piece (i.e. pieces neither on the corner nor in the center) on the bottom that contains white.
- 2. Adjust the top layer so that, directly above the edge piece containing white is a yellow piece
- 3. Make sure both pieces face toward you and the white center is still facing towards the ground.
- 4. Perform this move: F2
- 5. Repeat 1-4 until all white pieces are on the top
- 6. Insert each piece of your color scheme. Find where each color should go based on the colors around it, then adjust the U layer until both the spot where the color should be and the white piece with that color are facing you, then perform an F2.
-
2Insert the corners. This is relatively simple. One algorithm is used to swap a bottom corner and the corner above it, both on the front-right side: R2 U R2 U' R2.
- Keeping the white layer on the bottom, simply find where the white corner on the U layer should go, insert the corner and where it should go into the front-right side, and perform the algorithm.
- If no white corners are on the top but some corners on the bottom layer are still incorrect, simply use this algorithm on a white corner that is incorrect to remove it, and then you can insert it into the place it should go, removing another that you put back in its place, etc.


Building the Top Layer
-
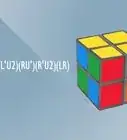
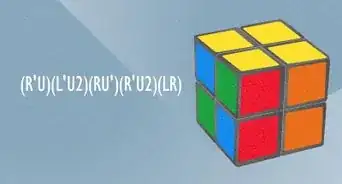
1Solve the corners. Keeping the yellow layer on the top, try to find headlights (i.e. same color, same side corners), as denoted in the image. When you found the headlights, make sure they are placed in the L layer, then perform this algorithm: (R2 U) (R2 U') (R2 U' D) (R2 U') (R2 U) (R2 D').
- If there are no headlights to be found, simply perform this algorithm and headlights will appear.
-
2Solve the edges. At this point, use these two algorithms until you have solved the cube.
- 1. Switching the UF (front-facing upper) and UB (back-facing upper) edge, i.e. Opposite: 3(R2 U2). Use this first; if any edge is the opposite of where it should be, use this. When there aren't any edges belonging in their opposite locations left ...
- 2. Switching the UF and UR (right-facing upper) edge, i.e. Adjacent: 2(R2 U) 2(R2 U2) (R2 U) (R2 U') R2. Finding these should be relatively simple. Find any two adjacent sides which are perfect except for inverted top edges, and perform this algorithm. If the previous algorithm was used as described beforehand, this should only need to be done at most twice.
-
3Celebrate! Now you can practice it to get good, show off to friends, solve it while you're waiting in line ... the possibilities are endless!


-Step-9.webp)