This article was co-authored by wikiHow staff writer, Jessica Gibson. Jessica Gibson is a Writer and Editor who's been with wikiHow since 2014. After completing a year of art studies at the Emily Carr University in Vancouver, she graduated from Columbia College with a BA in History. Jessica also completed an MA in History from The University of Oregon in 2013.
There are 11 references cited in this article, which can be found at the bottom of the page.
The wikiHow Video Team also followed the article's instructions and verified that they work.
This article has been viewed 22,460 times.
Learn more...
The V-neckline is a classic for a reason. Blouses, dresses, and T-shirts all look great with this simple neckline which flatters any figure. If you're sewing a garment that needs a little extra reinforcing, sew facing along the neckline. This keeps the V-neck from sagging or stretching. For a quick neckline that has an overlapping V-shaped collar, create a band of fabric that you sew into the neckline.
Steps
Sewing a V-Neck with Facing
-
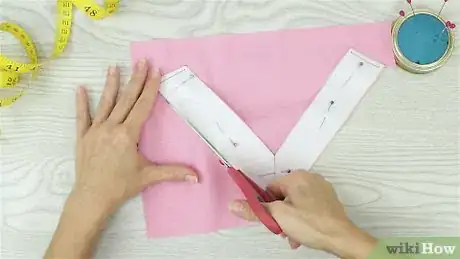
1Cut facing using your garment's pattern. Cut out the shirt or dress pattern piece for the facing and lay it on your facing material. Pin it in place and cut out the facing. The facing prevents the V-neckline from sagging and it gives the edges of the neckline support.[1]
- If your facing pattern is in 2 pieces, sew them together to make a single facing piece.
- Keep in mind that you'll also need to have your garment pieces assembled at the shoulders. This makes it easier to sew the facing to the neckline.
-
2Make stay stitches around the garment's neckline to stabilize the fabric. Set your sewing machine to make very short, straight stitches. Turn your garment inside out and sew around the front and back of the neckline. Leave a 1⁄2 inch (1.3 cm) seam allowance as you sew.[2]
- The stay stitches are optional, but they support the neckline so it doesn't stretch as you sew.
- Although you can sew the stay stitches by hand, sew the rest of the neckline with your machine so the stitches are sturdy.
Tip: To make it easier to sew around the sharp point of the V, stop sewing when you reach the bottom point. Raise your presser foot and turn the fabric 45-degrees. Then, lower your presser foot and keep sewing around the neckline.
Advertisement -
3Lay the facing on the garment so the right sides touch and pin them in place. Flip your garment so the pattern faces out and lay it flat. Place the facing on the garment so the wrong side faces up. Check the raw edges and adjust them so they line up with the raw edges of the garment. Then, insert sewing pins to prevent the fabric from sliding around.[3]
- Match the shoulder seams as you pin along the back of the neckline.
-
4Sew the facing to the neckline using short, straight stitches. There's no need to adjust your stitch length from the small ones you already set. Just start sewing from the bottom point of the V around the entire neckline. Leave a 1⁄2 inch (1.3 cm) or 5⁄8 inch (1.6 cm) seam allowance, depending on what your pattern specifies.[4]
-
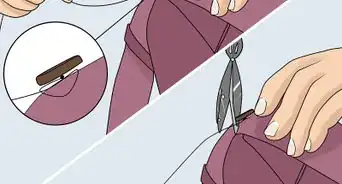
5Trim triangular notches along the seam allowance to help the neckline lay flat. The facing can make your V-neck bulky or bunched up unless you trim it. Take a sharp pair of scissors and carefully cut a triangular notch about every 1 inch (2.5 cm) along the seam line. Then, trim as much excess fabric as you can from the point of the V.[5]
- It's really important that you don't cut into the stitches or your neckline will fray.
-
6Understitch around the neckline to keep the facing in place. Unfold the garment and facing material so the pattern side faces up. Arrange the seam allowance so it lays under the facing side and slowly sew straight stitches along the edge of the facing.[6]
- Try to sew close to the seam line, which helps the V-neck lay smooth.
-
7Fold the facing under and sew a topstitch along the edge of the neckline. Once you've finished understitching, tuck the facing under the garment. Take the garment to your sewing machine and make small, straight stitches along the top edge of the neckline. Since these stitches are visible, this line is called a topstitch. When you reach the end, make a few backstitches and cut the thread.[7]
- To make your V-neckline lay smooth, you can iron it flat. Check the care instructions for your fabric so you know which setting to use on your iron.
Making an Overlapping V-Neck
-
1Sew the shoulder seams of your garment piece together. Stack the front and back pieces of your garment so the pattern-sides touch. Line up the edges and then sew across the shoulder seams so you have 1 garment piece.[8]
- Follow your pattern's seam allowance recommendation for the shoulders.
-
2Stay stitch the bottom of the V and snip the bottom point. Take the garment to the sewing machine and keep the fabric wrong-side out. Sew very short, straight stitches 1 inch (2.5 cm) from the bottom point of the V along the seam allowance line. Sew up 1 inch (2.5 cm) from the point. Then, use scissors to snip into the point of the V.[9]
- Sewing stay stitches in a V supports the neckline and prevents it from stretching or sagging.
- Cutting a slit into the point of the V makes it easier to pull and sew the V-neckline.
Tip: Ensure that you don't cut through the stitches you just made. If you accidentally do, the seam could unravel.
-
3Cut a strip of fabric for the neckband and fold it in half lengthwise. Follow your pattern measurements for the neckband or measure the neckline on your garment and subtract 1⁄2 inch (1.3 cm) to find the measurement. Then, cut a strip of fabric that's as long as your measurement and fold it in half lengthwise so the pattern faces out.[10]
- You can make your neckband as wide or narrow as you like.
- To make it easier to sew, iron the neckband flat.
-
4Wrap the neckband piece to overlap the ends and pin it in place. Press 1 end of the folded neckband down and hold the opposite end with your other hand. Wrap it around to make a loop so the raw edges face out. Then, overlap the ends so the edges line up and push a sewing pin through the fabric.[11]
-
5Sew straight stitches in a V-shape along the folded edge of the neckband. Make short stay stitches about 1⁄2 inch (1.3 cm) from the raw edge of the neckband. Just stitch a V-shape that's about 1 inch (2.5 cm) long on each side.[12]
- The stay stitches keep the neckband in place so it's easier to position it around your garment's neckline.
-
6Pin the right side of the collar to the right side of the garment neckline. Lay your garment flat so the pattern faces up and push a sewing pin through the bottom point of the neckband's stay stitches. Push the pin through the bottom point of the garment's V so you can swivel the neckband around. Line up the raw edges of the neckband with the raw edge of the garment and insert a pin about every 1 to 2 inches (2.5 to 5.1 cm).[13]
- You'll probably need to stretch the neckband slightly as you pin it to the garment.
-
7Straight stitch around the neckband. Start sewing at the bottom point of the V and use a straight to sew up and around the neckband. Leave a 1⁄4 inch (0.64 cm) seam allowance as you sew. Continue to sew until you reach the bottom of the V where you started and fold your new V-neck back so it's flat. Make a few backstitches when you reach the end and cut the thread.[14]
- If you're sewing stretchy fabric, use a zigzag stitch instead of a straight stitch. This lets the neckline stretch and pull back into place.
Warnings
- Avoid sewing over your sewing pins because this can damage the needle of your machine.⧼thumbs_response⧽
Things You'll Need
Sewing a V-Neck with Facing
- Pattern
- Garment pieces
- Facing material
- Scissors
- Sewing pins
- Sewing machine
Making an Overlapping V-Neck
- Garment
- Fabric
- Sewing pins
- Scissors
- Sewing machine
References
- ↑ https://sewguide.com/how-to-sew-facings/
- ↑ https://youtu.be/c6hFslLTWl0?t=167
- ↑ https://youtu.be/4R54KCmQMps?t=145
- ↑ https://sewguide.com/how-to-sew-a-vneck/
- ↑ https://youtu.be/4R54KCmQMps?t=220
- ↑ https://sewguide.com/how-to-sew-a-vneck/
- ↑ https://youtu.be/4R54KCmQMps?t=345
- ↑ https://youtu.be/bFf_R_V8h-M?t=65
- ↑ https://sewguide.com/how-to-sew-a-vneck/
-Step-24-Version-5.webp)

