This article was co-authored by wikiHow Staff. Our trained team of editors and researchers validate articles for accuracy and comprehensiveness. wikiHow's Content Management Team carefully monitors the work from our editorial staff to ensure that each article is backed by trusted research and meets our high quality standards.
This article has been viewed 87,411 times.
Learn more...
Raising your bed is a great way to add some extra space to your dorm room. If you have a bed with a slotted frame, you can simply take out the bed frame and move it up to the slot that you want. If you want to loft your bed and add a lot of extra space underneath, you’ll need to borrow a lofting kit from your dorm and attach it to the bottom of your bed. You and your roommate can also bunk your beds to give your room more floor space. Finally, if you can’t raise, loft, or bunk your bed, you can use bed risers to add a little height to your frame. No matter what method you use, make sure you have a friend to help you, because bed frames are heavy.
Steps
Raising Your Bed with a Slotted Frame
-
1Take your mattress off your bed. Raising your bed frame will be much easier with the mattress off, because the frame will be lighter. Take your mattress off, with the help of your roommate if you want, and lean it against the wall out of the way.[1]
- If your dorm room is really tiny, it might be helpful to put your mattress out in the hall temporarily while you work on raising your bed frame.
-
2Unhook the frame by tapping underneath the corners with a rubber mallet. Tap upwards at the corner of the bed frame where the horizontal part of the frame slots into the bed legs. Do one corner at a time. Have a friend hold up the bed frame as you loosen it so that it doesn’t fall down.[2]
- You can usually borrow a rubber mallet from your housing office.
Advertisement -
3Move the frame up to the position you want and slot all four corners in. You will definitely need a friend to help you with moving the bed frame to the right position. Make sure that all four corners of the frame are fully slotted into the right position on your bed. You should hear a clicking noise as the hooks on the corners of the bed frame slot into the legs of the bed.[3]
- If you can’t get the corners of the bed frame completely slotted in with just your hands, hammer them down with the rubber mallet.
-
4Replace your mattress. Put your mattress back up onto your bed frame and put on your sheets and blankets. Once your bed is raised, you can store more things underneath it, like a chest of drawers or a laundry hamper.
- If it turns out you don’t like the new height of your bed, you can always adjust it again.


Lofting Your Bed with a Lofting Kit
-
1Get a lofting kit from the housing office. This kit should include 2 extra bed legs and 4 pegs. Sometimes lofting kits also come with a safety rail and a ladder to help you get into your bed once it’s lofted.
- Most schools don’t make you pay extra for this lofting kit, but you should ask to make sure.
-
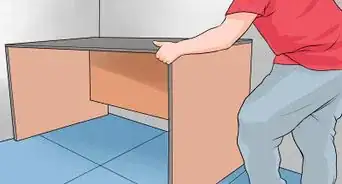
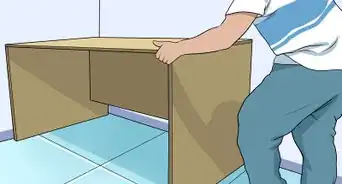
2Take the mattress off your bed and turn the frame on its side. Take the mattress off your bed frame and put it someplace out of the way. With the help of a friend, tip the bed frame onto its side. Make sure you have plenty of room to work on the bed frame.
- You may want to move the bed frame from its original position and out into the center of your dorm room to be able to work on it more easily.
-
3Attach the extra legs to the original legs using pegs at each corner. Put the pegs in the holes in the bottom of the legs on your bed frame, and slide the new legs onto the pegs. The holes on the top of the new legs should fit perfectly onto the pegs.[4]
- It’s helpful to have a friend at one side of the bed while you work on the other so you can slot the legs in at the same time.
-
4Turn your frame right-side-up again and replace your mattress. Carefully turn your bed onto its feet again and put it where you want it in your room. Put your mattress back on top of your bed and make your bed.
- You can add a ladder to the side of your lofted bed or just climb up using the slats on the side.
-
5Slot a safety rail into the frame if you have one. To keep yourself from falling out of your lofted bed, attach a safety rail on the side of the bed that won’t be protected by the wall. Usually, the safety rail just slots into the bed frame.
- If you want a safety rail and don’t have one, you should ask your housing desk for it.
-
6Put a desk or other furniture underneath your lofted bed. Lofting your bed opens up a lot of space underneath. You can put a desk, a chest of drawers, or even a couch underneath your bed.
- To have even more space in your room, help your roommate loft their bed, too.


Bunking Two Beds
-
1Get pegs for bunking your bed from the housing office. You can’t just stack one bed on top of another and hope for the best––not only is it risky, but most schools don’t allow it. You need pegs to secure the top bed to the bottom bed, so that there’s no chance of the beds becoming separated. Get pegs from the housing office of your dorm.[5]
- If you’re not sure where the housing office is for your dorm, ask a residential assistant or someone else on your hall who has already bunked or lofted their bed.
-
2Take the mattresses off the top bed. Lifting up a bed frame is challenging enough without the added weight of the mattress. Decide which bed will be the top bed, and take the mattress off of that one. You can leave the mattress on the bottom bunk, because you won’t have to move that frame.
- A convenient place to put the top mattress is on top of the bottom one.
-
3Put pegs in the holes on top of the bottom bunk. At each corner of the bottom bed, the leg of the bed should have a hole in it, where you can slot in the metal peg. Put one in each corner, so that you use all 4 pegs.
- Always use all 4 pegs, because if you use less, your bed will be unstable.
-
4Lift the top bed with a friend and slide the frame onto the pegs. Lift the top bunk above the bottom bunk. Be sure to lift with your legs, not your back, to avoid injuring yourself. Line up the top bunk exactly over the bottom bunk, and slide the frame down onto the pegs.
- You have to lower all four legs down at the same time to get them all onto the pegs.
-
5Attach a safety rail to the top bunk if you want. To help keep whoever is in the top bunk from falling out, attach a safety rail to the edge of the top bunk that’s not against the wall. Usually, safety rails have little hooks on the bottom that you can slot over the metal edge of your bed frame.
- If you don’t have one in your room already, borrow it from the housing office.
-
6Replace the top mattress. Put the mattresses back onto the upper bunk, so that each bunk has a mattress. Enjoy all the extra space in your dorm room that bunking your beds opened up. You and your roommate can decide who wants which bed.
- You can climb up to the top bunk using the side slats on your bed, or ask for a ladder from the housing office.


Raising Your Bed with Risers
-
1Get risers if your dorm bed isn’t made to be lofted. While most dorm beds are easy to loft, some beds aren’t. Luckily, you can raise dorm beds the same way you raise a normal bed, with risers.
- Risers help if you only want to raise your bed a little bit, but you won’t be able to loft your bed.
-
2Buy risers in the height you want. Risers usually come in 3 or 5 inches (7.6 or 12.7 cm). If you want to raise your bed higher, get stackable bed risers, so that you can stack the 3 and 5 inches (7.6 and 12.7 cm) for 8 inches (20 cm).[6]
- When deciding what height you want to raise your bed to, balance the benefit of extra storage space with the extra difficulty of climbing onto a high bed.
- You can buy bed risers at a home supply store or online.
-
3Lift up one corner of the bed at a time while your friend slides a riser underneath. Continue until all four risers are underneath the bed. Make sure that all four risers are the same height, so that your bed is level.
- If your bed is too heavy to lift, take off your mattress and put it someplace out of the way. Replace it once you're done.
-
4Store more things under your bed once it’s raised. Having some extra room under your bed is very helpful in the tight space of a dorm room. Make full use of the extra space by storing dresser drawers, suitcases, a laundry basket, shoes, or whatever else you want.
- Stacking items underneath your bed or keeping them organized in bins will help you save space.


Things You’ll Need
Lofting
- Rubber mallet
- Someone to help you
Bunking
- Pegs
- Rubber mallet
- Safety guard rail (optional)
- Someone to help you
Using Bed Risers
- 4 bed risers
- Someone to help you


References
About This Article