This article was co-authored by Aaron Asghari and by wikiHow staff writer, Amy Bobinger. Aaron Asghari is a Professional Guitarist and the lead guitarist of The Ghost Next Door. He received his degree in Guitar Performance from the Guitar Institute of Technology program in Los Angeles. In addition to writing and performing with The Ghost Next Door, he is the founder and primary guitar instructor of Asghari Guitar Lessons.
wikiHow marks an article as reader-approved once it receives enough positive feedback. This article received 19 testimonials and 80% of readers who voted found it helpful, earning it our reader-approved status.
This article has been viewed 597,874 times.
Playing guitar is a fun way to express your musical side, but a guitar can start to get heavy after you’ve been holding it for a long time. Putting a strap on your guitar can give your arms a rest, and it can help keep you from dropping the instrument, causing expensive damage. Most electric guitars, as well as some acoustics, will already have strap buttons attached at the bottom and top of the body. If you don’t have any strap buttons, you can install them yourself, but be careful not to crack the neck of your guitar.
Steps
Attaching a Strap to Buttons
-
1Look for a strap that fits you comfortably. Your guitar strap should be long enough to allow you to play comfortably while you're standing up. Consider looking for a padded strap so the material doesn't dig into your neck or your shoulder while you’re playing. The padding might be made from foam, fur, or another soft material.
- Some straps are cotton, some are made from a material similar to seatbelts, and top-of-the-line versions are made from durable leather. Pick one that feels right to you.
- Guitar straps come in a wide variety of designs, so try to find one that fits your personal style.
-
2Locate the strap buttons on either side of the guitar's body. The strap buttons will look like small metal studs. The first of these is at the base of the guitar's body - in other words, if you stand the guitar up vertically, it will be at the "bottom" of the guitar. This knob typically sticks out about 1/2 inch (1.25 cm) depending on what type of guitar you have.[1]
- On some guitars, the top button will be on the neck of the guitar, while on other guitars the button will be on the body itself, near where the neck and body meet.
- If your guitar doesn't have any buttons, you will need to install them in order to use a strap. If the guitar has one button on the body, you can either install a button on the neck or tie the strap onto the neck with string.
Advertisement -
3Slip one of the buttonholes over the button on the bottom of the guitar. Since you could drop your guitar and crack it if your strap isn't secure, the buttonholes are usually made to fit snugly over the button. This can make it difficult to push the strap onto the button, but it should go on with a little effort.[2]
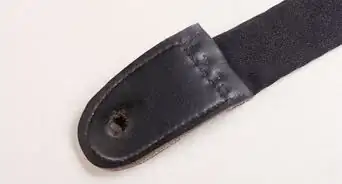
- Guitar straps typically have leather (or fake leather) ends in the shape of rounded triangles. On each end should be a small hole with a slit cut in the side of it. These holes will support the weight of your guitar while you play.
- To ensure comfort during playing, ensure that you slip the strap hole over the knob so that the fitting buckle faces outwards - otherwise, it may dig into your shoulder.
-
4Push the other hole on the strap over the second strap button. Once you’ve secured the first end of the strap, find the knob near the neck of the guitar. Slip the second buttonhole over this knob. Put the other end of the strap on this knob.
-
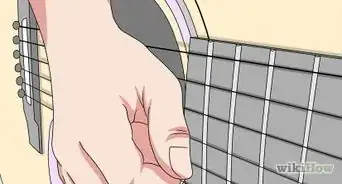
5Test the strap to make sure it’s secure. Tug firmly on the strap to make sure it’s connected securely, then slip the strap over your shoulder. Ensure your strap fits comfortably and doesn't inhibit your movement by playing a few simple chords or songs. Try playing in a variety of ways - standing up, sitting down, and even kneeling or laying down, for instance.[3]
- If you are right-handed, sling the strap over your left shoulder so that the guitar hangs in front of you, allowing you to strum with your right hand and fret with your left. If you are left-handed, do the reverse - sling the strap over your right shoulder.
- Do not use the strap if it easily slips off of the strap buttons. Instead, either get a new strap or install a strap lock.
-
6Adjust the strap's length as needed. When you play with a strap, you want your playing to come as easily and as naturally as it would without one. This means that your strap should allow the guitar to hang at such a height that you can strum and fret as you normally would. Use the strap's adjustable buckle to change the length of the strap as needed for your comfort and ease of playing.
- As above, be sure to orient the strap so that the buckle faces outward and doesn't dig into your shoulder while playing.
EXPERT TIPTo adjust your guitar strap, pull one of the strap through the buckle until it's the length you want.
Aaron Asghari is a Professional Guitarist and the lead guitarist of The Ghost Next Door. He received his degree in Guitar Performance from the Guitar Institute of Technology program in Los Angeles. In addition to writing and performing with The Ghost Next Door, he is the founder and primary guitar instructor of Asghari Guitar Lessons.
Aaron Asghari
Professional Guitar PlayerAaron Asghari
Professional Guitar Player


Installing Guitar Strap Buttons
-
1Use caution if you decide to install your own strap buttons. Installing a new knob can be a good way to get a secure fit on your strap, but it carries the risk of cracking the wood if you make a mistake. This can permanently damage the guitar. If you're inexperienced with modifying guitars, it might be a good idea to have an expert do this for you.
- If you have one strap button, you can tie the strap to the neck rather than installing another button. However, doing this can cause pressure on the neck joint and can damage the finish, so keep in mind that both methods carry risks when you're deciding which one is right for you.
-
2Purchase strap buttons and washers from a music shop. Some strap button kits will come with the washers included. However, in some cases, they will be sold separately. The washers are not expensive and they will keep the button from wearing away the finish on your guitar, so it's a good idea to buy them if they don't come with the buttons you buy.[4]
- Strap buttons come in different colors and designs, so look for a design that will look good with the finish and style of your guitar.
- Most of the time, strap buttons are sold in sets of 2. Depending on the style you choose, strap buttons are generally around $5-$15 USD.
- For added security, purchase locking strap buttons. These will have a metal piece that fits onto the strap so the strap can't fall off the button while you're playing.
-
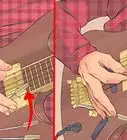
3Hold the guitar comfortably. Stand or sit the way you normally play, holding the guitar however is most comfortable for you. Even when you're wearing a strap, your hands will support most of the weight of the guitar. By holding the guitar normally, you'll be able to determine the location where the strap will sit most comfortably.[5]
- It's important that the strap helps you support the guitar comfortably; otherwise, wearing it could interfere with your playing.
-
4Have someone help you drape the strap around your neck. Since you need to be comfortable, this part will be easier if you have help. If the strap has a cushion, rest it on your shoulder, then drape the ends of the strap down so they reach the guitar at a natural angle. Drape the side of the strap that attaches to the neck in front of your left shoulder, and wrap the side that attaches to the guitar's body behind your right shoulder. (Reverse this if you play left-handed.)[6]
- The button on the body of the guitar should go in the center of the bottom panel, directly across the guitar from the head.
- Some guitars already have a strap button on the bottom of the guitar. If this is the case, attach the strap to this button, then wrap the strap behind your back and over your opposite shoulder, and find the angle location where the strap should attach to the neck of the guitar.
-
5Draw a mark on the guitar where you want the buttons to go. If you stand the guitar on its end, the first strap button should be located on the part of the guitar that's closest to the floor. The other should either be on the neck of the guitar or on the body close to the neck. To ensure the guitar can support the strap, make sure your marks are at least 1 1⁄4 in (3.2 cm) in from the edge of the guitar.[7]
- Try to keep the mark as small as possible, since you might not be able to remove it from the guitar if it's bigger than the button.
- You can crack the neck heel when installing a button there. If you don't want to take this chance, use string to tie the strap into place.
-
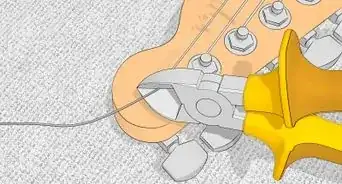
6Measure the fasteners and select a drill bit that's slightly smaller. The buttons you use will need to screw into the guitar. If the drill bit you use to make is exactly the same size, then the screw will strip out the wood and it won't hold the strap securely.[8]
- The size of strap buttons may vary by manufacturer, so it's a good idea to measure them even if you've done this before.
- For example, if the diameter of your button, including the threads, is 9⁄64 in (0.36 cm), but the diameter of the shaft without the threads is 7⁄64 in (0.28 cm), use a 7⁄64 in (0.28 cm) drill bit.
-
7Mark the drill bit with a marker at the depth you want to drill. If you drill too far into the guitar, you could accidentally put a hole in the other side. On the other hand, if you don't drill in far enough, the screw could crack the wood. Hold the drill bit up to the guitar to determine the depth you can drill, then mark that spot on the bit.[9]
- A red marker will be easy to see while you're drilling, but if you watch carefully, you can use whatever color you have on hand.
- The depth will vary depending on your guitar and the location of the hole, but you probably won't need to drill more than 1⁄2–1 in (1.3–2.5 cm).
-
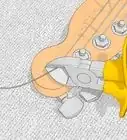
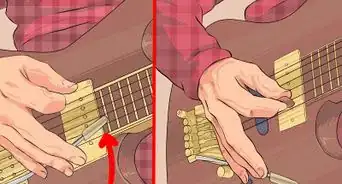
8Drill the hole, then countersink it with a Philips-head screwdriver. Using a cordless drill, drill the bit into the guitar just to the depth you marked earlier. This hole is called a pilot hole. Next, slip a Philips-head screwdriver into the hole and rotate it to about the same depth, which will help create the threads your screw will need as it goes into the guitar.[10]
- Countersinking should help prevent the wood from splitting or the finish from chipping.
-
9Lay down the washer and install the strap button. Place a felt washer over the hole, then place the button against the hole. Screw the button into place, but do not force it. If the button seems like it’s going in at an angle or it’s stuck, stop what you’re doing and unscrew the button. Otherwise, you could crack or split the wood.[11]
- Most strap buttons will come with a small felt washer. If yours didn’t come with one, you can buy one from a craft store or skip it entirely.
- The washer will keep the strap button from rubbing against the finish on the guitar, which could dull or damage it.
-
10Repeat the process for the other strap button. If you're installing 2 buttons, find the location of your second mark, then drill and countersink the hole, lay down the washer, and install the second button. If you're only installing 1 button, then you're finished!


Using Strap Locks
-
1Attach the metal bit to the strap if you're installing a strap lock. A strap lock functions the same way as a button, but it offers additional stability. A strap lock comes with 2 pieces—one that attaches to the guitar, and one that attaches to the strap. Install the button on the guitar the same way you would for a basic strap button, then follow the manufacturer's instructions for installing the lock on the strap.[12]
- When you attach the strap, the lock will snap into place. To remove it, just press the quick-release button, usually on the side of the lock.
- This is a good option if you have an expensive guitar or you tend to move around a lot while you're playing.
-
2Install basic plastic locks by putting them over the knob and twisting. Strap locks will keep your strap from slipping off of the buttons while you’re playing. Normal, inexpensive plastic strap locks usually take the form of small discs with holes in the middle and a set of ridges on a rotating upper portion. Install them by pushing the guitar knob through the central hole and using the ridges to twist the lock into place.
- After doing this for each knob, the strap should remain in place no matter how you twist or pull it while playing.
- You do not need to install special buttons for these locks. They can be used over your existing strap buttons.
-
3Use 5⁄16 in (0.79 cm) rubber washers if you don't have regular locks. Though strap locks are generally fairly cheap, there are free alternatives. For instance, one easy trick is to place a tight-fitting rubber washer over the top of each knob after placing the strap on the guitar. The rubber washer will hold the strap in place while playing, making it more difficult (but not impossible) for the strap to fall off of the guitar.
- You can find rubber washers at your local hardware store.


Community Q&A
-
QuestionThe knob on the bottom of my guitar is where I plug it into the amp. My strap won't fit, as it's too short! Any suggestions?
 Community AnswerI think that's just the amp plug and not the strap holder. There's not usually one knob for both of these functions. It sounds like your guitar doesn't have a knob to hold the strap. Take it to a guitar/music shop and see if they can install one for you.
 -
QuestionHow long will it last if I tie my guitar strap to my acoustic using yarn?
 Community AnswerIt will probably last about a few weeks to 2 months, depending on how tight you tie it and the type of yarn.
 -
QuestionMy guitar doesn't have any knobs at all to put my strap on. How do I tie it on?Community AnswerYou might have to buy some. They are called guitar strap pins and are available at music stores.
Things You'll Need
- Strap
Installing Strap Buttons
- Marker
- Strap Buttons
- Washer
- Drill Bit
- Cordless Drill
- Philips-head Screwdriver


References
- ↑ https://themusicianpicks.com/attach-a-strap-to-an-acoustic-guitar/
- ↑ https://themusicianpicks.com/attach-a-strap-to-an-acoustic-guitar/
- ↑ https://themusicianpicks.com/attach-a-strap-to-an-acoustic-guitar/
- ↑ https://www.premierguitar.com/articles/20399-guitar-shop-101-how-to-install-standard-and-locking-strap-buttons
- ↑ https://www.premierguitar.com/articles/20399-guitar-shop-101-how-to-install-standard-and-locking-strap-buttons
- ↑ https://www.premierguitar.com/articles/20399-guitar-shop-101-how-to-install-standard-and-locking-strap-buttons
- ↑ https://www.premierguitar.com/articles/20399-guitar-shop-101-how-to-install-standard-and-locking-strap-buttons
- ↑ https://www.premierguitar.com/articles/20399-guitar-shop-101-how-to-install-standard-and-locking-strap-buttons
- ↑ https://www.premierguitar.com/articles/20399-guitar-shop-101-how-to-install-standard-and-locking-strap-buttons?page=2
- ↑ https://www.premierguitar.com/articles/20399-guitar-shop-101-how-to-install-standard-and-locking-strap-buttons?page=2
- ↑ https://www.premierguitar.com/articles/20399-guitar-shop-101-how-to-install-standard-and-locking-strap-buttons?page=2
- ↑ https://themusicianpicks.com/attach-a-strap-to-an-acoustic-guitar/
About This Article
To put a strap on an electric guitar, find the holes on either end of the strap. Connect the strap to the knob at the base of the guitar’s body, or the bottom of the guitar if it’s standing straight up. Slip the hole on the other side of the strap over the second knob, where the neck of the guitar meets the body. To attach a strap to an acoustic guitar, use a piece of string or an old shoelace to tie one end of the strap to the headstock, and attach the other end of the strap to the knob at the base of the guitar. Finally, adjust the length as needed! For tips on installing strap buttons, scroll down!