This article was co-authored by Art Fricke. Art Fricke is a home renovation and repair specialist and the owner of Art Tile & Renovation based in Austin, Texas. With over 10 years of experience, he specializes in bathroom and kitchen renovations. Art focuses on a single contractor approach to customized renovation work, and performs projects such as installing custom tile showers, fixing tiled shower leaks, replacing cracked tiles, and installing floor and wall tile.
This article has been viewed 219,791 times.
A concrete floor is a good base for laying ceramic tiles, provided it is level and free of cracks or abrasions. Self-leveling compound can be purchased at your local home improvement store and applied to the concrete floor prior to tiling. Cleaning and filling any cracks in the floor takes a little time, and the only precautions to take prior to tiling are to make sure that the floor is completely dry, as the thinset used for tile needs a moisture-free environment.[1] The following steps will allow you to prepare a concrete floor before you lay your tiles.
Steps
Clean the Floor
-
1Sweep the floor for dust and debris. Use a broom to sweep any debris from the floor.[2]
-
2


Level the Floor
-
1Use a level to check the floor. Use a large carpenter's level to identify low areas of the floor. Move the level across the floor and use a marker to mark low levels of the concrete.
-
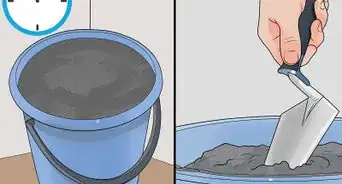
2Apply self-leveling compound.[8] Mix the self-leveling compound in a bucket according to package directions. Pour the compound into a bucket. Slowly pour the compound into the areas that you previously marked as low. The compound will expand and rise to reach the correct levels of the rest of the concrete. Use a trowel to spread the compound until it is as flat and smooth as possible. Allow the compound to dry for 24 hours before starting on your tile.[9]


Things You'll Need
- Broom
- Mop
- Thinset mortar
- Bucket
- Trowel
- Masonry float
- Concrete latex primer
- Paint tray
- Paint roller
- Marker
- Self-leveling compound


References
- ↑ Art Fricke. Home Renovation & Repair Specialist. Expert Interview. 1 July 2020.
- ↑ https://www.builddirect.com/learning-center/flooring/how-to-prepare-concrete-for-a-tile-installation/
- ↑ Art Fricke. Home Renovation & Repair Specialist. Expert Interview. 1 July 2020.
- ↑ https://www.builddirect.com/learning-center/flooring/how-to-prepare-concrete-for-a-tile-installation/
- ↑ Art Fricke. Home Renovation & Repair Specialist. Expert Interview. 1 July 2020.
- ↑ https://www.familyhandyman.com/tiling/how-to-tile-prepare-concrete-for-tile/
- ↑ https://www.familyhandyman.com/tiling/how-to-tile-prepare-concrete-for-tile/
- ↑ Art Fricke. Home Renovation & Repair Specialist. Expert Interview. 1 July 2020.
- ↑ https://www.homedepot.com/c/ah/how-to-prepare-a-subfloor-for-tile-installation/9ba683603be9fa5395fab90dfe976f0
About This Article