This article was co-authored by Lauren Kurtz and by wikiHow staff writer, Amber Crain. Lauren Kurtz is a Naturalist and Horticultural Specialist. Lauren has worked for Aurora, Colorado managing the Water-Wise Garden at Aurora Municipal Center for the Water Conservation Department. She earned a BA in Environmental and Sustainability Studies from Western Michigan University in 2014.
There are 10 references cited in this article, which can be found at the bottom of the page.
This article has been viewed 58,044 times.
Daylilies are hardy perennial plants that produce a gorgeous rainbow of blooms. They are a great choice for novice gardeners because they are easy to maintain, resistant to pests and disease, highly adaptable, and drought tolerant. Choose a planting location with full sun and well-drained soil to ensure your daylilies thrive. Plant these vigorous growers at least 2 ft (61 cm) apart to give them plenty of room to spread out!
Steps
Choosing a Planting Location
-
1Purchase nursery-grown starter plants or obtain root divisions. Daylilies are difficult to start at home. Visit your local nursery and buy a few starter plants. If you know another gardener in the process of dividing daylilies, ask if they’d be willing to share some of their root divisions with you.[1]
- Root divisions are created when multi-stemmed plants are pulled apart to form single stems.
- Daylilies are vigorous growers and often used as ground cover. They will spread and form a dense mat after a few seasons.
-
2Choose a site that gets at least 6 hours of full sun daily. Daylilies prefer full sun, although they will tolerate partial shade. To get the most blooms, choose a location that receives a minimum of 6 hours of direct sunlight each day. However, daylilies can easily handle 8 to 12 hours of full sun daily.[2]
- Daylilies planted in the shade will bloom less frequently.
Advertisement -
3Select an area with soil that drains well. Daylilies are hardy and can withstand almost any kind of soil, but they thrive in well-drained soil. To test your soil's drainage, dig a hole that is 1 ft (30 cm) wide and 1 ft (30 cm) deep. Fill the hole with water. If the water drains in 10 minutes or less, you have well-draining soil. If it takes an hour or more, your soil drainage is poor.[3]
- To amend soil that drains poorly, add some organic matter like well-rotted manure, wood chips, pea gravel, or peat moss. Mix it into the existing soil thoroughly.
-
4Test the soil for a pH between 6 and 7. Daylilies like slightly acidic soil. Purchase a soil testing kit from your local nursery and perform a reading by following the included instructions. Anything under 7 is considered acidic. Anything above 7 is considered alkaline.[4]
- To reduce acidity in your soil, add garden limestone.
- To reduce alkalinity, amend the soil with sulfur, gypsum, or sphagnum peat moss.[5]


Planting Root Divisions
-
1Plant daylilies in early spring or early fall. The best time to transplant or divide daylilies is early spring and early fall. If you transplant or divide in early spring, the lilies may not bloom until the following summer. If you transplant in early fall, do so right after summer blooming, at least 1 month before the first hard frost.[6]
- Daylilies are perennials, which means they go dormant during winter and then come back each spring.
-
2Till the soil and mix in compost or well-rotted manure. Use a till or shovel to turn the soil to a depth of about 18 in (46 cm). Remove any rocks and debris you find in the soil. Add a few shovels of compost to the soil and work it in using your till or shovel.[7]
- The organic matter in compost and manure encourages copious blooming and helps the soil retain moisture.
-
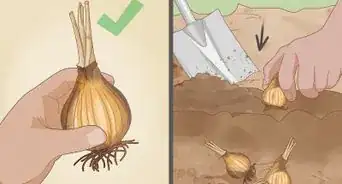
3Dig a 12 ft (370 cm) by 12 ft (370 cm) hole in the tilled soil. The hole needs to easily accommodate the roots of the division or transplant without bending or crowding them. A 12 ft (370 cm) by 12 ft (370 cm) will usually do the trick, but adjust as needed. Use a shovel to dig the hole and deposit the upturned soil on the ground right next to the hole.[8]
-
4Situate the roots in the hole. Hold the root division by the crown and place it in the hole. Fan the roots out in the hole. Make sure the crown is 0.5 in (1.3 cm) below the ground line. The crown is where the stem and roots meet. The soil level above the roots should be about even with the soil in the new location.[9]
- If the hole needs to be adjusted for the crown, pull out the division and amend the hole as needed.
- Each root division will have 2 to 3 stems.
-
5Add soil around the roots to refill the hole. Continue to hold the division by the crown as you add soil to the hole. Do not tamp down the dirt around the roots. You want the soil to be loose and not compacted at all. Gently push the soil down around the roots with your free hand so that the crown stands up straight.[10]
- Packing down the soil may reduce soil drainage around the plant.
-
6Plant the root divisions 2 ft (61 cm) to 3 ft (91 cm) apart. Daylilies are vigorous growers and they don’t like competition, so give them plenty of space. Even when they’re spaced this far apart, daylilies will naturally fill in the empty space around themselves as they grow. Each plant will eventually expand up to 3 ft (91 cm) in diameter.[11]
- If you plan to divide your plants during the next season, planting them 2 ft (61 cm) apart is fine. If you don’t want to divide them, give them about 3 ft (91 cm) of space.
-
7Water each planted root division thoroughly. Root divisions will be thirsty after they’ve been planted. Give each plant a thorough watering. Water your new transplants gently so that the soil around them isn’t disturbed. You may want to use a watering can for this first watering.


Maintaining Daylilies
-
1Give daylilies 1 in (2.5 cm) of water each week. Daylilies are drought-resistant, but they bloom best when they have moist soil. Water them in the morning or evening once each week. If your daylilies are planted in sandy soil, you may want to water them twice a week to ensure their soil stays moist.[12]
- Over-watering can cause crown rot, so be careful.
- Avoid watering daylilies during the midday heat.
-
2Fertilize daylilies in the late spring. Fertilizing lightly each spring after the initial planting will boost their growth for summer blooming. Use an extended release fertilizer for best results. Other than that, you can use any kind of fertilizer you want as long as it’s relatively low in nitrogen.[13]
-
3Mulch your daylily plants in the summer. Daylilies don't require winter mulch, but they will appreciate an organic mulch during the summer. They aren’t very particular about the type of mulch you use, so feel free to experiment. Take care not to cover the crown of the plant with mulch.[14]
- Straw, grass clippings, and leaves are all good choices for mulch.
- Summer mulching helps the soil retain water and lowers the soil temperature during the hot summer days. Mulch also helps crowd out weeds.[15]
-
4Watch out for spider mites during the summer. Daylilies are quite resistant to most pests, but spider mites can sometimes be a problem during the hot and dry summer months. If you see any spider mites on your plants, simply rinse them away with a forceful spray of water. Check the plants frequently and repeat the rinsing, if needed.
- If the mites are particularly tenacious, you can also use an insecticide.[16]


Dividing Daylilies
-
1Divide daylily plants every 3 to 5 years after initially planting them. Dividing the plants will rejuvenate them and improve blooming. Since daylilies grow so vigorously, they will likely need the additional space to stay healthy, as well. Divide daylilies after they have bloomed, but prior to the first frost.[17]
-
2Raise the whole daylily plant clump from the earth. Slice it into 6 to 8 sections (root divisions). Each root division should have several stems on the roots. Lop the foliage back 6 inches and remove any stems that look stunted or unhealthy.[18]
- Only choose your healthiest daylilies for division.
- Cutting back the foliage helps the roots establish themselves more easily when replanted.
-
3Replant the root divisions 24 in (61 cm) to 36 in (91 cm) apart. Dig a 12 ft (370 cm) by 12 ft (370 cm) hole for each division. Put 1 division in each hole and refill the hole with soil. Make sure the crown is 0.5 inches (1.3 cm) below the ground line. Water the new transplants thoroughly.
- Make sure that the crown isn't too deep. Replanting that way can cause the crown to rot.
- The daylilies will grow and fill in the new space around them.


Expert Q&A
-
QuestionIs mushroom compost good to use when transplanting daylilies?
 Lauren KurtzLauren Kurtz is a Naturalist and Horticultural Specialist. Lauren has worked for Aurora, Colorado managing the Water-Wise Garden at Aurora Municipal Center for the Water Conservation Department. She earned a BA in Environmental and Sustainability Studies from Western Michigan University in 2014.
Professional GardenerMushroom compost is good for adding to your existing soil. -
QuestionDo I need to soak them in water before planting?Lauren KurtzLauren Kurtz is a Naturalist and Horticultural Specialist. Lauren has worked for Aurora, Colorado managing the Water-Wise Garden at Aurora Municipal Center for the Water Conservation Department. She earned a BA in Environmental and Sustainability Studies from Western Michigan University in 2014.
Professional GardenerSoaking isn’t entirely necessary. Dip the root ball into a bucket of water before planting to help your daylily settle into its new location. -
QuestionIs early January too late to plant daylilies? I live in southeast GA.
 Community AnswerIf the soil is not frozen, you can plant daylilies. Daylilies are very hardy.
Warnings
- Although daylilies don't tend to be bothered by most disease or insects, they are attractive to deer, which may invade your garden and eat them.⧼thumbs_response⧽
Things You'll Need
- Daylily starter plants or root divisions
- Spade or garden fork
- Shovel
- Mulch
- Fertilizer


References
- ↑ https://www.extension.umn.edu/garden/yard-garden/flowers/growing-daylilies/
- ↑ https://www.americanmeadows.com/perennials/daylily/how-to-grow-daylilies
- ↑ https://www.bhg.com/gardening/yard/soil/what-is-well-drained-soil/
- ↑ https://www.bobvila.com/articles/how-to-test-soil-ph/
- ↑ https://www.lowes.com/projects/lawn-and-garden/test-and-improve-your-soil/project
- ↑ https://www.extension.umn.edu/garden/yard-garden/flowers/growing-daylilies/
- ↑ https://www.americanmeadows.com/perennials/daylily/how-to-grow-daylilies
- ↑ https://www.todayshomeowner.com/how-to-grow-daylilies/
- ↑ https://www.extension.umn.edu/garden/yard-garden/flowers/growing-daylilies/
- ↑ https://www.whiteflowerfarm.com/how-to-grow-daylilies
- ↑ https://www.todayshomeowner.com/how-to-grow-daylilies/
- ↑ https://www.todayshomeowner.com/how-to-grow-daylilies/
- ↑ https://www.whiteflowerfarm.com/how-to-grow-daylilies
- ↑ https://www.americanmeadows.com/perennials/daylily/how-to-grow-daylilies
- ↑ https://www.todayshomeowner.com/how-to-grow-daylilies/
- ↑ https://www.whiteflowerfarm.com/how-to-grow-daylilies
- ↑ https://www.whiteflowerfarm.com/how-to-grow-daylilies
- ↑ https://www.gardeners.com/how-to/growing-daylilies/8104.html
About This Article

To plant daylilies, start in the early spring by choosing a site with well-draining soil that gets at least 6 hours of sunlight a day. Additionally, make sure the soil has a pH between 6 and 7 by using a soil testing kit from your local nursery. Then, till the soil, mix in well-rotted manure, and dig a 12 foot by 12 foot hole in the soil. Place the roots in the hole, then water the plant gently so the soil around it isn’t disturbed. Afterwards, water your daylilies twice a week and fertilize them in the late spring to see your flowers bloom during May or June. For more advice from our Horticultural reviewer, including how to divide and replant your daylilies once they get too big, keep reading.