This article was co-authored by Jeanine Hattas Wilson. Jeanine Hattas Wilson is a Professional Painter and the President of Hattas Public Murals, Inc. With nearly 20 years of experience, Jeanine specializes in creating, overseeing, designing, and painting murals. Jeanine holds a BA in Advertising from Marquette University and a Studio Painting Minor from The Milwaukee Institute of Art & Design. She has studied at The Atelier Artien in Paris, France, Los Angeles Academy of Figurative Art, and under renowned artists such as Robert Liberace, Michael Siegel, and William Cochran. To date, Hattas Public Murals has painted nearly 5,000 commissioned works of art in homes and commercial and public spaces.
There are 9 references cited in this article, which can be found at the bottom of the page.
This article has been viewed 56,909 times.
Do you want to be an artist? A common thing to paint is actually a body of water. The ocean has served as inspiration for countless famous paintings. With a little time and practice, you can paint a stunning seaside painting of your own. Spend some time sketching your painting, then paint your canvas, add some finishing touches, and then display your work.
Steps
Sketching Your Painting
-
1Learn the basics of a seascape painting. Seascape paintings should follow certain conventions to assure their accuracy. Before you start to sketch your painting, spend some time familiarizing yourself with the conventions involved in painting the ocean.
- The horizon line is the point where the ocean meets the skyline. It should be convex, meaning it curves outward, without being noticeable to the eye. Edges, in general, should not be hard in a seascape painting. Keep the edges of waves and sprays curved and soft.[1]
- When it comes to color, cool blues and violets work well under the foam of waves.[2] Limit use of white, as it can make a painting feel busy.[3]
- Decide whether you want to focus more on the water or the sky. This will help you decide how high or low you want to make the horizon.[4]
- Consider using a reference photo. It can be hard to imagine the precise nuances of waves and reflections. You can find a photo of the ocean online.[5]
-
2Make decisions about your precise setting. Before you start your sketch, you'll need to make certain decisions about the nature of your setting. If you're using a reference photo, this can be helpful.
- You should decide what kind of substrate you want to use if you're painting water that's near the shore. The substrate is essentially whatever's lining the bottom of the ocean. It could be rocks, gravel, coral, stones, and so on.[6]
- The lighting in your scene makes a big impact on color and reflection in your painting. Consider the time of day in the scene in your painting. Is it early afternoon? Evening? Where is the sun in the sky? Has it set yet? Light forms patterns in the water, called refraction, and less light results in less refraction while more light results in more refraction.[7]
Advertisement -
3Sketch your painting on an appropriate canvas. Once you've made some basic decisions, sketch your drawing. Use the appropriate paper for the kind of painting you're using. For example, use watercolor paper if you're painting with water colors.[8]
- Using the rule of thirds can help you position your painting on the page. Divide the canvas into three portions horizontally and then into three portions vertically. This can help you keep your proportions realistic while your sketch your painting.[9]
- Study your reference photo if you're using one. Drawing is very much rooted in observation, so pay close to attention to the photo. If you're not using a photo, study how water moves and works. If possible, plan a trip to the beach to see the ocean in real life. You can also browse pictures and videos of the ocean online.[10]
- Look for basic shapes. The world is comprised of shapes like circles, squares, triangles, and more. Knowing the underlying shapes behind a variety of scenes and objects can help you lay down the foundation for a drawing.[11]
- Practice. If you're new to drawing, you may have to make a couple of different drawings before you find a drawing that works for your painting.[12]


Painting the Sea
-
1Create a value chart of colors. You'll need to determine which colors to use in your painting to best convey how the sea looks.[13] It can help to make a value chart of colors before starting to paint your sea drawing.
- Gather your paints together, focusing on the colors you're most likely to use. For an ocean, that will likely be blues, purples, greens, and whites.
- Pick a color and, without diluting the paint in water at all, draw a small line of it on a sheet of paper. This is the strongest shade of this particular color. Then, add a small amount of water and draw another line. Continue this process until the color slowly fades into white. This will give you a sense of the full spectrum of that color and an idea of how much water you should add to get your desired shade.[14]
- Repeat this process will all the colors you're going to use on your painting.[15]
-
2Add your lightest color first. You should begin painting by adding your lightest color first. This allows you to form a foundation.[16]
- Use a brush and gently paint the areas on your canvas that need to be lighter.[17] Running water tends to be lighter, as do the tips of waves and swells. The time of day also affects color. For example, water may be lighter earlier in the day.[18]
- Once you're done painting, wait for the lighter areas to dry. While you're waiting, you can use something called masking fluid to make the areas where you plan on adding foam to any waves in your painting. The masking agent will prevent other colors from leaking onto these portions.[19]
-
3Paint on the darker colors. Once the lighter colors have dried, move to painting on the darker colors. Use broad strokes when necessary to indicate shape and movement in the water. Try to blend the dark colors in with the lighter shades in order to create a smooth transition between the lighter and darker shades.[20]
-
4Be conscious of reflection. Reflection can be one of the trickiest parts of painting water. Depending on the time of day, certain objects like mountains, ships, and rocks may be reflected in the water's surface.
- Keep shade in mind. What's dark on dry land will be lighter in water and what's light on dry land will be darker in water.[21]
- Colors are less saturated in water reflections. Even shades like white should be toned down slightly when drawn as a reflection in water. Also, obscure details. Really, only the basic smudges of images are needed in water reflections.[22]
- Not all water reflects objects equally. Moving water, such as a stormy scene, will be unlikely to convey reflection. Also, water ripples can also obscure reflection. When in doubt, look up a variety of photos of the types of water you're painting to see how reflection is or is not present.[23]
-
5Pay attention to the water's depth. The depth of the water can affect many aspects of your painting. Be aware of the water's depth while painting to portray it accurately.[24]
- Shallow water tends to ripple more, which can cause the reflection to break. You should use quick and light brush strokes when painting shallow water.[25]
- Deep water tends to move more slowly. Use broader brush strokes, and bigger brushes, and keep your movements slower when painting deeper water.[26]

Completing Your Painting
-
1Add in small details using colored pencils or finer tipped brushes. Once you've finished the main aspects of painting, use water color pencils or thin tipped brushes to fill in small details. These are usually things like individual shadows, bubbles, or foam from crashing waves. You may also notice you missed a small spot here or there, which you can use a thin tipped brush or colored pencils to fill.[27]
-
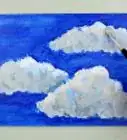
2Take a step back from your painting and consider what's missing. Once you finished filling in any missing spots, step back from your painting for a moment. See if anything is missing. If so, try to add or alter the painting the best you can.
- Foam from waves is typically one of the last thing a painter adds. You might have to add small dots of bubbles and foams. To do this, use a small liner brush and acrylic white paint.[28]
-
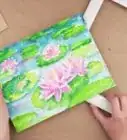
3Allow your painting to dry and then hang it up. Once you're finished, allow your painting to dry. This may take a few days. If you're happy with the painting, buy a frame for it and hang it up in your home. Keep in mind it may take a few different paintings before you're really happy with your work. Drawing and painting are like any other skill in that they require practice for proficiency.


Expert Q&A
-
QuestionHow do you paint a realistic sea?
 Jeanine Hattas WilsonJeanine Hattas Wilson is a Professional Painter and the President of Hattas Public Murals, Inc. With nearly 20 years of experience, Jeanine specializes in creating, overseeing, designing, and painting murals. Jeanine holds a BA in Advertising from Marquette University and a Studio Painting Minor from The Milwaukee Institute of Art & Design. She has studied at The Atelier Artien in Paris, France, Los Angeles Academy of Figurative Art, and under renowned artists such as Robert Liberace, Michael Siegel, and William Cochran. To date, Hattas Public Murals has painted nearly 5,000 commissioned works of art in homes and commercial and public spaces.
Professional PainterStart with a darker color in the back or at the top of your painting. Then, ombre down to a lighter color near the sand. -
QuestionHow do you paint ocean waves?Jeanine Hattas WilsonJeanine Hattas Wilson is a Professional Painter and the President of Hattas Public Murals, Inc. With nearly 20 years of experience, Jeanine specializes in creating, overseeing, designing, and painting murals. Jeanine holds a BA in Advertising from Marquette University and a Studio Painting Minor from The Milwaukee Institute of Art & Design. She has studied at The Atelier Artien in Paris, France, Los Angeles Academy of Figurative Art, and under renowned artists such as Robert Liberace, Michael Siegel, and William Cochran. To date, Hattas Public Murals has painted nearly 5,000 commissioned works of art in homes and commercial and public spaces.
Professional PainterPaint the crest of the wave in white on top of the "water" you've already painted. If the sun is shining through the wave, try making it more saturated, lighter, and brighter. -
QuestionWhat color is best to use for the sea?Jeanine Hattas WilsonJeanine Hattas Wilson is a Professional Painter and the President of Hattas Public Murals, Inc. With nearly 20 years of experience, Jeanine specializes in creating, overseeing, designing, and painting murals. Jeanine holds a BA in Advertising from Marquette University and a Studio Painting Minor from The Milwaukee Institute of Art & Design. She has studied at The Atelier Artien in Paris, France, Los Angeles Academy of Figurative Art, and under renowned artists such as Robert Liberace, Michael Siegel, and William Cochran. To date, Hattas Public Murals has painted nearly 5,000 commissioned works of art in homes and commercial and public spaces.
Professional PainterUse grays and blues for water that's far in the distance; as the water gets further away, you won't want to paint as much detail and contrast. Feel free to use more colors as you paint the foreground, since this where all your detail will go.

References
- ↑ http://www.artistsnetwork.com/articles/art-demos-techniques/insight-on-painting-seascapes
- ↑ Jeanine Hattas Wilson. Professional Painter. Expert Interview. 11 May 2021.
- ↑ http://www.artistsnetwork.com/articles/art-demos-techniques/insight-on-painting-seascapes
- ↑ http://www.artistsnetwork.com/articles/art-demos-techniques/insight-on-painting-seascapes
- ↑ http://www.craftsy.com/blog/2014/06/painting-water-in-acrylics/
- ↑ http://www.explore-acrylic-painting.com/how-to-paint-water.html
- ↑ http://www.explore-acrylic-painting.com/how-to-paint-water.html
- ↑ http://www.craftsy.com/blog/2014/07/how-to-paint-waves/
- ↑ http://www.craftsy.com/blog/2014/07/how-to-paint-waves/
- ↑ http://thevirtualinstructor.com/QuicktipsDrawing.html
- ↑ http://thevirtualinstructor.com/QuicktipsDrawing.html
- ↑ http://thevirtualinstructor.com/QuicktipsDrawing.html
- ↑ Jeanine Hattas Wilson. Professional Painter. Expert Interview. 11 May 2021.
- ↑ http://www.craftsy.com/blog/2014/05/color-value-in-art/?_ct=rbew&_ctp=101084
- ↑ http://www.craftsy.com/blog/2014/05/color-value-in-art/?_ct=rbew&_ctp=101084
- ↑ Jeanine Hattas Wilson. Professional Painter. Expert Interview. 11 May 2021.
- ↑ http://www.craftsy.com/blog/2014/07/how-to-paint-waves/
- ↑ http://www.craftsy.com/blog/2014/06/painting-water-in-acrylics/
- ↑ http://www.craftsy.com/blog/2014/07/how-to-paint-waves/
- ↑ Jeanine Hattas Wilson. Professional Painter. Expert Interview. 11 May 2021.
- ↑ http://www.artistsnetwork.com/articles/art-demos-techniques/secrets-to-painting-water-reflections
- ↑ http://www.artistsnetwork.com/articles/art-demos-techniques/secrets-to-painting-water-reflections
- ↑ http://www.artistsnetwork.com/articles/art-demos-techniques/secrets-to-painting-water-reflections
- ↑ Jeanine Hattas Wilson. Professional Painter. Expert Interview. 11 May 2021.
- ↑ http://www.finearttips.com/2010/06/tips-for-painting-water-and-reflection/
- ↑ http://www.finearttips.com/2010/06/tips-for-painting-water-and-reflection/
- ↑ http://www.finearttips.com/2010/06/tips-for-painting-water-and-reflection/
- ↑ http://www.finearttips.com/2010/06/tips-for-painting-water-and-reflection/
About This Article