X
wikiHow is a “wiki,” similar to Wikipedia, which means that many of our articles are co-written by multiple authors. To create this article, 16 people, some anonymous, worked to edit and improve it over time.
This article has been viewed 33,950 times.
Learn more...
There are many ways to make friendship bracelets, most of which involve tying a series of knots to make a pattern. You can make a zipper pattern using a combination of forward/backward knots, and backward/forward knots. You can also make a zipper pattern using square knots. Take some time to practice your knots and you'll be making bracelets in no time.
Steps
Method 1
Method 1 of 4:
Make a Braided Zipper Bracelet
-
1Gather your materials. Zippers come in a variety of colors and styles. For this project, you will be braiding zippers together, so pick a few different colors. Shop online, or at a craft store, for the following materials:
- 3 7-inch YKK Zippers
- 12 fold over crimp ends
- 7 mm jump rings
- Lobster clasp
- Scissors
- Chain nose pliers
- Bent nose pliers
-
2Separate the zippers. On each zipper you should see a small metal clasp connecting the two zipper sides. Turn the zipper over and look for the small metal prongs connecting the two sides. Use the chain nose pliers to bend the prongs up, and pull the clasp off.
- Pull the zipper slide down, and separate the two pieces.
- You can also use scissors to remove the clasp. Cut across the zipper just above the clasp. You will lose some length from your bracelet if you use scissors instead of the chain nose pliers.
- Repeat this process for each zipper, until you have 6 individual pieces. Use the same method for each zipper.
Advertisement -
3Cut the zipper teeth off. Use your scissors to remove the zipper teeth from each piece. Cut along the teeth, removing any excess cloth from the zipper. Set each strand of zipper teeth aside.
-
4Attach the crimp ends to the zipper pieces. Place a crimp end at each end of each strand of zipper teeth. Fold each side of the crimp over and push them down to close the crimp around the strand.
- Give the crimp a slight pull to make sure it's secure.
-
5Open the 7 mm jump rings. The number of jump rings you'll need for your bracelet will depend on your wrist size. You will need both sets of pliers to open the jump rings.
- Hold one side of the jump ring with the chain nose pliers, and one side with the bent nose pliers. Make sure the opening of the jump ring is between the pliers.
- Pull one pair of pliers towards you, and push the other pair away from you. Don't pull the pliers to the side. Try to maintain the circle shape of the ring, and take care not to pull the ring apart.
-
6Braid the zippers. Thread each of the zipper strands onto the jump ring, and use the pliers to push the jump ring back together. Thread some wire through the jump ring and tie it around something to secure the bracelet.
- You could also secure the bracelet using tape or a clipboard.
- Make three sets of two zippers and braid the zippers together. Keep one set on the left side, one in the middle, and one on the right.[1]
- The set that was on the left is now in the middle. Cross the right set over this set. Now, the right set is in the middle. Cross the set that is currently on the left, over the set in the middle. Continue this process until you have finished braiding the zippers.[2]
- When you have finished braiding the zippers, secure the loose ends in another jump ring.
-
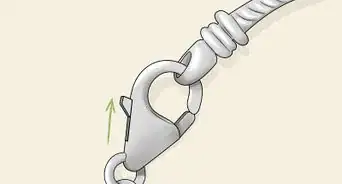
7Put the lobster clasp on the bracelet. Open another jump ring and put a lobster clasp on it. Put the jump ring with the lobster clasp on it through one of the jump rings on the end of the bracelet.
- Add as many jump rings as you need to the other end of the bracelet. Don't make your bracelet too tight. It should fit comfortably around your wrist.
-
8Done.


Advertisement
Method 2
Method 2 of 4:
Making a Simple Zipper Bracelet
-
1Gather your materials. All you need to make a simple zipper bracelet is one 9" zipper, a pair of fabric scissors, some embroidery floss, and an embroidery needle.[3]
- You may want to keep some clear nail polish on hand in case your zipper starts to fray as you're working with it.[4]
- You should be able to find everything you need at a craft store.
-
2Cut the cloth from your zipper. Use your fabric scissors to cut away any excess cloth from the zipper. Cut as close to the teeth as you can. If your zipper starts to fray, use a little clear nail polish to seal the ends.[5]
-
3Tie the zipper ends together. Measure and cut the zipper strand to the desired length. This bracelet does not have a clasp, so make sure you have enough so that you can fit the bracelet over your wrist.[6]
- Thread your needle with embroidery floss. Insert the needle between the zipper teeth on one end of the strand. Pull the other end of the bracelet around, and join the two sides together by sticking the needle through the other end.[7]
- Make sure there is some overlap between each end. Wind the embroidery floss around both sides. Keep it tight and make sure the ends are secure.[8]
- To finish tying the ends together, thread the needle back through the zipper ends and tie a knot. Cut off any excess zipper.[9]
-
4Done.


Advertisement
Method 3
Method 3 of 4:
Making a Studded Zipper Bracelet
-
1Gather your materials. You can find most of these supplies online or at your local craft store. If you want to make a double wrap bracelet, get a 20" length of zipper. Crafting buttons are also called fabric studs. Gather the following materials to make a studded zipper bracelet:
- 7" zipper
- Crafting buttons
- Fabric glue
- Fabric scissors
- Clasps
- Jump rings
- Crimp closures
- Charms
- Needle nose pliers
- Flat nose pliers
-
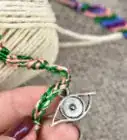
2Add studs to the zipper. Push the craft buttons through the fabric along the length of the zipper. The craft buttons have teeth on the bottom to secure them to fabric. Use the flat nose pliers to bend the teeth flat and secure the buttons.
- Keep adding buttons to your bracelet until you've completed your design.
-
3Add the crimp closure. Trim off any excess fabric from the ends of your zipper. Leave enough fabric on each end to apply the crimp closure.
- Put a little fabric glue inside a crimp closure. Insert the zipper fabric into the crimp closure, and use your pliers to secure them together. Repeat this process on the other end of your bracelet.
-
4Attach the clasp. Open the jump ring using your pliers and attach it to a crimp closure on one end of your bracelet. Put the clasp on the jump ring, and use your pliers to close the ring.
- Add another jump ring to the crimp closure on the other end.
- If you have charms you want to add to your bracelet, place them on the jump rings.
-
5Done.


Advertisement
Method 4
Method 4 of 4:
Making a Zipper Pattern Knotted Bracelet
-
1Set up your station. To make a zipper pattern bracelet you will need three different colors of thread. One of the colors will act as the base for the bracelet, and won't be visible in the final product. Aside from the thread, you will need a few more things.
- Make sure you have something to secure the thread with. A clipboard works well for this, but you could also use tape, or a safety pin.
- Keep some scissors on hand so you can cut the thread when you need to.[10]
-
2Measure your thread. The amount of thread you need will depend on what you are making, who you are making it for, and what kind of knot you are using. Start working with several feet of thread, and periodically measure your bracelet until you reach the right length.[11]
-
3Secure your thread. If you are using a clipboard, secure your bracelet just beneath the knot. If you are using tape, find a flat surface and tape the knot of your bracelet down.[14]
-
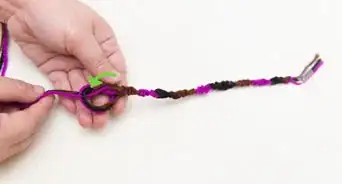
4Separate your threads. Divide your threads by color. You should have one color on the left, one in the middle, and one on the right.[15]
-
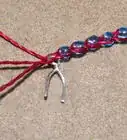
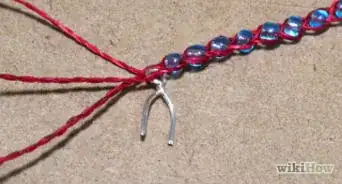
5Start your first knot. Take the color on the left (L) and bring it over the color in the middle (M). The threads should look something like the number "4."[16]
- Take thread L and bring it through the loop you just created. Pull the thread tight until the knot is secure at the top. This is the first hitch in a forward/backward knot.[17]
- The threads have now switched place. Take color L, which is now in the middle, and bring it over color M, which is now on the left. The threads should look something like the letter "P." This is a mirror image of the first hitch you made.[18]
- Bring thread L through the loop you just made, and pull the thread tight until the knot is secure at the top. This is the second hitch in a forward/backward knot. The threads should now be back in the same position as they were in the beginning.[19]
-
6Start the second knot. Start with the color on the right (R). You will be doing the reverse of the knot you just tied. This knot is called a backward/forward knot. Bring color R over color M. You should have something that looks like the letter "P."[20]
- Bring color R through the loop you just made, and pull the thread tight until the knot is secure at the top. Then, place color R, which is now in the middle, over color M. Pull color R through the loop, and pull the knot tight.[21]
- After the second knot is complete, your threads should be back in the starting position.[22]
-
7Continue the process. The zipper pattern bracelet is one continuous series of forward/backward knots, and backward/forward knots. Continue tying your knots until your bracelet is the desired length.[23]
-
8Tie your bracelet off. Once you've reached the desired length, take the threads and tie them in a knot at the end of your zipper pattern. Leave some excess thread to tie your bracelet on, and cut off the rest.
-
9Done.
-
10Finished.


Advertisement


References
- ↑ http://www.animatedknots.com/braidthreestrandone/
- ↑ http://www.animatedknots.com/braidthreestrandone/
- ↑ http://www.momsandcrafters.com/diy-zipper-bracelets/
- ↑ http://www.momsandcrafters.com/diy-zipper-bracelets/
- ↑ http://www.momsandcrafters.com/diy-zipper-bracelets/
- ↑ http://www.momsandcrafters.com/diy-zipper-bracelets/
- ↑ http://www.momsandcrafters.com/diy-zipper-bracelets/
- ↑ http://www.momsandcrafters.com/diy-zipper-bracelets/
- ↑ http://www.momsandcrafters.com/diy-zipper-bracelets/
- ↑ http://friendship-bracelets.net/tutorial.php?id=602#h5000
- ↑ http://friendship-bracelets.net/tutorial.php?id=602#h5000
- ↑ http://friendship-bracelets.net/tutorial.php?id=602#h5000
- ↑ http://friendship-bracelets.net/tutorial.php?id=602#h5000
- ↑ http://friendship-bracelets.net/tutorial.php?id=602#h5000
- ↑ http://friendship-bracelets.net/tutorial.php?id=602#h5000
- ↑ http://friendship-bracelets.net/tutorial.php?id=602#h5000
- ↑ http://friendship-bracelets.net/tutorial.php?id=66#h2000
- ↑ http://friendship-bracelets.net/tutorial.php?id=66#h2000
- ↑ http://friendship-bracelets.net/tutorial.php?id=66#h2000
- ↑ http://friendship-bracelets.net/tutorial.php?id=602#h5000
- ↑ http://friendship-bracelets.net/tutorial.php?id=602#h5000
- ↑ http://friendship-bracelets.net/tutorial.php?id=602#h5000
- ↑ http://friendship-bracelets.net/tutorial.php?id=602#h5000
About This Article
Advertisement