This article was co-authored by wikiHow Staff. Our trained team of editors and researchers validate articles for accuracy and comprehensiveness. wikiHow's Content Management Team carefully monitors the work from our editorial staff to ensure that each article is backed by trusted research and meets our high quality standards.
The wikiHow Video Team also followed the article's instructions and verified that they work.
This article has been viewed 545,521 times.
Learn more...
Parachutes are a great way to learn about gravity and air resistance. They are also a great way to pass the time, especially once you begin to experiment with different weights and sizes. If you already know how to make a simple parachute, why not try a larger, more advanced one instead?
Steps
Making a Simple Parachute
-
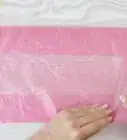
1Get a napkin or cut a square out of a plastic bag. If you are going to use a napkin, choose a large, dinner-sized one. A paper towel could also work.[1]
-
2Cover each corner with a piece of tape. Flip the napkin over, and cover the back of each corner as well. This will make the corners nice and strong for the next step.[2]Advertisement
-
3Punch a hole into each corner with a hole puncher. Make sure that you are only punching through the taped area, otherwise the napkin will rip.[3]
- If you don't have a hole puncher, cut a small slit into each corner instead.
-
4Cut four pieces of string. Each piece needs to be the same length as your square. For example, if your square was 8 inches (20 centimeters) on each side, then your strings should be 8 inches (20 centimeters) long.[4]
-
5Thread and tie the strings through the holes. Take your first string and poke the end up through a hole. Bring the end down, and tie it to the rest of the string. Do this for the other strings and corners.[5]
-
6Thread the strings through a button. Find a button that has four holes in it. Feed the other end of each string through each hole. Tie the strings together into one big knot under the button.[6]
- You can also tie the strings to a paperclip, a charm, or a small washer.
- If you have a small toy, like a Lego or plastic soldier, tie two strings together on each side to make loops.[7]
-
7Toss the parachute. Hold the parachute by the button, then toss it upwards. If you are allowed to, climb up onto a table or chair, and try again! This will give the parachute even more time to float down!
- If you made loops for a small toy, slip the loops under the toy's arms first.
Making a Parachute for a Toy Soldier
-
1Cut a large square out of a plastic bag. Make the square at least 8 inches (20 centimeters) on each side.[8]
- This parachute will only work on small toys, about 1 to 2 inches (2.5 to 5 centimeters) tall. Great toys include toy soldiers and Lego men. It won't work on dolls and bears.
-
2Tie a knot into each corner of the square. This will help keep the strings on. Set the square aside when you are done.[9]
-
3Cut two long pieces of string. Each piece of string needs to be twice the length of you square. For example, if your square was 8 inches (20 centimeters) on each side, then the strings should be 16 inches (40 centimeters) long.[10]
- You can use yarn, fishing line, embroidery floss, or even thread!
-
4Tie the end of each string to each corner of the square. Take your first string, and tie each end to a corner on the top of the square. Take your second string, and tie each end to the corners on the bottom.[11]
- Make sure that you are tying the strings behind the knots so that they don't slide off.
-
5Slip a small toy through the loops. Find a small, plastic figure, like a toy soldier or Lego man. Slip the left loop under the left arm, and the right loop under the right arm. If the strings won't stay on, stick a piece of tape over them.
- The toy should be 1 to 2 inches (2.5 to 5 centimeters) tall. If it's too big or heavy, the parachute won't work.
-
6Toss the parachute. Hold the parachute by the toy, toss it upwards, and watch it float down! If you are allowed to, get onto a chair or staircase, and try again. This will give the parachute more time to fall down.
Making a Large Parachute
-
1Cut a 24-inch (61-centimeter) square out of a cheap, plastic tablecloth. Make sure it is the thin kind; the kind that have the felt coating on the back will be too thick for this project. If you can't find any cheap, plastic tablecloths, use a large trash bag instead.[12]
- This parachute will work on action figures that are 3 to 4 inches (7.6 to 10 centimeters) tall, like Star Wars action figures.[13]
-
2Cut a 5-inch (13-centimeter) square out of each corner. Fold the square in half to make a rectangle, then fold it in half again to make a square. Draw a 5-inch (13-centimeter) square on the corner where all four corners are loose (not joined). Cut the square out, going through all four layers, then unfold the square. You will have something that looks like a plus sign.[14]
-
3Tape together the cut corners along the bottom point. Go to the first corner you cut the 5-inch (13-centimeter) square from. Push the edges together to close the square. Place a 2-inch (5-centimeter) piece of tape halfway over the bottom edge. Leave the bottom half of the tape hanging over the edge of the tablecloth.[15]
- Do this for the remaining three corners.
-
4Flip the tablecloth over and fold the pieces of tape onto the back. Flip the tablecloth cove. You should still see the pieces of tape sticking out from underneath it. Fold each piece of tape over the edge of the table cloth. Now the corners are taped on both sides.[16]
- You will have something that looks like a bag or basket with a slit in each corner. Do not tape these slits up!
-
5Cut two long pieces of string, and make a mark at each end. Find some thin cording, such as crochet string, thin yarn, or kite string. Cut two 30-inch (76-centimeter) pieces. Use a marker to make a dot on each string, 1 inch (2.5 centimeters) away from each end.[17]
- You will need two dots on each string, one fo each end. These will be your guides for the next step.
-
6Tape the end of your first string to one of the taped corners. Take your first string, and place the end over one of the corners you taped up. Align the mark with the edge of the tablecloth, then place a strip of tape over it. You will have about ½ inch (1 centimeter) of string peeking out over the top of the tape.[18]
- Keep the tape horizontal; don't let it hang over the edge of the parachute.
-
7Tape the end of the string down. Fold the loose end of the string over the tape, towards the edge of the tablecloth. Place another piece of tape over it to secure it.[19]
-
8Tape the other end of the string to the next corner. Use the same technique as before. When you are done, tape the other string in the same way. When you are done, you'll have two loops hanging from your parachute.[20]
-
9Tie a knot into the middle of each loop. Hook your finger through the first loop and tug it away from the parachute to find the middle. Tie a knot in the loop right above your finger. The loop should have equal amounts of string on both sides of the knot.[21]
- Repeat this step for the other loop.
- Leave some space between the knot and the middle of the string. You want to be able to feed elastic through it.
-
10Slip the mini loops over the arms of an action figure. If the loops are too small, you can link mini rubber bands together to make a harness for the figure. You can also lay a strip of tape across the figure and the string to hold everything together.
Community Q&A
-
QuestionWhat should I do if my parachute will not float?
 Community AnswerTry using a lighter object to attach to the parachute. Or, you could use a larger canopy.
 -
QuestionFrom how high up can I release the parachute?
 Community AnswerHolding you hand above your head should be enough. If you can drop it off of a second-story balcony, the parachute will float further. Just make sure that there's no one standing beneath the balcony and that you can get to the parachute again.
 -
QuestionWhat determines the rate of descent on the parachute?
 Community AnswerThere are two main variables to make the parachute fall at different speeds: 1) The mass of the object that you are attaching to the parachute (more mass=more gravitational force acting on the object) makes the parachute fall at different speeds. 2) The size of the canopy can make a huge difference to the speed of the fall for example a larger canopy traps air resistance making the parachute fall more slowly and making it more effective.
Warnings
- Always make sure that there isn't anyone standing in the landing zone underneath the parachute.⧼thumbs_response⧽
Things You'll Need
Making a Simple Parachute
- Large napkin or plastic bag
- Tape
- Scissors
- String
- Hole puncher (recommended)
- Button, paperclip, charm, etc.
Making a Parachute for a Small Toy
- Plastic bag
- Scissors
- String
- And More!
- Small toy (ie: toy soldier or Lego man)
Making a Large Parachute
- Cheap, plastic tablecloth
- Measuring tape
- Marking pen
- String
- Tape
- Scissors
- Small toy
- And more!


References
- ↑ http://www.notimeforflashcards.com/2011/02/toy-parachute-craft.html
- ↑ http://www.notimeforflashcards.com/2011/02/toy-parachute-craft.html
- ↑ http://www.notimeforflashcards.com/2011/02/toy-parachute-craft.html
- ↑ http://www.kidspot.com.au/things-to-do/activities/parachuting-toys-how-to-make-a-parachute-for-toys
- ↑ http://www.notimeforflashcards.com/2011/02/toy-parachute-craft.html
- ↑ https://www.education.com/activity/article/parachute_kindergarten/
- ↑ http://www.notimeforflashcards.com/2011/02/toy-parachute-craft.html
- ↑ http://www.kidspot.com.au/things-to-do/activities/parachuting-toys-how-to-make-a-parachute-for-toys
- ↑ http://www.kidspot.com.au/things-to-do/activities/parachuting-toys-how-to-make-a-parachute-for-toys
- ↑ http://littlebinsforlittlehands.com/coffee-filter-parachute-lego-minifigure-parachute-activity/
- ↑ http://littlebinsforlittlehands.com/coffee-filter-parachute-lego-minifigure-parachute-activity/
- ↑ https://www.youtube.com/watch?v=v8WfzFZsevg&feature=youtu.be&t=3m48s
- ↑ https://www.youtube.com/watch?v=v8WfzFZsevg&feature=youtu.be&t=3m48s
- ↑ https://www.youtube.com/watch?v=v8WfzFZsevg&feature=youtu.be&t=3m48s
- ↑ https://www.youtube.com/watch?v=v8WfzFZsevg&feature=youtu.be&t=3m48s
- ↑ https://www.youtube.com/watch?v=v8WfzFZsevg&feature=youtu.be&t=3m48s
- ↑ https://www.youtube.com/watch?v=v8WfzFZsevg&feature=youtu.be&t=3m48s
- ↑ https://www.youtube.com/watch?v=v8WfzFZsevg&feature=youtu.be&t=3m48s
- ↑ https://www.youtube.com/watch?v=v8WfzFZsevg&feature=youtu.be&t=3m48s
- ↑ https://www.youtube.com/watch?v=v8WfzFZsevg&feature=youtu.be&t=3m48s
- ↑ https://www.youtube.com/watch?v=v8WfzFZsevg&feature=youtu.be&t=3m48s
- ↑ https://www.education.com/activity/article/parachute_kindergarten/
- ↑ http://www.sciencekids.co.nz/experiments/freefall.html
- ↑ http://www.sciencekids.co.nz/experiments/freefall.html
- ↑ http://www.sciencekids.co.nz/experiments/freefall.html
About This Article

To make a toy parachute, start by finding a napkin or cutting a square out of a plastic bag. Next, cover each corner with tape to make them more sturdy. After you’ve finished all 4 corners, cut a small slit in each taped corner. Then, cut 4 pieces of string to the same length as the sides of your square, and poke a piece of string up through each hole and secure it in a knot. Finally, thread the other ends of the string through a button with 4 holes or paper clip and tie them in a knot. To learn how to attach your parachute to a toy soldier or how to make a larger parachute, read on!