This article was co-authored by Amber Rose. Amber Rose is a Licensed Cosmetologist and the Founder and Owner of Quality Style Weaves and Braids Salon in Orlando, Florida. With over ten years of experience, Amber is experienced in twists, braids, weaves, cutting, styling, and conditioning treatments. She specializes in hair growth for all hair types.
This article has been viewed 961,160 times.
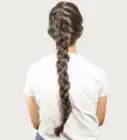
Do you love the way rope braids look, but are not sure how to do them? A pretty and unusual rope braid looks much more difficult than it really is. Once you understand how the braid works, you will be able to construct this braid for yourself, your friends, or your family.
Steps
French Rope Braid
-
1Brush your hair. You need to start off this braid with tangle-free hair. Brush out the length of your hair. This braid will not work if you have snags in your hair as you move through the steps.
- IF you have curly or wavy hair, blow-dry it straight before you start.[1]
-
2Gather your hair. You need to decide how thick you want your French rope braid to be. If your beginning section is larger, then each section of the French braid portion of your braid will be thicker. Gather a small section of hair at the crown of your head.
- You can do this as a side braid as well. Just pick a section of hair on the side of you head that you want to braid. The braid follows the same path as the middle braid.[2]
Advertisement -
3Start your braid. Like with the traditional rope braid, you will only need 2 sections of hair for this braid. Divide the section in your hand in 2 down the middle. Twist the 2 strands counterclockwise around your fingers. Make sure you keep the twists tight as you twirl them. Cross the twisted strands clockwise over each other, holding the strands lightly so they don't unravel.
- For a French rope, you'll twist the hair as you go, so don't worry if you only have the base of the strand twisted for now. That is the part that is incorporated into the braid, so as long as that portion is twisted, your braid will look great.[3]
- If you want a less twisty French braided portion, you can leave the strands untwisted and just cross them over each other.
-
4Twist and cross more of your hair. Once you have crossed the two initial strands, grab the section of hair directly beside the right section. It should incorporate some of hair from the side of your head where your twisted strand sits. Incorporate the new hair into the strand, twisting it counterclockwise into the other hair. Repeat on the left side. Add and twist the hair counterclockwise with the other section of hair. Both strands should have an equal amount of new hair incorporated into the strand so the braid will stay even.[4]
- If you want a smaller, tighter French braid, make sure you grab smaller sections as you move down your hair. This will take a little longer but will give you a closer weave to the braid.
-
5Continue the braid. Cross the now thicker sections of hair clockwise over each other, just as you did with your first 2 pieces of hair. Incorporate more hair into the strands, twisting as you did with the previous section and then crossing them. Repeat until you have run out of hair at the sides of your head.
- Make sure to add hair to both sections before you cross them over each other. If you are twisting rather than folding the sections, make sure to twist counterclockwise and cross the sections clockwise.
- If you want a half French rope braid, you can choose at what length that you want the braid stop. Once you've decided a length, tie the two strands together with an elastic band.[5]
-
6Finish the braid. Once you get to the nape of your neck, you need to start a traditional rope braid. Keep the sections of your hair twisted in the counterclockwise direction, crossing them clockwise as you finish the lower area of your braid. If they are not as tight of twists as you would like, twist them a little more before you finish the braid. Close off the end with an elastic band.
- You can make this into a bun at the bottom as well. Once you have braided the ends, twist the braid into a bun. Secure it with bobby pins.[6]
Basic Rope Braid
-
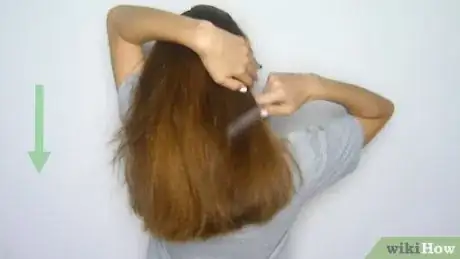
1Comb your hair. To do this braid neatly, you need to have well-combed hair. You don't want your hair to get caught in a tangled mess as you are making your braid. You can also dampen your hair, which will help it twist into cleaner sections.
- You can also spray your hair with a leave-in conditioner or smoother. This can help with fly away strands of hair and keep the braid looking tighter.[7]
-
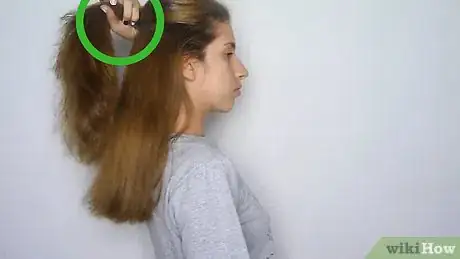
2Put your hair in a ponytail. If you want to make a tight, structured braid, start with your hair in a ponytail. Grab your hair, pulling it up to the height you want your ponytail. Secure it with an elastic band.
- You can do a side ponytail instead of a traditional center ponytail. It just depends on what style you are going for. To make a side ponytail, just brush your hair to the side and secure it with an elastic band.[8] [9]
- It you want a messier look, then skip to this step and simply start the braid at the nape of your neck.[10]
-
3Twist your hair. Separate your ponytail into 2 equal sections. Taking one strand in each hand, twist each section around your fingers in a counterclockwise direction. Make sure to keep your fingers tight on the twists. If you let them go, they will unravel and you will have to start over.[11]
- If your hair is too long to twist all at once, you can pinch the top of the section, twist the hair, and then move down an inch to twist the next section of hair. Continue this for the entirety of each section.
-
4Start the braid. Holding one section in each hand, cross the pieces over one another in a clockwise motion. The twisted strands should switch hands. You should be crossing them in the opposite direction from the way you twisted your hair. If you twist and cross in the same direction, your braid will turn into 1 big twist instead of a 2-strand twist.[12] [13]
-
5Finish twisting your braid. Twist your braid, crossing the sections over one another until you reach the end of your hair. If you find that your hair is unraveling as you are braiding it, just twist it tight again before you continue your braid.
-
6Finish the braid. Once you've reached the end of your hair, you need to tie it off with an elastic band. If you want your hair to look fuller, you can gently fluff out the ropes in your braid to give it width. You can also add a barrette over the elastic or use a decorative band instead to add a little flourish to your braid.[14] [15]
- You can dress this braid up or dress it down. It is very versatile. Add a beanie if it's cold outside, or add a ribbon or flower to the base of your ponytail to make it softer and more feminine.[16]
Expert Q&A
-
QuestionWhat is a twist out?
 Laura MartinLaura Martin is a Licensed Cosmetologist in Georgia. She has been a hair stylist since 2007 and a cosmetology teacher since 2013.
Licensed Cosmetologist A twist out is when you use a rope braid to create structured waves in the hair. You twist the hair into braids when it is wet and remove the braids after it dries.
 -
QuestionHow do you braid hair?
 Laura MartinLaura Martin is a Licensed Cosmetologist in Georgia. She has been a hair stylist since 2007 and a cosmetology teacher since 2013.
Licensed Cosmetologist You can braid hair by dividing it into sections and then folding those sections over each other in a pattern. Some braids also use twisting.
 -
QuestionWhat are twist braids?
 Laura MartinLaura Martin is a Licensed Cosmetologist in Georgia. She has been a hair stylist since 2007 and a cosmetology teacher since 2013.
Licensed Cosmetologist A twist braid is the same thing as a rope braid. It is made by twisting the hair one direction and then wrapping it the opposite way.
References
- ↑ Amber Rose. Licensed Cosmetologist. Expert Interview. 13 April 2021.
- ↑ http://manouvellemode.com/2013/05/09/the-rope-braid/
- ↑ http://manouvellemode.com/2013/05/09/the-rope-braid/
- ↑ http://manouvellemode.com/2013/05/09/the-rope-braid/
- ↑ http://manouvellemode.com/2013/05/09/the-rope-braid/
- ↑ http://manouvellemode.com/2013/05/09/the-rope-braid/
- ↑ https://www.youtube.com/watch?v=sP4eAODAxlE
- ↑ http://www.hairromance.com/2013/09/hairstyle-tutorial-how-to-do-a-rope-twist-braid.html
- ↑ https://www.youtube.com/watch?v=sP4eAODAxlE
- ↑ http://www.latest-hairstyles.com/tutorials/rope-braid.html
- ↑ http://www.latest-hairstyles.com/tutorials/rope-braid.html
- ↑ http://www.hairromance.com/2013/09/hairstyle-tutorial-how-to-do-a-rope-twist-braid.html
- ↑ https://www.youtube.com/watch?v=sP4eAODAxlE
- ↑ http://www.hairromance.com/2013/09/hairstyle-tutorial-how-to-do-a-rope-twist-braid.html
- ↑ http://www.latest-hairstyles.com/tutorials/rope-braid.html
- ↑ https://www.youtube.com/watch?v=sP4eAODAxlE
- Videos provided by eatmango321
About This Article
To make a rope braid, start by combing your hair to get rid of any tangles and knots. Then, put your hair in a ponytail and separate it into 2 equal sections. Next, twist each section around your fingers counterclockwise and cross the sections over one another. Continue crossing the sections until you reach the end of your hair. Finally, finish your rope braid by tying the end off with an elastic band. To learn how to make a French rope braid, keep reading!
